Android笔记——By Bug
前言
相关配置下载 下载 Android Studio 和应用工具 - Android 开发者 | Android Developers (google.cn)
笔记的IDE版本信息如下 Android Studio Koala Feature Drop | 2024.1.2 Build #AI-241.18034.62.2412.12266719, built on August 23, 2024 Runtime version: 17.0.11+0--11852314 amd64 VM: OpenJDK 64-Bit Server VM by JetBrains s.r.o. Windows 10.0 GC: G1 Young Generation, G1 Old Generation Memory: 2048M Cores: 20 Registry: ide.experimental.ui=true Non-Bundled Plugins: com.intellij.zh (241.271) com.github.tuchg.nonasciicodecompletionhelper (1.0.1)
参考资料
【2022 最新 Android 基础教程,从开发入门到项目实战,看它就够了,更新中】 https://www.bilibili.com/video/BV19U4y1R7zV/?p=2&share_source=copy_web&vd_source=ea0cf64e8dac6f0193a7e28187a0fccb
介绍
注意事项
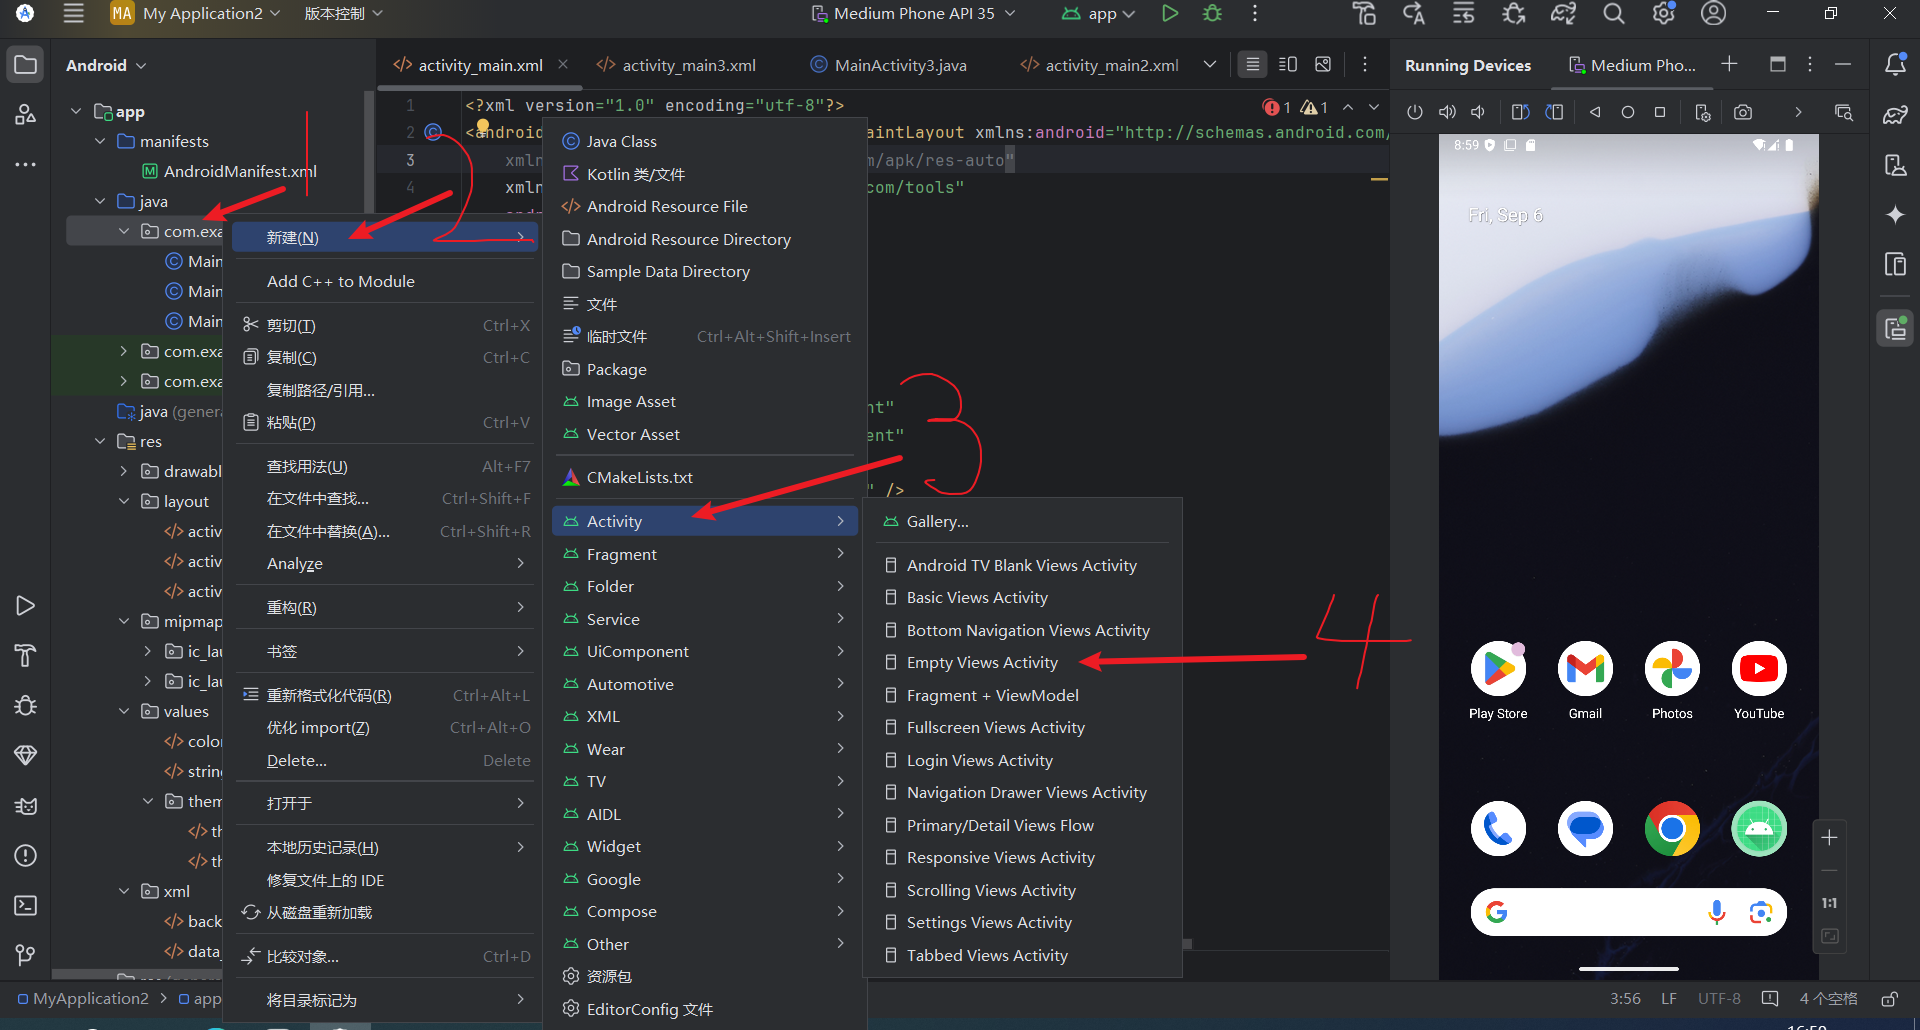
这个版本创建项目时,如需要使用Java语言编写,需要选择No Activity或Empty Viue Activity
日志信息介绍
Log.e:代表错误信息
Log.w:代表警告信息
Log.d:代表调试信息
Log.v:代表冗余信息
运行调试APP应用
在模拟器上运行APP应用
使用手机调试APP应用
App开发语言
APP开发两大技术路线
原生开发
混合开发
Android官方编程语言:Java,kotlin
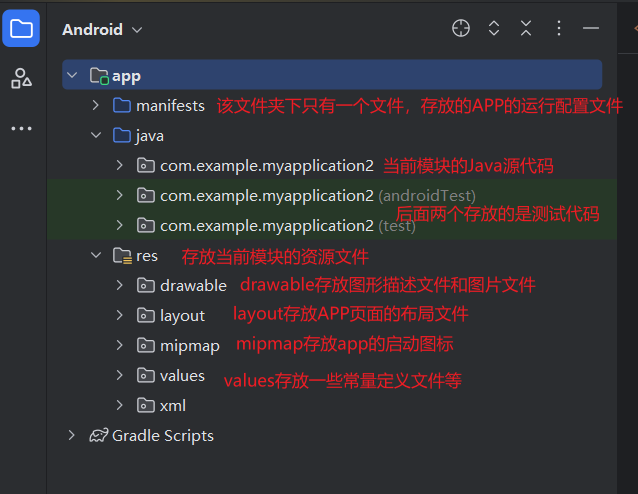
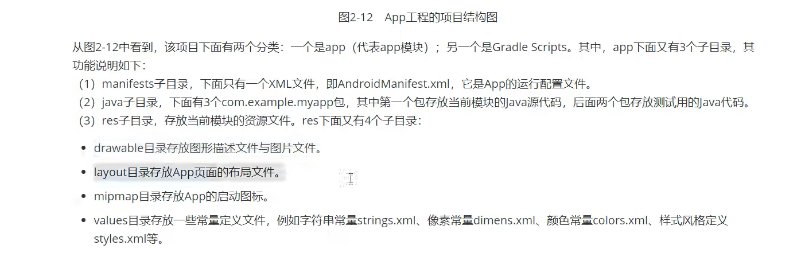
工程目录介绍
App工程分为两个层次
项目
模块
模块依附于项目,每个项目至少有一个模块至多个模块
一般的,编译运行App指运行某个模块,而非运行整个项目
目录功能介绍
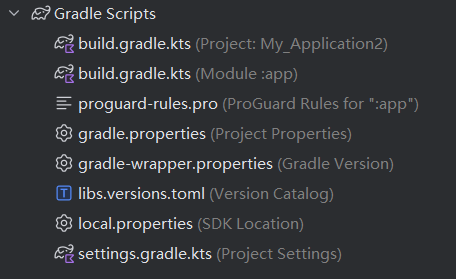

gradle介绍 gradle是一个项目自动化构建工具,可以帮我们做依赖,打包,部署,发布,各种渠道的差异管理等工作
Activity介绍 Activity是一个应用程序组件,提供一个屏幕,用户可以来交互为了完成一些任务
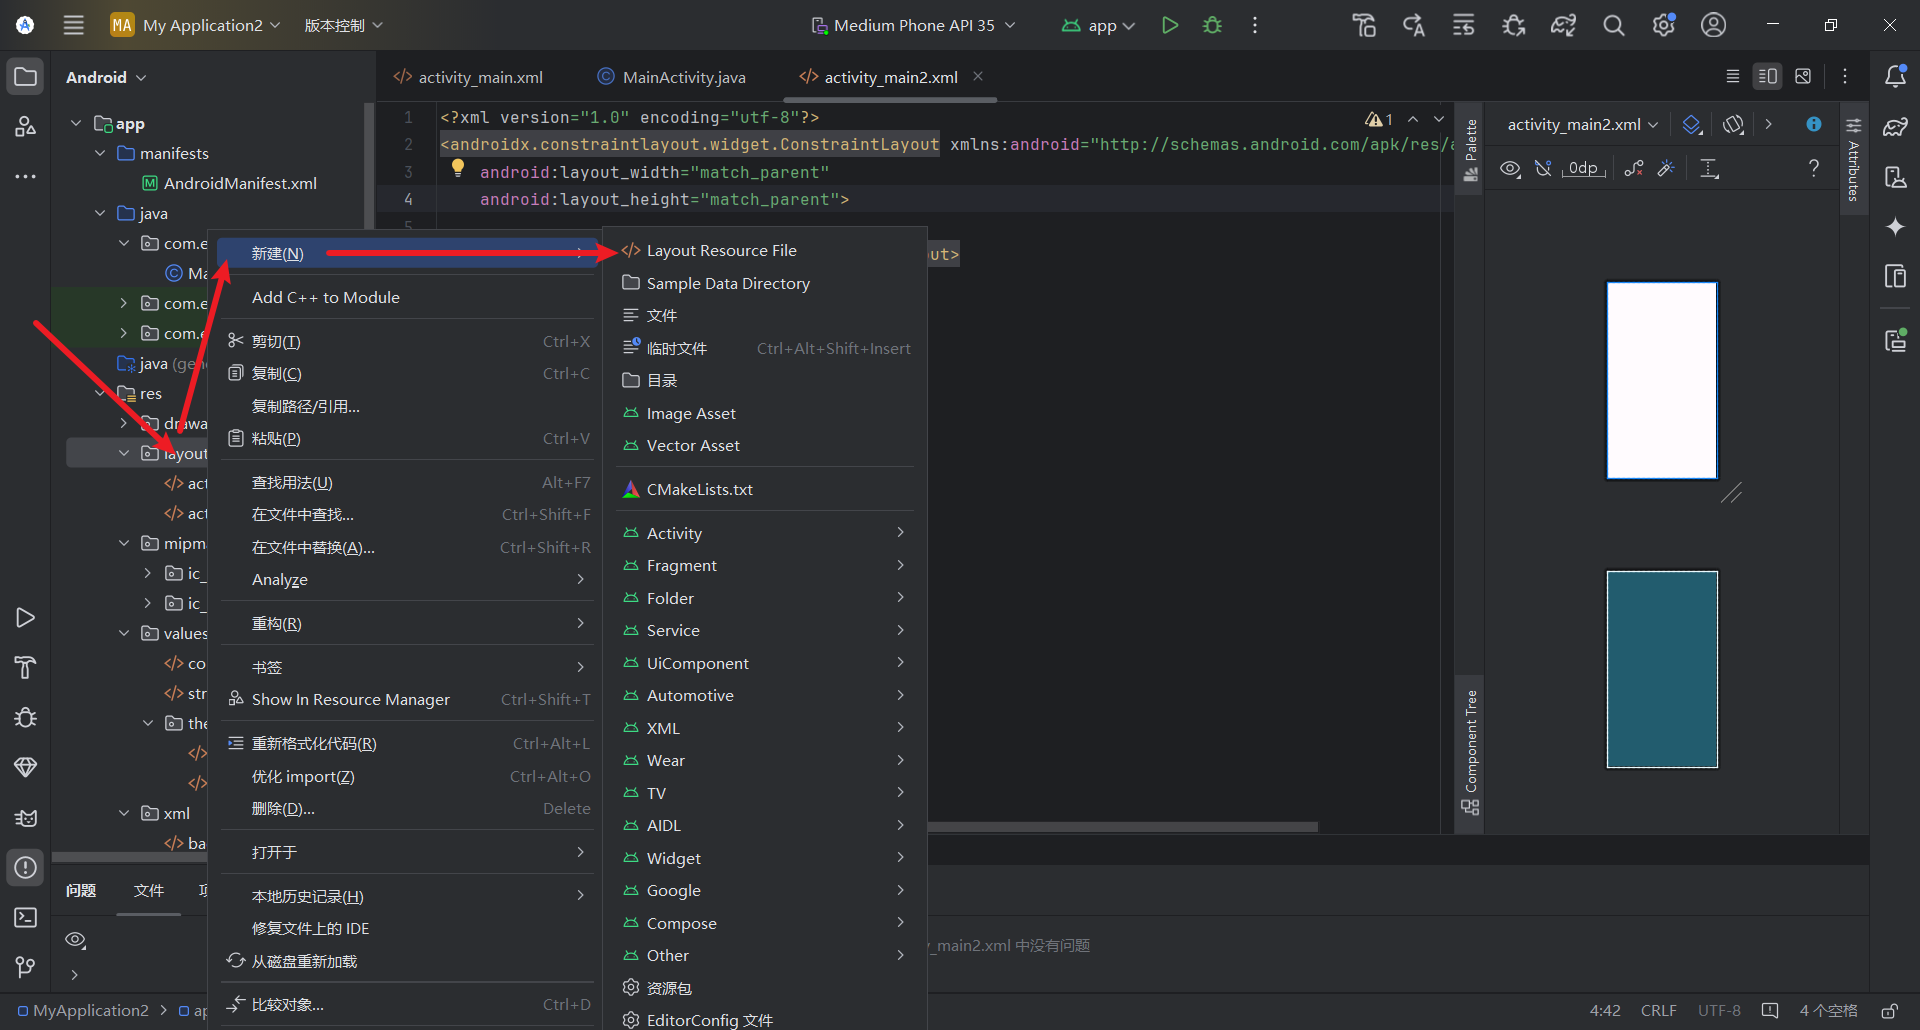
创建新页面
在layout目录下创建XML文件
创建xml文件对应的Java代码,继承AppCompatActivity,重写oncreate方法
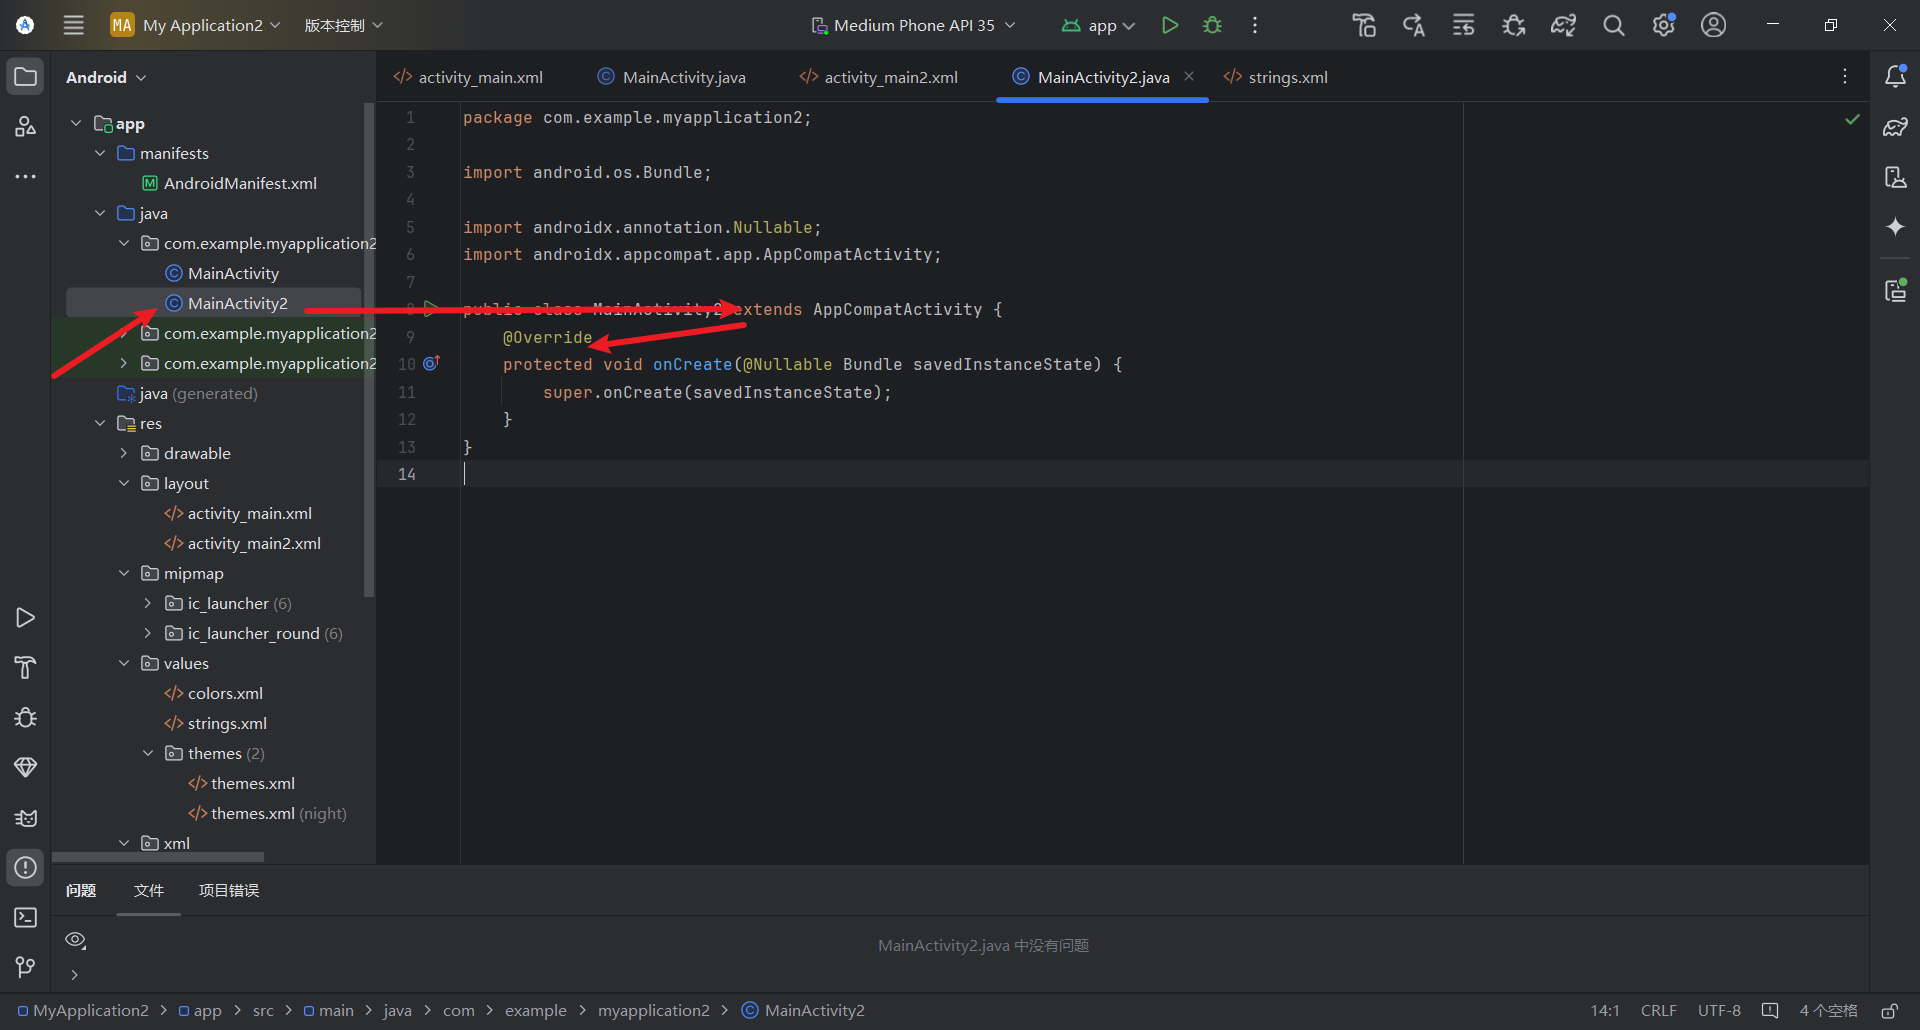
在AndroidManifest.XML文件下注册页面配置
技巧:快速创建activity方法
简单控件
文本显示
设置文本内容
在XML文件中通过Android.text设置文本
xxxxxxxxxx<LinearLayout xmlns:android="http://schemas.android.com/apk/res/android"android:layout_width="match_parent"android:layout_height="match_parent"><TextView android:id="@+id/sayHello"android:layout_width="wrap_content"android:layout_height="wrap_content"android:text="hello world! Every one!"/></LinearLayout>在Java代码中调用文本视图对象的setText方法设置文本
xxxxxxxxxxprotected void onCreate(Bundle savedInstanceState) {super.onCreate(savedInstanceState);setContentView(R.layout.activity_main1);TextView txv = findViewById(R.id.sayHello);txv.setText("Hello World");}}
设置文字大小
在XML文件中设置相关属性Android:textSize设置文本大小 单位:介绍
px:是手机屏幕的最小显示单元,与设备的显示屏有关
dp:它是与设备无关的显示单位,只与屏幕的尺寸有关
sp:它专门用来设置字体的大小,在系统设置中可以调整字体大小
在Java代码中设置调用setTextSize方法指定文本大小
名称 解释 PX(像素) 也称为图像元素,是作为图像构成的基本单元,单个像素的大小并不固定,跟随屏幕的大小和像素数量的关系变化,一个像素点为1px Resolution(分辨率) 指的是屏幕的垂直和水平方向和垂直方向的像素数量。 Dpi(像素密度) 屏幕上每英寸(2.54cm)有多少个像素点。 Density(密度) 屏幕上每平方英寸含有的像素点数量 Dip/dp(设备独立像素) dip也叫dp,长度单位,同一个单位在不同设备上有不同的显示效果,具体效果根据设备的密度有关
设置文本颜色 在Java代码中调用setTextColor方法即可设置文本颜色
在XML文件中设置文本颜色。
视图基础
设置视图宽高 视图的宽高可以通过下面的属性设置
在XML文件中修改属性
xxxxxxxxxxandroid:layout_width="match_parent"android:layout_height="match_parent"wrap_content:表示与内容自适应
match_parent:表示与上级视图保持一致
以dp为单位
在Java代码中修改 首先要确保XML的宽高属性值为wrap_content
调用控件对象的getLayoutParams()方法,获取该控件的布局参数
xxxxxxxxxxtxv.getLayoutParams().height = 100;txv.getLayoutParams().width = 100;布局参数的width为宽度,height为高度
设置视图间距 两种方式:
layout_margin:它指定了当前视图与周围平级视图之间的距离(外间距)
padding:指定了当前视图与内部下级视图之间的距离。
设置视图对齐方式
layout_gravity:指定了当前视图相对于上级视图的对齐方式
gravity:它指定了下级视图相对于当前视图的对齐方式
取值:left,top,right,bottom,还可以用 | 连接取值,例如左上对齐:left|top
常用布局
线性布局LinearLayout
两种排列方式 vertical:内部视图从上至下排列 horizontal:内部视图从左至右排列 若不指定,默认为左右排列(horizontal)
xxxxxxxxxx<LinearLayout android:layout_width="" android:layout_height="" android:orientation="horizontal"/><LinearLayout android:layout_width="" android:layout_height="" android:orientation="vertical"/>示例
xxxxxxxxxx<?xml version="1.0" encoding="utf-8"?><LinearLayout xmlns:android="http://schemas.android.com/apk/res/android"android:layout_width="match_parent"android:layout_height="match_parent"android:orientation="vertical"><LinearLayout android:layout_width="wrap_content"android:layout_height="wrap_content"android:orientation="horizontal"><TextViewandroid:layout_width="wrap_content"android:layout_height="wrap_content"android:text="第一行第一个"/><TextViewandroid:layout_width="wrap_content"android:layout_height="wrap_content"android:text="第一行第二个"/></LinearLayout><LinearLayout android:layout_width="wrap_content"android:layout_height="wrap_content"android:orientation="vertical"><TextViewandroid:layout_width="wrap_content"android:layout_height="wrap_content"android:text="第2行"/><TextViewandroid:layout_width="wrap_content"android:layout_height="wrap_content"android:text="第三行"/></LinearLayout></LinearLayout>第一类属性 属性值为true或者false
android:layout_centerHrizontal 水平居中
android:layout_centerVertical 垂直居中
android:layout_centerInparent 相对于父控件完全居中
android:layout_alignParentBottom 贴紧父控件的下边缘
android:layout_alignParentLeft 贴紧父控件的左边缘
android:layout_alignParentRight 贴紧父控件的右边缘
android:layout_alignParentTop 贴紧父控件的上边缘
android:layout_alignWithParentIfMissing 如果对应的兄弟控件找不到的话,就以父控件作为参照物
第二类属性 属性值必须为id的引用名“@id/id-name”
android:layout_below 在某控件下方
android:layout_above 在某控件上方
android:layout_toLeftOf 在某控件的左边
android:layout_toRightOf 在某控件的右边
android:layout_alignTop 本控件的上边缘和某控件的上边缘对齐
android:layout_alignLeft 本控件的左边缘和某控件的左边缘对齐
android:layout_alignBottom 本控件的下边缘和某控件的下控件对齐
android:layout_alignRight 本控件的右边缘和某控件的有边缘对齐
第三类:属性值为具体的像素值,如30dip,40px
android:layout_marginBottom 离某控件底边缘的距离
android:layout_marginLeft 离某控件左边缘的距离
android:layout_marginRight 离某控件右边缘的距离
android:layout_marginTop 离某控件上边缘的距离
相对布局RelativeLayout
相对布局的下级视图位置由其他试图决定,用于确定下级视图位置的参考物分为以下两种
与该视图自身平级的视图
该视图的上级视图(也就是它归属的RelativeLayout )
如果不设定下级视图的参照物,那么下级视图默认显示在RelativeLayout 内部的左上角
网格布局GridLayout
网格布局支持多行多列的表格排列
网格布局默认为从上到下,从左到右排列,新增了两个属性:
ColumnCount:指定了网格的列数
RowCount:指定了网格的行数
xxxxxxxxxx<GridLayout android:layout_width="wrap_content" android:layout_height="wrap_content" android:rowCount="2" android:columnCount="3"> <TextView android:layout_width="120dp" android:height="40dp" android:background="@color/black" android:layout_margin="10dp"/> <TextView android:layout_width="120dp" android:height="40dp" android:background="@color/black" android:layout_margin="10dp"/> <TextView android:layout_width="120dp" android:height="40dp" android:background="@color/black" android:layout_margin="10dp"/> <TextView android:layout_width="120dp" android:height="40dp" android:background="@color/black" android:layout_margin="10dp"/> <TextView android:layout_width="120dp" android:height="40dp" android:background="@color/black" android:layout_margin="10dp"/> <TextView android:layout_width="120dp" android:height="40dp" android:background="@color/black" android:layout_margin="10dp"/></GridLayout>
滚动视图ScrollView
滚动视图有两种
ScrollView:它是垂直方向的滚动视图,垂直方向滚动时,layout_width属性值设置为match_parent,layout_height属性值设置为wrap_content
HorizontalScrollView:它是水平方向的滚动视图,水平方向滚动时,Layout_width属性值设置为wrap_content,layout_height属性值设置为match_parent
xxxxxxxxxx//水平滚动视图
<HorizontalScrollView                       android:layout_width="wrap_content"                       android:layout_height="300dp">    <LinearLayout                  android:layout_width="wrap_content"                  android:layout_height="match_parent"                  android:orientation="horizontal"                  >        <View android:layout_width="400dp"              android:layout_height="match_parent"              android:background="@color/black"/>        <View android:layout_width="400dp"              android:layout_height="match_parent"              android:background="@color/green"/>    </LinearLayout></HorizontalScrollView>
xxxxxxxxxx//垂直滚动视图<ScrollView android:layout_width="match_parent" android:layout_height="wrap_content" > <LinearLayout android:layout_width="match_parent" android:layout_height="wrap_content" android:orientation="vertical" > <View android:layout_width="match_parent" android:layout_height="600dp" android:layout_marginBottom="30dp" android:background="@color/black"/> <View android:layout_width="match_parent" android:layout_height="600dp" android:background="@color/black"/> </LinearLayout>
按钮触控
Button
xxxxxxxxxx<Button android:layout_width="match_parent" android:layout_height="wrap_content" android:text="Hello World" />Button新增两个属性如下
xxxxxxxxxxandroid:textAllCaps="true"//是否将字母转换成大写,true表示转换axxxxxxxxxxtools:ignore="OnClick"/>//用来接管用户的点击动作,指定点击要触发的方法
在android开发中,把控件的初始化放到onCreate方法里面
点击事件
监听器:专门监听控件的动作行为,只有控件发生了指定的动作,监听器才会触发开关,去执行对应的代码逻辑
点击监听器:setOnClickListener()方法设置,按钮被按住少于500ms,会触发点击事件
案例:点击按钮,在文本框中显示内容
xxxxxxxxxx//java代码public class ButtonClickActivity extends AppCompatActivity {
private TextView textView;
protected void onCreate(Bundle savedInstanceState) { super.onCreate(savedInstanceState); EdgeToEdge.enable(this); setContentView(R.layout.activity_button_click);
textView = findViewById(R.id.tex); Button button = findViewById(R.id.butn); button.setOnClickListener(new buttonClick(textView));
}
static class buttonClick implements View.OnClickListener { private TextView tex;
public buttonClick(TextView tex) { this.tex = tex; }
public void onClick(View v) { tex.setText("12112323"); }
}}xxxxxxxxxx <LinearLayout xmlns:android="http://schemas.android.com/apk/res/android" android:layout_width="match_parent" android:layout_height="match_parent" android:orientation="vertical"> <Button android:id="@+id/butn" android:layout_width="100dp" android:layout_height="120dp" android:text="点击修改" /> <TextView android:id="@+id/tex" android:layout_width="match_parent" android:layout_height="match_parent" android:text="这里显示文字" android:textSize="28dp"/>
</LinearLayout>
长按事件
长按监听器:setOnLongClickListener()方法设置,按钮被按住超过500ms,会触发长按事件
案例:同上
xxxxxxxxxx//类继承长按接口static class buttonClick implements View.OnLongClickListener { private TextView tex;
public buttonClick(TextView tex) { this.tex = tex; }
public boolean onLongClick(View v) { tex.setText("12112323"); return false; }
public boolean onLongClickUseDefaultHapticFeedback( View v) { return View.OnLongClickListener.super.onLongClickUseDefaultHapticFeedback(v); }}
禁用和恢复按钮
可用按钮:按钮可点击,点击按钮会触发点击事件。
不可用按钮:按钮不允许点击,即使点击也不会触发点击事件,同时按钮文字为灰色。
按钮是否允许点击使用enabled属性控制,属性为true代表允许点击,false代表禁止点击。
xxxxxxxxxx<Button android:layout_width="match_parent" android:layout_height="wrap_content" android:text="可点击按钮" android:enabled="true"/><Button android:layout_width="match_parent" android:layout_height="wrap_content" android:text="不可点击按钮" android:enabled="false"/>案例:点击开始按钮,启用解锁按钮,点击解锁按钮,启用显示按钮,点击显示按钮,在文本框显示时间
xxxxxxxxxx//Java代码package com.example.myapplication;
import android.os.Bundle;import android.view.View;import android.widget.Button;import android.widget.TextView;import androidx.activity.EdgeToEdge;import androidx.appcompat.app.AppCompatActivity;
import java.util.Date;
public class ButtonClickActivity extends AppCompatActivity implements View.OnClickListener {
private TextView textView; private Button zuo; private Button you; private Button xia; private TextView tex;
protected void onCreate(Bundle savedInstanceState) { super.onCreate(savedInstanceState); EdgeToEdge.enable(this); setContentView(R.layout.activity_button_openclose); zuo = findViewById(R.id.zuo); you = findViewById(R.id.you); xia = findViewById(R.id.xia); tex = findViewById(R.id.xianshi); zuo.setOnClickListener(this); you.setOnClickListener(this); xia.setOnClickListener(this); }
public void onClick(View v) { if (v.getId()==R.id.zuo){ this.you.setEnabled(true);
} else if(v.getId()==R.id.you){ this.xia.setEnabled(true); } else if (v.getId()==R.id.xia){ this.tex.setText(new Date().toString()); } }
}xxxxxxxxxx//布局 <LinearLayout xmlns:android="http://schemas.android.com/apk/res/android" android:layout_width="match_parent" android:layout_height="match_parent" android:orientation="vertical"> <!-- First row containing two buttons --> <LinearLayout android:layout_width="match_parent" android:layout_height="wrap_content" android:orientation="horizontal">
<Button android:id="@+id/zuo" android:layout_width="0dp" android:layout_weight="1" android:layout_height="wrap_content" android:text="开始测试" android:textSize="28dp"/>
<Button android:id="@+id/you" android:layout_width="0dp" android:layout_weight="1" android:layout_height="wrap_content" android:text="解锁按钮" android:textSize="28dp" android:enabled="false"/> </LinearLayout>
<!-- Second row containing the third button --> <Button android:id="@+id/xia" android:layout_width="match_parent" android:layout_height="wrap_content" android:text="显示结果" android:textSize="28dp" android:enabled="false"/> <TextView android:id="@+id/xianshi" android:layout_width="match_parent" android:layout_height="wrap_content" android:text="这里显示结果" android:textSize="25dp" android:paddingLeft="5dp"/></LinearLayout>
图像显示
ImageView
xxxxxxxxxx<ImageView android:layout_width="match_parent"android:layout_height="200dp"android:src="@drawable/game1"/>
图像视图缩放类型 使用 android:scaleType=""属性设置图片的缩放类型
| XML缩放类型 | ScaleType类中的缩放类型 | 说明 |
|---|---|---|
| fitXY | FIT_XY | 拉伸图片填满视图(会导致图片变形) |
| fitStart | FIT_START | 保持宽高比,使其位于视图上方或左侧 |
| fitCenter | FIT_CENTER | 保持宽高比,使其位于视图中间 |
| fitEnd | FIT_END | 保持宽高比,市区位于视图下方或右侧 |
| center | CENTER | 保持图片原尺寸,并使其位于视图中间 |
| centerCrop | CENTER_CROP | 拉伸图片充满视图,并位于视图中间 |
| CenterInside | CENTER_INSIDE | 保持宽高比,缩小图片使其位于视图中间(只缩小,不放大) |
ImageButton
ImageButton是显示图片的图像按钮,但它继承自ImageView,而非继承Button
ImageButton和Button的区别有:
Button既可以显示文字,也可以显示图片,ImageButton只能显示图片,不能显示文字
ImageButton的图像可按比例缩放,而Button通过背景设置的图像会拉伸变形。
Button只能靠背景显示一张图片,而ImageButton可分别在前景和背景显示图片,从而实现两张图片叠加的效果。
同时展示文本和图像
展示文本图像途径
利用LinearLayout对ImgView和TextView组合
通过按钮控件Button和drawable属性设置文本周围的图标
drawableTop:指定文字上方的图片
drawableBottom:指定文字下方的图片
drawableLeft:指定文字左边的图片
drawableRight:指定文字右边的图片
drawablePadding:指定文字和图片的间距
案例:计算器
需求:
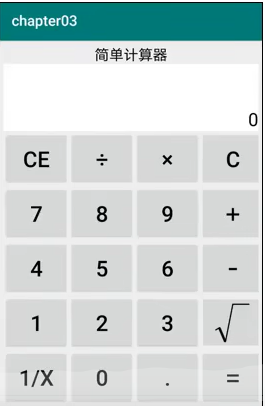
需求描述:计算器的界面分为两大部分,第一部分是上方的计算表达式,既包括用户的按键输入,也包括计算结果数字;第二部分是下方的按键,例如:从0-9的数字按钮,加减乘除等号、正负号按钮,小数点按钮,求倒数按钮、平方按钮、开关按钮,以及退格、清空、取消等按钮。
布局方式分析:
线性布局LinearLayout:计算器的整体布局是从上到下排列的。
网格布局GridLayout:计算器下半部分按钮,采用网格分布布局。
滚动布局ScrollView:计算器界面如果超出屏幕大小,就要支持滚动。
文本视图:计算结果文本使用。
按钮Button:用于0-9的数字按钮。
图像按钮:根号运算符(根号),虽然能打出来,显示可能会出现问题,所以要用图像按钮以图的形式显示出来。
页面设计
xxxxxxxxxx <LinearLayout xmlns:android="http://schemas.android.com/apk/res/android" xmlns:tools="http://schemas.android.com/tools" xmlns:app="http://schemas.android.com/apk/res-auto" android:id="@+id/main" android:layout_width="match_parent" android:layout_height="match_parent" android:orientation="vertical" android:background="#87CEEB" tools:context=".MainActivity">
<ScrollView android:layout_width="match_parent" android:layout_height="wrap_content"> <LinearLayout android:background="#E6E6FA" android:layout_width="match_parent" android:layout_height="wrap_content" android:orientation="vertical"> <TextView android:layout_width="match_parent" android:layout_height="wrap_content" android:text="@string/title" android:gravity="center" android:textSize="25sp" android:background="#CCC" android:padding="5dp"/> <TextView android:id="@+id/tv_result" android:layout_width="match_parent" android:layout_height="130dp" android:lines="3" android:text="0" android:gravity="right|bottom" android:padding="10dp" android:textSize="26dp" android:background="#fff"/> <GridLayout android:layout_width="match_parent" android:layout_height="wrap_content" android:columnCount="4" android:rowCount="5">
<Button android:id="@+id/but_CE" android:layout_width="0dp" android:layout_height="@dimen/button_height" android:text="@string/CE" android:layout_columnWeight="1" android:gravity="center" android:textSize="@dimen/textSize" android:layout_margin="5dp" /> <Button android:id="@+id/but_chu" android:layout_width="0dp" android:layout_height="@dimen/button_height" android:gravity="center" android:layout_columnWeight="1" android:textSize="@dimen/textSize" android:layout_margin="5dp" android:text="@string/chu" /> <Button android:id="@+id/but_cheng" android:layout_width="0dp" android:layout_height="@dimen/button_height" android:gravity="center" android:layout_columnWeight="1" android:textSize="@dimen/textSize" android:layout_margin="5dp" android:text="@string/cheng"
/> <Button android:id="@+id/but_C" android:layout_width="0dp" android:layout_height="@dimen/button_height" android:gravity="center" android:layout_columnWeight="1" android:textSize="@dimen/textSize" android:layout_margin="5dp" android:text="@string/C" /> <Button android:id="@+id/but_seven" android:layout_width="0dp" android:layout_height="@dimen/button_height" android:gravity="center" android:layout_columnWeight="1" android:textSize="@dimen/textSize" android:layout_margin="5dp" android:text="@string/seven" /> <Button android:id="@+id/but_eight" android:layout_width="0dp" android:layout_height="@dimen/button_height" android:gravity="center" android:layout_columnWeight="1" android:textSize="@dimen/textSize" android:layout_margin="5dp" android:text="@string/eight" /> <Button android:id="@+id/but_nine" android:layout_width="0dp" android:layout_height="@dimen/button_height" android:gravity="center" android:layout_columnWeight="1" android:textSize="@dimen/textSize" android:layout_margin="5dp" android:text="@string/nine" /> <Button android:id="@+id/but_jia" android:layout_width="0dp" android:layout_height="@dimen/button_height" android:gravity="center" android:layout_columnWeight="1" android:textSize="@dimen/textSize" android:layout_margin="5dp" android:text="@string/jia" /> <Button android:id="@+id/but_four" android:layout_width="0dp" android:layout_height="@dimen/button_height" android:gravity="center" android:layout_columnWeight="1" android:textSize="@dimen/textSize" android:layout_margin="5dp" android:text="@string/four" /> <Button android:id="@+id/but_five" android:layout_width="0dp" android:layout_height="@dimen/button_height" android:gravity="center" android:layout_columnWeight="1" android:textSize="@dimen/textSize" android:layout_margin="5dp" android:text="@string/five" /> <Button android:id="@+id/but_six" android:layout_width="0dp" android:layout_height="@dimen/button_height" android:gravity="center" android:layout_columnWeight="1" android:textSize="@dimen/textSize" android:layout_margin="5dp" android:text="@string/six" /> <Button android:id="@+id/but_jian" android:layout_width="0dp" android:layout_height="@dimen/button_height" android:gravity="center" android:layout_columnWeight="1" android:textSize="@dimen/textSize" android:layout_margin="5dp" android:text="@string/jian" /> <Button android:id="@+id/but_one" android:layout_width="0dp" android:layout_height="@dimen/button_height" android:gravity="center" android:layout_columnWeight="1" android:textSize="@dimen/textSize" android:layout_margin="5dp" android:text="@string/one" /> <Button android:id="@+id/but_tow" android:layout_width="0dp" android:layout_height="@dimen/button_height" android:gravity="center" android:layout_columnWeight="1" android:textSize="@dimen/textSize" android:layout_margin="5dp" android:text="@string/two" /> <Button android:id="@+id/but_three" android:layout_width="0dp" android:layout_height="@dimen/button_height" android:gravity="center" android:layout_columnWeight="1" android:textSize="@dimen/textSize" android:layout_margin="5dp" android:text="@string/three" /> <Button android:id="@+id/but_gen" android:layout_width="0dp" android:layout_height="@dimen/button_height" android:gravity="center" android:layout_columnWeight="1" android:textSize="@dimen/textSize" android:layout_margin="5dp" android:text="@string/gen" /> <Button android:id="@+id/but_kai" android:layout_width="0dp" android:layout_height="@dimen/button_height" android:gravity="center" android:layout_columnWeight="1" android:textSize="@dimen/textSize" android:layout_margin="5dp" android:text="@string/kai" /> <Button android:id="@+id/but_zero" android:layout_width="0dp" android:layout_height="@dimen/button_height" android:gravity="center" android:layout_columnWeight="1" android:textSize="@dimen/textSize" android:layout_margin="5dp" android:text="@string/zero" /> <Button android:id="@+id/but_dian" android:layout_width="0dp" android:layout_height="@dimen/button_height" android:gravity="center" android:layout_columnWeight="1" android:textSize="@dimen/textSize" android:layout_margin="5dp" android:text="@string/dian" /> <Button android:id="@+id/but_deng" android:layout_width="0dp" android:layout_height="@dimen/button_height" android:gravity="center" android:layout_columnWeight="1" android:textSize="@dimen/textSize" android:layout_margin="5dp" android:text="@string/deng" /> </GridLayout>
</LinearLayout>
</ScrollView>
</LinearLayout>
逻辑处理
xxxxxxxxxxpackage cn.shuzilearn.juisuan;
import android.os.Bundle;
import android.view.View;import android.widget.TextView;import androidx.appcompat.app.AppCompatActivity;import androidx.core.graphics.Insets;import androidx.core.view.ViewCompat;import androidx.core.view.WindowInsetsCompat;import cn.shuzilearn.juisuan.R.id;
public class MainActivity extends AppCompatActivity implements View.OnClickListener {
private TextView textView; private String FirstNumber = "";//第一个操作数 private String operator = ""; private String SecondNumber = "";//第二个操作数 private String ResultNumber = "";
protected void onCreate(Bundle savedInstanceState) { super.onCreate(savedInstanceState); setContentView(R.layout.activity_main);
// 获取显示框 textView = findViewById(id.tv_result); // 获取各个按钮,并为其添加点击事件 findViewById(id.but_CE).setOnClickListener(this); findViewById(id.but_chu).setOnClickListener(this); findViewById(id.but_cheng).setOnClickListener(this); findViewById(id.but_C).setOnClickListener(this); findViewById(id.but_seven).setOnClickListener(this); findViewById(id.but_eight).setOnClickListener(this); findViewById(id.but_nine).setOnClickListener(this); findViewById(id.but_jia).setOnClickListener(this); findViewById(id.but_four).setOnClickListener(this); findViewById(id.but_five).setOnClickListener(this); findViewById(id.but_six).setOnClickListener(this); findViewById(id.but_jian).setOnClickListener(this); findViewById(id.but_one).setOnClickListener(this); findViewById(id.but_tow).setOnClickListener(this); findViewById(id.but_three).setOnClickListener(this); findViewById(id.but_gen).setOnClickListener(this); findViewById(id.but_kai).setOnClickListener(this); findViewById(id.but_zero).setOnClickListener(this); findViewById(id.but_dian).setOnClickListener(this); findViewById(id.but_deng).setOnClickListener(this);
ViewCompat.setOnApplyWindowInsetsListener(findViewById(id.main), (v, insets) -> { Insets systemBars = insets.getInsets(WindowInsetsCompat.Type.systemBars()); v.setPadding(systemBars.left, systemBars.top, systemBars.right, systemBars.bottom); return insets; }); }
public void onClick(View v) { String inputText; if (v.getId() == id.but_gen) { inputText = "√"; } else { inputText = ((TextView) v).getText().toString(); } //清除 if (v.getId() == id.but_C) { FirstNumber = "";//第一个操作数 operator = ""; SecondNumber = "";//第二个操作数 flushText(FirstNumber + operator + SecondNumber); } //回退 else if (v.getId() == id.but_CE) { FirstNumber = "";//第一个操作数 operator = ""; SecondNumber = "";//第二个操作数 flushText(FirstNumber + operator + SecondNumber);
} //加减乘除 else if (v.getId() == id.but_jia || v.getId() == id.but_jian || v.getId() == id.but_cheng || v.getId() == id.but_chu) { operator = inputText; flushText(FirstNumber + operator + SecondNumber); } //等号 else if (v.getId() == id.but_deng) { double num1 = Double.parseDouble(FirstNumber); double num2 = Double.parseDouble(SecondNumber); double resu = 0.0;
switch (operator) { case "+": resu = num1 + num2; break; case "-": resu = num1 - num2; break; case "×": resu = num1 * num2; break; case "÷": if (num2<=0) { ResultNumber="除数不能为0"; } else { resu = num1 / num2; } break; } ResultNumber = String.valueOf(resu); flushText(ResultNumber); } //开根号 else if (v.getId() == id.but_gen) {
} //求倒数 else if (v.getId() == id.but_kai) {
} else { //如果没有输入运算符,拼接操作数1 if (operator.equals("")) { FirstNumber = FirstNumber + inputText; } //如果有输入运算符,拼接操作数2 else { SecondNumber = SecondNumber + inputText; }
flushText(FirstNumber + operator + SecondNumber); }
}
private void flushText(String text) { textView.setText(text); }
}
activity生命周期
activity启动与停止
启动
xxxxxxxxxx//从当前页面跳转到新的页面startActivity(new Intent(源页面.this,目标页面.class));//示例:点击按钮,从main跳转到main1findViewById(R.id.jump2).setOnClickListener(new View.OnClickListener() { public void onClick(View v) { startActivity(new Intent(MainActivity.this, MainActivity.class)); } });
停止
xxxxxxxxxx//关闭当前活动界面finish();
activity生命周期
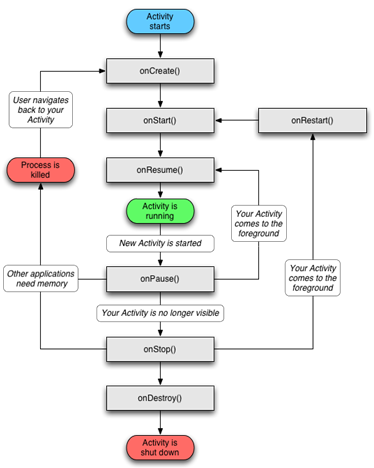
生命周期方法
onCreate() 创建活动,把页面布局加载到内存,进入初始状态
ontart() 开始活动,把活动页面显示在屏幕上,进入就绪状态
onResume() 恢复活动,活动页面进入活动状态,能够与用户正常交互
onPause() 暂停活动,页面进入暂停状态,用户无法正常交互
onStop() 停止活动,页面不在屏幕上显示
onDestory() 销毁活动,回收活动占用的系统资源,把页面从内存中清除,
onRestart() 重启活动,重新加载内存中的页面数据
onNewIntent()
重用已有的活动实例
各状态之间的切换
打开界面 onCreate->onStart->onResume
关闭旧页面 onPause->onStop->onDestory
activity启动模式
默认启动模式:standard 在该模式下,启动的Activity会依照启动顺序依次压入任务栈中
栈顶复用模式:singleTop 在该模式下,如果栈顶的Activity,为我们需要的,那么就不会重复创建 场景:适合开启渠道多,多应用开启调用的Activity,通过这种模式可以避免已经创建过的Activity被宠重复创建。多数通过动态设置使用。
栈内复用模式:singleTask 与singleTop模式类似,只不过singleTop只针对栈顶元素,而singleTask模式下,如果栈内存在目标实例,则将栈内目标的activity实例之上的所有activity弹出栈,并将目标activity至于栈顶,获取焦点。
场景:
比如:程序主界面,不希望被创建多次,而在主界面退出时,退出整个APP
对于耗费系统资源的activity,可以考虑使用该模式,减少资源耗费
全局唯一模式:singleInstance
在该模式下,我们会为目标activity创建一个新的Task栈,并将目标activity放入新的Task栈中,并让目标activity获得焦点,新的Task有且只有这一个Activity实例。如果已经创建过目标Activity实例,就不会创建新的Task,并将以前创建的Activity唤醒。
在代码中设置启动标志
Intent.FLAG_ACTIVITY_NEW_TASK:开辟一个新的任务栈
Intent.FLAG_ACTIVITY_SINGLE_TOP:当栈顶为带跳转的活动实例时,重用栈顶实例
Intent.FLAG_ACTIVITY_CLEAR_TOP:当栈中存在带跳转的实例时,则重新创建一个,并清空原实例之上的所有实例
Intent.FLAG_ACTIVITY_NO_HISTORY:栈中不保存新启动的实例
Intent.FLAG_ACTIVITY_CLEAR_TASK跳转到新页面时,栈中原有实例全部清空
Intent(意图)
Intent时各个组件之间信息沟通的桥梁,它是Android各组件之间的通信,主要完成下面的工作
标明本次通信请求从哪来,到哪去,怎么走。
发起方携带本次通信需要的数据内容,接收方接受意图,并解析其中的数据。
发起方若想判断接收方的处理结果,意图就要负责让接收方回传应答数据内容。
Intent的组成
| 名称 | 设置方法 | 说明 |
|---|---|---|
| Component | setComponent() | 组件,指定意图的来源和目标 |
| Action | setAction() | 动作,指定意图的动作行为 |
| Data | setData() | Uri,指定动作要操作的数据路径 |
| Category | addCategory() | 类别,指定意图的操作类别 |
| Type | setType() | 数据类型,指定消息的数据类型 |
| Extras | putExtras() | 扩展信息,指定装在的包裹信息 |
| Flags | setFlags() | 标志位,指定活动的启动标志 |
显式Intent
直接指定来源活动和目标活动,属于精准匹配,它有三种构建方式
在Intent的构造函数中指定
调用意图对象的setClass方法指定
调用意图的setComponent方法指定。
隐式Intent
没有明确指定要跳转的目标活动,只给出一个动作字符串,让系统自动匹配,属于模糊匹配
比如从应用中打开系统的拨号,短信等界面
常见的系统动作
向下一个Activity发送数据
Intent使用Bundle对象存放待传递的数据信息
Bundle对象操作各类数据的方法:
| 数据类型 | 读方法 | 写方法 |
|---|---|---|
| 整数型 | getInt | putInt |
| 浮点型 | getFloat | putFloat |
| 双精度数 | getDouble | putDouble |
| 布尔值 | getBoolean | putBoolean |
| 字符串 | getString | putString |
| 字符串数组 | getStringArray | putStringArray |
| 字符串列表 | getStringArrayList | putStringArrayList |
| 可序列化结构 | getSerializable | putSerializable |
xxxxxxxxxxfindViewById(R.id.jumptoSecond).setOnClickListener(new View.OnClickListener() { public void onClick(View v) { Intent intent = new Intent(); intent.setClass(MainActivity.this,MainActivity2.class); Bundle bundle = new Bundle(); bundle.setClassLoader(MainActivity.class.getClassLoader()); bundle.putString("data", new Date().getTime()+""); intent.putExtras(bundle); startActivity(intent); }});
// 下一个页面中获取上一个页面传来的意图Intent intent = getIntent();Bundle bundle = intent.getExtras();
向上一个Activity返回数据
处理下一个页面的应答数据如下:
上一个页面打包好请求数据,调用startActivityForResult方法(已过时,替代方法见下方)执行跳转动作
下一个页面接受并解析请求数据,做出相应的处理
下一个页面在返回上一个页面时,打包应答事件并调用setResult方法返回数据包裹
上一个页面重写onActivityResult,解析上一个页面返回的数据
替代:
xxxxxxxxxx/*registerForActivityResult(new ActivityResultContracts.StartActivityForResult(), new ActivityResultCallback<ActivityResult>() { @Override public void onActivityResult(ActivityResult o) { } }).var;*/ActivityResultLauncher<Intent> register = registerForActivityResult(new ActivityResultContracts.StartActivityForResult(), new ActivityResultCallback<ActivityResult>() { public void onActivityResult(ActivityResult o) {
}});
//启动register.launch(intent);
xxxxxxxxxx// 向上一个页面回传数据String TAG = "这段文字来自MainActivity2";Intent intent = new Intent();Bundle bundle = new Bundle();bundle.putString("data", TAG);intent.putExtras(bundle);setResult(RESULT_OK, intent);finish();xxxxxxxxxx//在第一个页面对返回的数据进行处理ActivityResultLauncher<Intent> register = registerForActivityResult(new ActivityResultContracts.StartActivityForResult(), o -> { if (o!=null){ Intent data = o.getData(); Bundle extras = data.getExtras(); TextView t = findViewById(R.id.showText1); t.setText(extras.getString("data")); }
});
利用资源文件配置字符串
从string.xml文件中获取字符串
xxxxxxxxxx<resources> <string name="app_name">xuexiPro</string> <string name="texts">这是一段字符串,存在于string.xml中</string></resources>xxxxxxxxxx// 从string资源文件中获取字符串String TAG = getString(R.string.texts);
利用元数据传递配置信息
将数据写到清单文件中
xxxxxxxxxx <activity                android:name=".MainActivity"                android:exported="true">            <intent-filter>                <action android:name="android.intent.action.MAIN"/>
                <category android:name="android.intent.category.LAUNCHER"/>            </intent-filter>            <meta-data android:name="weather" android:value="晴天,西风三级"/>        </activity>
使用场景:使用第三方sdk,存储sdk提供服务的token
在代码中获取元数据步骤:
调用getPackageManager方法获取当前应用的包管理器
调用包管理器的getActivityInfo方法获取当前活动的信息对象
活动信息对象的metaData是Bundle包裹类型,调用包裹对象的getString即可获得指定名称的参数值
xxxxxxxxxxPackageManager pm = getPackageManager();try {// 在包管理器中获取当前活动信息ActivityInfo info =  pm.getActivityInfo(getComponentName(),PackageManager.GET_META_DATA);// 获取活动的元数据信息Bundle data = info.metaData;
Intent intent = new Intent();
intent.putExtras(data);setResult(RESULT_OK, intent);finish();} catch (PackageManager.NameNotFoundException e) {throw new RuntimeException(e);}
给页面注册快捷方式
元数据不仅能传递简单的字符串,还能传递更加复杂的资源数据,比如:支付宝的快捷方式菜单(效果:支付宝桌面图标长按,会出现一个快捷方式菜单。)
步骤:
创建一个xml文件
xxxxxxxxxx<?xml version="1.0" encoding="utf-8"?><shortcuts xmlns:android="http://schemas.android.com/apk/res/android"><shortcutandroid:shortcutId="eat"android:enabled="true"android:icon="@mipmap/ic_launcher"android:shortcutShortLabel="@string/shortcut_eat_short_label"android:shortcutLongLabel="@string/shortcut_eat_long_label"><intentandroid:action="android.intent.action.VIEW"android:targetPackage="cn.shuzilearn.xuexipro"android:targetClass="cn.shuzilearn.xuexipro.MainActivity" /></shortcut><shortcutandroid:shortcutId="drink"android:enabled="true"android:icon="@mipmap/ic_launcher"android:shortcutShortLabel="@string/shortcut_drink_short_label"android:shortcutLongLabel="@string/shortcut_drink_long_label"><intentandroid:action="android.intent.action.VIEW"android:targetPackage="cn.shuzilearn.xuexipro"android:targetClass="cn.shuzilearn.xuexipro.MainActivity" /></shortcut><shortcutandroid:shortcutId="run"android:enabled="true"android:icon="@mipmap/ic_launcher"android:shortcutShortLabel="@string/shortcut_run_short_label"android:shortcutLongLabel="@string/shortcut_run_long_label"><intentandroid:action="android.intent.action.VIEW"android:targetPackage="cn.shuzilearn.xuexipro"android:targetClass="cn.shuzilearn.xuexipro.MainActivity" /></shortcut></shortcuts>在清单文件中设置meta-data
xxxxxxxxxx<meta-data android:name="android.app.shortcuts"android:value="@xml/shortcuts"/>
中级控件
图形定制
图形Drawable
Android把所有能够显示的图形都抽象为Drawable类,这里的图形不只是图片,包括色块,画板,背景等。 包含图片在内的图形文件放在res目录下的drawable目录下。
形状图形
定义:这是一种在 XML 文件中定义的通用形状。
文件位置:res / drawable / filename.xml
xxxxxxxxxxandroid:shape="oval"shape是图形文件的根节点,它描述的是当前是那种几何图形
| 形状类型 | 说明 |
|---|---|
| rectangle | 圆环 |
| oval | 椭圆,此时corners失效 |
| line | 直线,必须设置stroke,否则报错 |
| ring | 圆环 |
| 属性 | 说明 |
|---|---|
| corners | 标签是用来字义圆角的,其中radius与其它四个可以共同使用,但其它四个优先级更高。 |
| gradient | 用以定义渐变色,可以定义两色渐变和三色渐变,及渐变样式,它的优先级高于solid,同时定义时显示gradient定义的效果。 |
| padding | 用来定义内部边距 |
| size | 是用来定义图形的大小 |
| solid | 用以指定内部填充色 |
| stroke | 描边属性,可以定义描边的宽度,颜色,虚实线等 |
例子:有一个圆角矩形,一个椭圆形,点击按钮,切换图像的形状
xxxxxxxxxx <!-- 指定颜色 --><shape xmlns:android="http://schemas.android.com/apk/res/android"> <!-- 指定颜色 --> <solid android:color="@color/DarkKhaki"/> <!-- 指定边框颜色和粗细 --> <stroke android:color="@color/black" android:width="5dp"/> <!-- 指定圆角的半径 --> <corners android:radius="10dp"/>
</shape>
xxxxxxxxxx <shape xmlns:android="http://schemas.android.com/apk/res/android" android:shape="oval"> <!-- android:shape="oval"得到一个椭圆 --> <solid android:color="@color/DarkKhaki"/> <stroke android:color="@color/black" android:width="5dp"/></shape>xxxxxxxxxx//java代码package cn.shuzilearn.xuexipro;
import android.os.Bundle;
import android.view.View;import androidx.activity.EdgeToEdge;import androidx.appcompat.app.AppCompatActivity;import androidx.core.graphics.Insets;import androidx.core.view.ViewCompat;import androidx.core.view.WindowInsetsCompat;
public class tuxingAcrivity extends AppCompatActivity {
protected void onCreate(Bundle savedInstanceState) { super.onCreate(savedInstanceState); setContentView(R.layout.activity_tuxing_acrivity); View img = findViewById(R.id.tuxing); findViewById(R.id.btn1).setOnClickListener(new View.OnClickListener() { public void onClick(View v) { img.setBackgroundResource(R.drawable.layout_jvxing);
} }); findViewById(R.id.btn2).setOnClickListener(new View.OnClickListener() { public void onClick(View v) { img.setBackgroundResource(R.drawable.layout_tuoyuan);
} });
}}
九宫格图片
描述:将某张图片设置成视图的背景时,如果图片的尺寸太小,系统会自动拉伸填满背景,一旦图片拉伸过大,画面就容易变得模糊
图片后缀名:xxx.9.png
创建方法:
将图片引入项目
右键图片,在菜单中选择Create-9-Patch选项,可以将图片转换成九宫格图片(如果不是Png格式的图片,需要先将图片转换成Png格式)
状态列表形状
样例:按钮按下和抬起,分别是两种样式
定义selector
xxxxxxxxxx <selector xmlns:android="http://schemas.android.com/apk/res/android"> <!-- 按下时形状 --> <item android:state_pressed="true" android:drawable="@drawable/layout_jvxing"/> <!-- 未按下的形状 --> <item android:drawable="@drawable/layout_tuoyuan"/></selector>状态类型取值
| 属性名称 | 说明 | 适用的控件 |
|---|---|---|
| state_pressed | 是否按下 | 按钮Button |
| state_checked | 是否勾选 | 复选框CheckBox,单选按钮RadioButton |
| state_focused | 是否获取焦点 | 文本编辑框EditText |
| state_selected | 是否选中 | 各控件通用 |
选择按钮
CheckBox,Switch,RadioButton都继承自CompoundButton,CompoundButton类是抽象的复合按钮。因为它是抽象类,不能直接创建对象。
复选框CheckBox
xxxxxxxxxx <LinearLayout xmlns:android="http://schemas.android.com/apk/res/android" android:layout_width="match_parent" android:layout_height="match_parent" android:orientation="vertical"> <CheckBox android:layout_width="match_parent" android:layout_height="wrap_content" android:textSize="20sp" android:text="按钮1"/> <CheckBox android:layout_width="match_parent" android:layout_height="wrap_content" android:textSize="20sp" android:text="按钮2"/> <CheckBox android:layout_width="match_parent" android:layout_height="wrap_content" android:textSize="20sp" android:text="按钮3"/>
</LinearLayout>一般使用原生的样式,不够美观,我们一般采用定制的样式,例如更换选择框的图标形状,选中和非选中为两种样式。 定制样式:
xxxxxxxxxx <selector xmlns:android="http://schemas.android.com/apk/res/android"> <!-- 被选中的样式 --> <item android:state_checked="true" android:drawable="@drawable/checkyes"/> <!-- 未被选中的样式 --> <item android:drawable="@drawable/checkno"/></selector>在布局文件中,修改多选框的button属性,引用定制好的样式
xxxxxxxxxx<CheckBox android:layout_width="wrap_content" android:layout_height="wrap_content" android:text="抽烟" android:textSize="22sp" android:button="@drawable/checkbox_style"/>
如果想要修改选中框为自己的图片样式,可以使用以下的方法
xxxxxxxxxx<CheckBox android:layout_width="wrap_content"          android:layout_height="wrap_content"          android:text="抽烟"          android:drawableStart="@drawable/checkbox_style"          android:textSize="22sp"          android:drawablePadding="8dp"          android:button="@null"/>
<!-- 设置按钮为图片样式的  android:drawableStart="@drawable/checkbox_style"android:button="@null"-->
为复选框添加事件监听
xxxxxxxxxxCompoundButton checkBox = findViewById(R.id.check1);checkBox.setOnCheckedChangeListener(new CompoundButton.OnCheckedChangeListener() { public void onCheckedChanged(CompoundButton buttonView, boolean isChecked) { // 代码逻辑 buttonView.setText(isChecked ? "1" : "0"); }});
开关按钮Switch
按钮Switch在选中和取消时,可展现的界面元素比复选框更加丰富
switch控件新添加的xml属性:
textOn:设置开启时的文本
textOff:设置关闭时的文本
track:设置开关轨道背景
thumb:设置开关标识的图标
开关按钮的使用方法
xxxxxxxxxx<Switch android:layout_width="match_parent" android:layout_height="wrap_content" android:text="灯泡" android:textOn="开灯" android:textOff="关灯" android:textSize="27sp" android:id="@+id/switch_tx" android:minHeight="48dp"/><TextView android:layout_width="match_parent" android:layout_height="wrap_content" android:text="这是开关状态" android:textSize="20sp" android:id="@+id/showState"/>xxxxxxxxxxSwitch switchs = findViewById(R.id.switch_tx);TextView tx = findViewById(R.id.showState);switchs.setOnCheckedChangeListener(new CompoundButton.OnCheckedChangeListener() { public void onCheckedChanged(CompoundButton buttonView, boolean isChecked) { tx.setText(isChecked ? "开灯" : "关灯"); }});自定义开关按钮的样式
xxxxxxxxxx <selector xmlns:android="http://schemas.android.com/apk/res/android"> <item android:state_checked="true" android:drawable="@drawable/on"/> <item android:drawable="@drawable/off"/></selector>xxxxxxxxxx<CheckBox android:layout_width="100dp" android:layout_height="wrap_content" android:button="@null" android:background="@drawable/switch_style"/>
单选按钮RadioButton
xxxxxxxxxx<!-- 单选按钮 --><RadioGroup android:layout_width="match_parent" android:layout_height="wrap_content" android:id="@+id/gender_choose"> <RadioButton android:layout_width="match_parent" android:layout_height="wrap_content" android:text="男生" android:textSize="20sp"/> <RadioButton android:layout_width="match_parent" android:layout_height="wrap_content" android:text="女生" android:textSize="20sp"/> <RadioButton android:layout_width="match_parent" android:layout_height="wrap_content" android:text="保密" android:textSize="20sp"/></RadioGroup><TextView android:layout_width="match_parent" android:layout_height="wrap_content" android:id="@+id/showSex" android:minHeight="40sp" android:textSize="20sp"/>xxxxxxxxxx// 设置事件RadioGroup radioGroup = findViewById(R.id.gender_choose);TextView textView = findViewById(R.id.showSex);radioGroup.setOnCheckedChangeListener(new RadioGroup.OnCheckedChangeListener() {
public void onCheckedChanged(RadioGroup group, int checkedId) { RadioButton radioButton = group.findViewById(checkedId); textView.setText(radioButton.getText()); }});RadioGroup实质上是一个布局,可以设置按钮的排列方向,同一组RadioButton都要放在同一个RadioGroup下,除了RadioButton。也可以放其他控件
文本输入
编辑框EditText
相关属性
inputType:指定输入的文本类型
inputType取值 说明 text 文本 textPassword 文本密码 number 整数型 numberSigned 带符号的数字 numberDecimal 带小数点的数字 numberPassword 数字密码 datetime 时间日期格式 date 日期格式 time 时间格式maxLength:指定文本的最大长度 maxLength:指定文本的最大长度
hint:指定提示文本的内容
textColorHint:指定提示文本颜色
xxxxxxxxxx<!-- 文本编辑框 --><EditText android:layout_width="match_parent" android:layout_height="wrap_content" android:id="@+id/Edittx" android:textSize="20sp" android:hint="请输入文字" android:inputType="text" android:minLines="1" android:maxLines="1"/><EditText android:layout_width="match_parent" android:layout_height="wrap_content" android:id="@+id/Edittxpwd" android:textSize="20sp" android:hint="请输入文字" android:inputType="textPassword" android:minLines="1" android:maxLines="1"/>自定义边框样式
定义一个形状,圆角矩形
xxxxxxxxxx <shape xmlns:android="http://schemas.android.com/apk/res/android"> <corners android:radius="10dp"/> <solid android:color="#42b983"/> <stroke android:dashWidth="2dp" android:color="#DA70D6"/> <padding android:bottom="3dp" android:left="3dp" android:right="3dp" android:top="3dp"/></shape>样式文件:
xxxxxxxxxx <selector xmlns:android="http://schemas.android.com/apk/res/android"> <item android:state_focused="true" android:drawable="@drawable/text_foc_yes"/> <item android:drawable="@drawable/text_foc_no"/>
</selector>引入
xxxxxxxxxx<!-- 自定样式 --><EditText android:layout_width="match_parent" android:layout_height="wrap_content" android:id="@+id/Edit" android:textSize="20sp" android:background="@drawable/edittext_style" android:hint="这是自定义的文本框" android:minHeight="48dp" android:inputType="text" android:minLines="5"/>
文本变化监听器
需求:用户输入手机号码,校验手机号码是否合法
xxxxxxxxxxEditText phone = findViewById(R.id.phone);TextView showp = findViewById(R.id.showPhone);phone.addTextChangedListener(new TextWatcher() { String regex = "^1[3-9]\\d{9}$"; public void beforeTextChanged(CharSequence s, int start, int count, int after) {
}
public void onTextChanged(CharSequence s, int start, int before, int count) { Boolean p = Pattern.matches(regex, s); String sa = p? s+"合法":s+"不合法"; showp.setText(sa);
}
public void afterTextChanged(Editable s) {
}});xxxxxxxxxx<!-- 判断电话号码的合法性 --><EditText android:layout_width="match_parent" android:layout_height="wrap_content" android:layout_marginTop="20dp" android:id="@+id/phone" android:textSize="20sp" android:background="@drawable/edittext_style" android:hint="请输入电话号码" android:minHeight="48dp" android:inputType="text" android:minLines="5"/><TextView android:layout_width="match_parent" android:layout_height="wrap_content" android:inputType="number" android:textSize="20sp" android:id="@+id/showPhone"/>beforeTextChanged:在焦点变更之前触发
onTextChanged:在文本变化过程中触发
afterTextChanged:在文本变化后触发
焦点变更监听器
xxxxxxxxxxphone.setOnFocusChangeListener(new View.OnFocusChangeListener() { public void onFocusChange(View v, boolean hasFocus) { //code showp.setText(hasFocus?"选中了":"未选择"); }});
对话框
提醒对话框AltertDialog
AltertDialog可以完成常见的交互操作,例如:提示,确认,选择等功能。AltertDialog需要借助建造器AltertDialog.Builder才能完成参数设置
调用建造器的create方法生成对话框实例,再调用对话框实例的show方法,在页面上弹出提醒对话框。
xxxxxxxxxxfindViewById(R.id.showAlter).setOnClickListener(new View.OnClickListener() {
public void onClick(View v) { // 创建对话框的构建器 AlertDialog.Builder a = new AlertDialog.Builder(MainActivity.this); // 设置title a.setTitle("这是一个提示框"); // 设置图标 a.setIcon(R.drawable.flower); // 设置消息 a.setMessage("AAAAAA"); // 设置确定的按钮 a.setPositiveButton("yes", (dialog, which) -> { Toast.makeText(MainActivity.this, "你选择了确定", Toast.LENGTH_SHORT).show(); });
// 设置拒绝的按钮 a.setNegativeButton("no", (dialog, which) -> { Toast.makeText(MainActivity.this, "你选择了取消", Toast.LENGTH_SHORT).show();
}); a.create().show();
}});
日期对话框DatePickerDialog
虽然文本编辑框有提供data格式的输入数据,但一般不使用其获取日期输入
DatePicker日期组件
xxxxxxxxxxandroid:datePickerMode="calendar"取值:calendar:日历形式spinner:滚动形式android:calendarViewShown="false"可以关闭滚动形式右侧的日历
xxxxxxxxxx<DatePicker android:layout_width="match_parent" android:layout_height="wrap_content" android:datePickerMode="spinner" android:calendarViewShown="false" />DatePickerDialog日期弹窗
xxxxxxxxxxfindViewById(R.id.showdataAlter).setOnClickListener(this);public void onClick(View v) { int id = v.getId(); if (id==R.id.showdataAlter){ DatePickerDialog builder = new DatePickerDialog(MainActivity.this, this, 2024, 11, 26); builder.setTitle("请选择日期"); // builder.setMessage() builder.create(); builder.show(); }}public void onDateSet(DatePicker view, int year, int month, int dayOfMonth) { Toast.makeText(MainActivity.this, String.format("你选择的日期是%s年%s月%s日",year,month,dayOfMonth), Toast.LENGTH_SHORT).show();
}
时间对话框TimePickerDialog
时间组件TimePicker
xxxxxxxxxx<TimePicker android:layout_width="match_parent" android:layout_height="wrap_content" android:timePickerMode="spinner"/><TimePicker android:layout_width="match_parent" android:layout_height="wrap_content" android:timePickerMode="clock"/>时间对话框TimePickerDialog
xxxxxxxxxxTimePickerDialog timePickerDialog = new TimePickerDialog(MainActivity.this,android.R.style.Theme_Holo_Light_Dialog,this,3,55,true);timePickerDialog.setTitle("选择出发时间");timePickerDialog.create();timePickerDialog.show();
案例:登录和找回密码页面
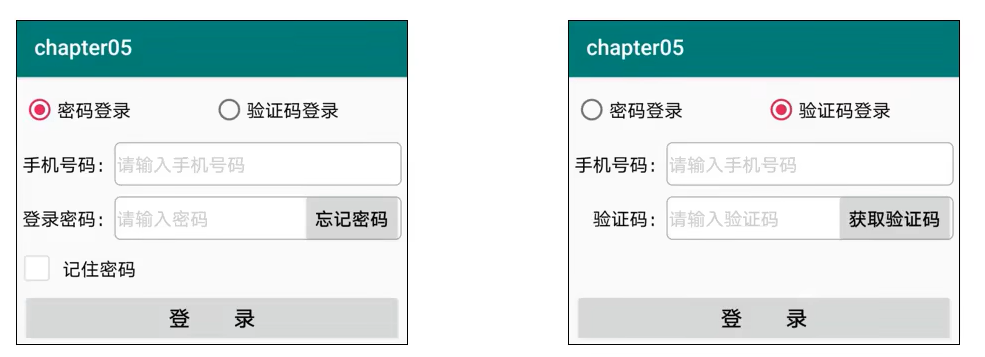
需求描述
登录方式有两种
用户名+密码登录
手机号+验证码登录
页面布局代码
xxxxxxxxxx
逻辑处理代码
xxxxxxxxxx
数据存储
共享数据SharedPreferences
共享参数用法
介绍
SharedPreferences是Android的一个轻量级存储工具,采用的存储结构是key-value键值对的形式进行存储的。
共享参数的存储介质是符合XML规范的配置文件,保存路径是:/dat/data/应用包名/shared_prefs/文件名.xml
使用场景
简单且孤立的数据,若复杂且相互关联的数据要存到数据库中
文本形式的数据,若是二进制数据(如音视频图片等),则要保存到文件中
需要持久化的数据,应用在关闭后再次打开时,之前保存的数据仍然有效。
在实际开发中,共享参数经常用于存储APP的个性化配置信息,用户行为和临时需要保存的片段信息等数据。
xxxxxxxxxx<!--  SharedPreferences基本使用  --><LinearLayout android:layout_width="match_parent"              android:layout_height="wrap_content"              android:orientation="vertical">    <TextView android:layout_width="match_parent"              android:layout_height="wrap_content"              android:text="SharedPreferences基本使用"              android:textSize="20sp" android:textColor="@color/black"/>
    <EditText android:layout_width="match_parent"              android:layout_height="wrap_content"              android:id="@+id/user"              android:hint="请输入姓名"              android:minHeight="48dp"              android:inputType="text"              android:maxLength="11"/>
<EditText android:layout_width="match_parent" android:layout_height="wrap_content" android:minHeight="48dp" android:id="@+id/age" android:hint="请输入年龄" android:inputType="number" android:maxLength="3"/> <Button android:layout_width="match_parent" android:layout_height="wrap_content" android:id="@+id/saveData1" android:text="点击保存数据"/></LinearLayout>xxxxxxxxxxTextView usr = findViewById(R.id.user);TextView age = findViewById(R.id.age);// 获取preferences,参数1为文件名,参数2为模式preferences = getSharedPreferences("xinxi", MODE_PRIVATE);
// 下次启动时读取保存信息的文件usr.setText(preferences.getString("name",""));int a = preferences.getInt("age",0);age.setText(String.valueOf(a));
findViewById(R.id.saveData1).setOnClickListener(new View.OnClickListener() { public void onClick(View v) {
String nameStr = usr.getText().toString(); String ageStr = age.getText().toString();
// 获取编辑器 SharedPreferences.Editor editor = preferences.edit(); // 存入key -- value editor.putString("name", nameStr); editor.putInt("age", Integer.parseInt(ageStr)); editor.apply();
}});
数据库SQLite
SQLite是一种小巧的嵌入式数据库,使用方便,开发简单。属于轻型数据库。
数据库详细笔记,请参阅主页的:《MySQL学习笔记》
SQL基础语法
数据定义语言
创建表格 创建表格使用create命令完成,格式:create table if not exists 表名; 比如创建一个用户信息表
xxxxxxxxxxcreate table if not exists user_info(id integer primary key ......,name varchar not null,age integer not null,......);SQL语句不区分大小写
SQLite支持整型integer,长整型LONG,字符串VARCHAR,浮点型FLOAT,但不支持布尔型!如果直接保存布尔类型,在存入数据库时,会自动将true转换成1,false转换成0,进行存储
建表时需要加上唯一标识字段ID
删除表格 格式:drop table if exists 表名; 例如:删除用户表
xxxxxxxxxxdrop table if exists user_info;修改表结构 修改表结构使用alter命令,但是在SQLite中,只支持增加字段,不支持删除和修改字段。
语法:alter table 表名 add column 字段名 字段类型; 例如:在用户中添加体重字段
xxxxxxxxxxalter table user_info add column height float;
数据操纵语言
插入数据格式:insert into 表名 字段名 values 字段名
xxxxxxxxxxinsert into user_info (name,age) values ("张三",18);删除数据格式:delete from 表名 where 字段名 ="值"
xxxxxxxxxxdelete from user_info where name ="张三";修改数据格式:update name set 字段名 ="值" from 表名 where 字段名 ="值";
xxxxxxxxxxupdate user_info set age = 20 where name = "张三";查询数据格式:select 字段名列表 from 表名 where 查询条件;
xxxxxxxxxxselect * from user_info where name = "张三";
数据库管理SQLiteDatabase
SQLiteDatabase是SQLite数据库管理类,它提供了若干操作数据表的API,常用的方法分为三类
管理类:用于数据库层面的操作
openDatabase:打开指定路径的数据库
isOpen:判断数据库是否打开。
close:关闭数据库
getVersion:获取数据库的版本号
setVersion:设置数据库的版本号
xxxxxxxxxx<LinearLayoutxmlns:android="http://schemas.android.com/apk/res/android"xmlns:tools="http://schemas.android.com/tools"android:id="@+id/main"android:orientation="vertical"android:layout_width="match_parent"android:layout_height="match_parent"tools:context=".DateBase"><LinearLayout android:layout_width="match_parent" android:layout_height="wrap_content"android:orientation="vertical"><Button android:layout_width="match_parent"android:layout_height="wrap_content"android:id="@+id/create"android:text="创建数据库"/><Button android:layout_width="match_parent"android:layout_height="wrap_content"android:id="@+id/delete"android:text="删除数据库"/><TextView android:layout_width="match_parent"android:layout_height="wrap_content"android:minHeight="48dp"android:id="@+id/showStates"/></LinearLayout></LinearLayout>xxxxxxxxxxpackage cn.shuzilearn.xuexipro1;import android.database.sqlite.SQLiteDatabase;import android.os.Bundle;import android.view.View;import android.widget.Button;import android.widget.TextView;import androidx.activity.EdgeToEdge;import androidx.appcompat.app.AppCompatActivity;import androidx.core.graphics.Insets;import androidx.core.view.ViewCompat;import androidx.core.view.WindowInsetsCompat;public class DateBase extends AppCompatActivity implements View.OnClickListener {private String dir;private TextView show;protected void onCreate(Bundle savedInstanceState) {super.onCreate(savedInstanceState);setContentView(R.layout.activity_date_base);Button create = findViewById(R.id.create);Button delete = findViewById(R.id.delete);show = findViewById(R.id.showStates);create.setOnClickListener(this);delete.setOnClickListener(this);// 定义一个路径dir = getFilesDir()+"/test.db";}public void onClick(View v) {if (v.getId()==R.id.create){// 如果数据库存在,就打开,不存在就创建// openOrCreateDatabase() 传入路径和模式以及游标工厂;SQLiteDatabase sqLiteDatabase = openOrCreateDatabase(dir, MODE_PRIVATE, null);String s = String.format("数据库%s创建%s",sqLiteDatabase.getPath(),(sqLiteDatabase!=null?"成功":"失败"));show.setText(s);}else if(v.getId()==R.id.delete){boolean res = deleteDatabase(dir);String s = String.format("数据库删除%s",res?"成功":"失败");show.setText(s);}}}事务类,用于事务层面的操作
beginTransaction:开始事务
setTransaction:设置事务成功的标志
endTransaction:结束事务
事务的四大特性|ACID(⭐)
原子性(Atomicity):事务是不可分割的最小操作单元,要么全部成功,要么全部失败。
一致性(Consistency):事务完成时,必须使所有数据都保持一致状态。
隔离性(Isolation):数据库系统提供的隔离机制,保证事务在不受外部并发操作影响的独立环境下运行。
持久性(Durability):事务一旦提交或回滚,它对数据库中的数据的改变就是永久的。
xxxxxxxxxxtry {//开启事务writeDB.beginTransaction();writeDB.insert(TABLE_NAME, null, contentValues);writeDB.insert(TABLE_NAME, null, contentValues);//设置事务成功的标志writeDB.setTransactionSuccessful();} catch (Exception e) {e.printStackTrace();} finally {//结束事务writeDB.endTransaction();}数据处理类。用于数据层面的操作
execSQL:执行拼接好的SQL控制语句
delete:删除符合条件的记录
update:更新符合条件的记录
query:执行查询操作,返回结果集的游标
rewQuery:执行拼接好的SQL查询语句,返回结果集的游标
(相关操作代码见下SQLiteOpenHelper演示代码)
数据库帮助器SQLiteOpenHelper
SQLiteOpenHelper是Android提供的数据库辅助工具,用于指导开发者进行SQLite的合理使用
SQLiteOpenHelper使用步骤如下
新建一个继承SQLiteOpenHelper的数据库操作类
封装保证数据库安全的必要方法
提供对表记录进行增加、删除、修改、查询的操作方法
使用演示(插入数据)相关代码:
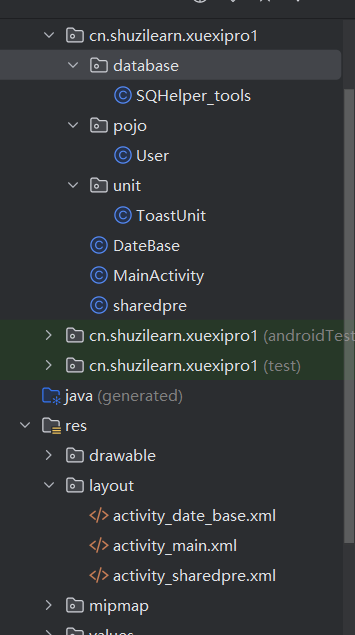
目录结构
页面布局代码
xxxxxxxxxx<LinearLayout android:layout_width="match_parent"android:layout_height="wrap_content"android:orientation="vertical"><EditText android:layout_width="match_parent"android:layout_height="wrap_content"android:maxLength="10"android:height="48dp"android:hint="请输入姓名"android:id="@+id/name"/><EditText android:layout_width="match_parent"android:layout_height="wrap_content"android:maxLength="10"android:height="48dp"android:hint="请输入年龄"android:id="@+id/age"/><Button android:layout_width="match_parent"android:layout_height="wrap_content"android:id="@+id/save"android:text="保存到数据库"/></LinearLayout>java代码
Activity类
xxxxxxxxxxpackage cn.shuzilearn.xuexipro1;import android.os.Bundle;import android.view.View;import android.widget.EditText;import android.widget.TextView;import androidx.appcompat.app.AppCompatActivity;import cn.shuzilearn.xuexipro1.database.SQHelper_tools;import cn.shuzilearn.xuexipro1.pojo.User;import cn.shuzilearn.xuexipro1.unit.ToastUnit;import java.util.List;public class DateBase extends AppCompatActivity implements View.OnClickListener {private String dir;private TextView show;private SQHelper_tools mhelp;private EditText name;private EditText age;private TextView viewById;protected void onCreate(Bundle savedInstanceState) {super.onCreate(savedInstanceState);setContentView(R.layout.activity_date_base);name = findViewById(R.id.name);age = findViewById(R.id.age);viewById = findViewById(R.id.showDatabase);findViewById(R.id.save).setOnClickListener(this);findViewById(R.id.deleteData).setOnClickListener(this);findViewById(R.id.updateDate).setOnClickListener(this);findViewById(R.id.selectDate).setOnClickListener(this);}protected void onStart() {super.onStart();// 获取数据库帮助实例mhelp = SQHelper_tools.getInstance(this);// 打开帮助器的读写mhelp.openReadDB();mhelp.openWriteDB();}protected void onStop() {super.onStop();// 关闭数据库连接mhelp.close();}public void onClick(View v) {if (v.getId()==R.id.save){String nameStr = name.getText().toString();int ageStr = Integer.parseInt(age.getText().toString());User user = new User(nameStr,ageStr);long res = mhelp.insert(user);if (res > 0) {ToastUnit.toast_show(this,"插入成功!");}else {ToastUnit.toast_show(this,"插入失败!");}}else if(v.getId()==R.id.deleteData){String nameStr = name.getText().toString();User user = new User(nameStr, 0);long res = mhelp.deleteByname(nameStr);if (res > 0) {ToastUnit.toast_show(this,"删除成功!");}else {ToastUnit.toast_show(this,"删除失败!");}}else if(v.getId()==R.id.updateDate){String nameStr = name.getText().toString();int ageStr = Integer.parseInt(age.getText().toString());User user = new User(nameStr, ageStr);long res = mhelp.updateByname(user);if (res > 0) {ToastUnit.toast_show(this,"修改成功!");}else {ToastUnit.toast_show(this,"修改失败!");}}else if(v.getId()==R.id.selectDate){String nameStr = name.getText().toString();List<User> qd = mhelp.selectALL(nameStr);StringBuilder sb = new StringBuilder();for (User user : qd) {sb.append(user.toString());}viewById.setText(sb.toString());}}}SQLiteOpenHelper工具类
xxxxxxxxxxpackage cn.shuzilearn.xuexipro1.database;import android.annotation.SuppressLint;import android.content.ContentValues;import android.content.Context;import android.database.Cursor;import android.database.sqlite.SQLiteDatabase;import android.database.sqlite.SQLiteOpenHelper;import cn.shuzilearn.xuexipro1.pojo.User;import java.util.ArrayList;import java.util.List;// sqlite工具类public class SQHelper_tools extends SQLiteOpenHelper {// 数据库名称private static final String DATABASE_NAME = "shuzilearn.db";// 表名private static final String TABLE_NAME = "student";// 数据库版本private static final int DATABASE_VERSION = 1;private static SQHelper_tools mhelper;// 提供度和写的实例private SQLiteDatabase readDB;private SQLiteDatabase writeDB;// 单例模式private SQHelper_tools(Context context) {super(context, DATABASE_NAME, null, DATABASE_VERSION);}public static SQHelper_tools getInstance(Context context) {if (mhelper == null) {mhelper = new SQHelper_tools(context);}return mhelper;}public void onCreate(SQLiteDatabase db) {String CREATE_TABLE_SQL = "CREATE TABLE " + TABLE_NAME +"( id integer primary key autoincrement not null," +" name varchar not null," +" age integer not null" +")";db.execSQL(CREATE_TABLE_SQL);}public void onUpgrade(SQLiteDatabase db, int oldVersion, int newVersion) {}// 数据库的读连接public SQLiteDatabase openReadDB() {if (readDB == null || !readDB.isOpen()) {readDB = mhelper.getReadableDatabase();}return readDB;}// 数据库的写连接public SQLiteDatabase openWriteDB() {if (writeDB == null || !writeDB.isOpen()) {writeDB = mhelper.getWritableDatabase();}return writeDB;}// 关闭连接public void closeDB() {if (readDB != null && readDB.isOpen()) {readDB.close();readDB = null;}if (writeDB != null && writeDB.isOpen()) {writeDB.close();writeDB = null;}}// 插入数据public long insert(User user) {// 创建一个ContentValues实例// 在Android开发中,ContentValues是一个非常重要的类,// 它用于存储一组键值对,其中键是字符串类型,而值是基本数据类型。// 这使得ContentValues类似于Hashtable,但它专门用于Android// 的内容提供者(Content Providers)和数据库操作。ContentValues contentValues = new ContentValues();// 使用put方法添加键值对contentValues.put("name", user.getName());contentValues.put("age", user.getAge());// 使用数据库的insert方法插入数据return writeDB.insert(TABLE_NAME, null, contentValues);}// 删除数据public long deleteByname(String name) {return writeDB.delete(TABLE_NAME, "name = ?", new String[]{name});}// 修改数据public long updateByname(User user) {ContentValues contentValues = new ContentValues();contentValues.put("name", user.getName());contentValues.put("age", user.getAge());return writeDB.update(TABLE_NAME, contentValues, "name = ?", new String[]{user.getName()});}// 查询数据("Range")public List<User> selectALL(String name) {List<User> list = new ArrayList<User>();Cursor cursor = readDB.query(TABLE_NAME, null, null, null, null, null, null);while (cursor.moveToNext()) {User user = new User();// user.setName(cursor.getString(cursor.getColumnIndex("name")));// user.setAge(cursor.getInt(cursor.getColumnIndex("age")));user.setName(cursor.getString(0));user.setAge(cursor.getInt(1));list.add(user);}return list;}}user对象
xxxxxxxxxxpackage cn.shuzilearn.xuexipro1.pojo;public class User {private int id;private String name;private int age;public User(String name, int age) {this.name = name;this.age = age;}public User() {}public int getId() {return id;}public void setId(int id) {this.id = id;}public String getName() {return name;}public void setName(String name) {this.name = name;}public int getAge() {return age;}public void setAge(int age) {this.age = age;}}ToastUnit工具类
xxxxxxxxxxpackage cn.shuzilearn.xuexipro1.unit;import android.content.Context;import android.widget.Toast;public class ToastUnit {public static void toast_show(Context ct, String msg) {Toast.makeText(ct, msg, Toast.LENGTH_SHORT).show();}}
数据库升级
xxxxxxxxxxpublic void onUpgrade(SQLiteDatabase db, int oldVersion, int newVersion) { // code}当数据库版本发生变化时,会执行此该函数
存储卡的文件操作
私有空间和公共空间
Android把外部存储分为两部分,一部分为所用应用都能访问的公共空间,另外一部分为只有应用自己才能访问的私有空间。
在存储卡上读写文本文件
读写文件的工具类
xxxxxxxxxxpackage cn.shuzilearn.xuexipro1.unit;
import java.io.*;
public class FileUnit {
    // 保存内容到文件    public static void writeFile(String path, String content)  {        // 输出流        BufferedWriter bw = null;        try {            bw = new BufferedWriter(new FileWriter(path));            bw.write(content);            bw.flush();        } catch (IOException e) {            throw new RuntimeException(e);        } finally {            if (bw != null) {                try {                    bw.close();                } catch (IOException e) {                    throw new RuntimeException(e);                }            }        }
    }
    // 读取文件的内容    public static String readFile(String path)  {        // 输入流        BufferedReader br = null;        StringBuffer sb = new StringBuffer();        try {            br = new BufferedReader(new FileReader(path));            // 将数据一行行读取并进行拼接            String line = null;            while ((line =br.readLine())!=null){                sb.append(line);            }        } catch (Exception e) {            e.printStackTrace();        } finally {            if (br != null) {                try {                    br.close();                } catch (IOException e) {                    throw new RuntimeException(e);                }            }        }        // 返回拼接好的字符串        return sb.toString();
    }}
xxxxxxxxxxEditText name1 = findViewById(R.id.name1);EditText age1 = findViewById(R.id.age1);TextView S1 = findViewById(R.id.showText);TextView S2 = findViewById(R.id.showTextot);
// 定义私有空间路径String path = getFilesDir()+"/user.txt";// 定义外部存储私有空间路径(download文件夹)String OUTPath = getExternalFilesDir(Environment.DIRECTORY_DOWNLOADS).toString()+"/user.txt";// 定义外部存储的// 此操作需要为应用添加读写权限,在清单文件中// <uses-permission android:name="android.permission.READ_EXTERNAL_STORAGE"/>// <uses-permission android:name="android.permission.WRITE_EXTERNAL_STORAGE"/>// android:requestLegacyExternalStorage="true" 获取外部存储String OUTPathg = Environment.getExternalStoragePublicDirectory(Environment.DIRECTORY_DOWNLOADS).toString()+"/user.txt";
findViewById(R.id.savefile).setOnClickListener(new View.OnClickListener() { public void onClick(View v) { String inputStr ="姓名:"+ name1.getText().toString()+"年龄:"+age1.getText().toString(); FileUnit.writeFile(path,inputStr); FileUnit.writeFile(OUTPath,inputStr);
}});
findViewById(R.id.readfile).setOnClickListener(new View.OnClickListener() { public void onClick(View v) { String TX = "内部空间"+FileUnit.readFile(path); String TXO = "外部空间"+FileUnit.readFile(OUTPath); S1.setText(TX); S2.setText(TXO);
}});
注意!:保存至私有空间在软件卸载后将被删除,而保存在公共空间下的文件则不会被删除
在存储卡上读写图片文件
在Android中的位图工具是Bitmap,APP读写Bitmap可以使用性能更好的BufferedOutputStream和BufferedInputStream
Android还提供了BitmapFactory工具用于读取各种来源的图片
decodeResource:可以从资源文件中读取图片信息
decodeFile:可将指定路径的图片读取到Bitmap对象
decodeStream:从输入流中读取位图数据
操作实例代码
java代码
xxxxxxxxxxpackage cn.shuzilearn.xuexipro1;
import android.graphics.Bitmap;import android.graphics.BitmapFactory;import android.os.Bundle;
import android.os.Environment;import android.util.Log;import android.view.View;import android.widget.ImageView;import androidx.appcompat.app.AppCompatActivity;import cn.shuzilearn.xuexipro1.unit.ToastUnit;
import java.io.File;import java.io.FileInputStream;import java.io.FileOutputStream;import java.io.IOException;import java.time.LocalDateTime;
public class BitmapWR extends AppCompatActivity implements View.OnClickListener {
private String dir; private String filename; private String paths; private ImageView imgshow;
protected void onCreate(Bundle savedInstanceState) { super.onCreate(savedInstanceState); setContentView(R.layout.activity_bitmap_wr); // 获取当前应用的私有下载目录 dir = getExternalFilesDir(Environment.DIRECTORY_DOWNLOADS).toString(); // 定义文件名 filename = LocalDateTime.now().toString()+ ".jpeg"; findViewById(R.id.saveImg).setOnClickListener(this); findViewById(R.id.readImg).setOnClickListener(this); imgshow = findViewById(R.id.showImg);
}
public void onClick(View v) { if (v.getId() == R.id.saveImg) { // 从资源文件中读取图片 Bitmap btm = BitmapFactory.decodeResource(getResources(), R.drawable.img); paths = dir + "/" + filename; ImgUnit.saveImg(paths, btm); ToastUnit.toast_show(this, "图片保存成功"); } else if (v.getId() == R.id.readImg) { Bitmap bt1 = ImgUnit.readImg(paths); imgshow.setImageBitmap(bt1);
} }
static class ImgUnit { // 把位图数据报错到指定路径 public static void saveImg(String path, Bitmap btm) { FileOutputStream fos = null; Log.d("saveImg", path); try { fos = new FileOutputStream(new File(path)); //把位图数据压缩到文件输出流 btm.compress(Bitmap.CompressFormat.JPEG, 100, fos);
} catch (Exception e) { e.printStackTrace(); } finally { if (fos != null) { try { fos.close(); } catch (IOException e) { throw new RuntimeException(e); } } } }
// 从指定路径在读取位图数据 public static Bitmap readImg(String path) { FileInputStream fis = null; Bitmap bitmap = null; try { fis = new FileInputStream(new File(path)); bitmap = BitmapFactory.decodeStream(fis);
} catch (Exception e) { e.printStackTrace(); } finally { if (fis != null) { try { fis.close(); } catch (IOException e) { throw new RuntimeException(e); } } }
return bitmap; } }}布局代码
xxxxxxxxxx <LinearLayout xmlns:android="http://schemas.android.com/apk/res/android" xmlns:tools="http://schemas.android.com/tools" xmlns:app="http://schemas.android.com/apk/res-auto" android:id="@+id/main" android:orientation="vertical" android:layout_width="match_parent" android:layout_height="match_parent" tools:context=".BitmapWR"> <LinearLayout android:layout_width="match_parent" android:layout_height="match_parent" android:orientation="vertical"> <Button android:layout_width="match_parent" android:layout_height="wrap_content" android:id="@+id/saveImg" android:text="保存图片"/>
<Button android:layout_width="match_parent" android:layout_height="wrap_content" android:id="@+id/readImg" android:text="读取图片"/>
<ImageView android:layout_width="200dp" android:layout_height="200dp" android:id="@+id/showImg"/>
</LinearLayout>
</LinearLayout>
应用组件Application
Application生命周期
Application是Android的一大组件,在app运行过程稿,有且只有一个Application对象贯穿整个生命周期。
onConfigurationChanged( ) :在配置被改变时触发 。
onCreate() :在程序创建时创建。
onLowMemory() :内存不够时触发。
onTerminate() :当终止程序时调用 但是不能保证一定调用
onTrimMemory() :在内存清理时触发
使用 首先创建一个Application对象
重写对应的方法
xxxxxxxxxxpackage cn.shuzilearn.xuexipro1.unit;
import android.app.Application;import android.content.res.Configuration;import android.util.Log;import androidx.annotation.NonNull;
public class myapplication extends Application { public void onCreate() { // 程序创建的时候执行 Log.d("TAG", "onCreate"); super.onCreate(); } public void onTerminate() { // 程序终止的时候执行 Log.d("TAG", "onTerminate"); super.onTerminate(); } public void onLowMemory() { // 低内存的时候执行 Log.d("TAG", "onLowMemory"); super.onLowMemory(); } public void onTrimMemory(int level) { // 程序在内存清理的时候执行 Log.d("TAG", "onTrimMemory"); super.onTrimMemory(level); }
public void onConfigurationChanged( Configuration newConfig) { // 在配置信息改变时执行,比如横竖屏切换等 super.onConfigurationChanged(newConfig); }}
利用Application操作全局变量
全局即其他代码都可以引用该变量,因此全局变量时共享数据和传递消息的好帮手
在Application适合保存以下类型的数据
会频繁读取的信息,例如:用户名,手机号等信息
不方便通过意图进行传递的数据,例如:位图对象,非字符串类型的集合对象等
容易因频繁分配导致内存泄漏的对象,如Handler对象等
自定义的Application
xxxxxxxxxxpackage cn.shuzilearn.xuexipro1.unit;
import android.app.Application;import android.util.Log;import java.util.HashMap;
public class myapplication extends Application { // 声明一个公共信息映射对象的map public HashMap<String,String> maps = new HashMap<>(); // 将myapplication设计为单例模式 private static myapplication instance; public static myapplication getInstance() { return instance; }
public void onCreate() { // 程序创建的时候执行 Log.d("TAG", "onCreate"); super.onCreate(); instance = this; }
}
ApplicationActivity
xxxxxxxxxxpackage cn.shuzilearn.xuexipro1;
import android.os.Bundle;
import android.view.View;import android.widget.EditText;import androidx.appcompat.app.AppCompatActivity;import cn.shuzilearn.xuexipro1.unit.myapplication;
public class ApplicationActivity extends AppCompatActivity implements View.OnClickListener {
private myapplication myapp; private EditText name; private EditText age;
protected void onCreate(Bundle savedInstanceState) { super.onCreate(savedInstanceState); setContentView(R.layout.activity_date_base);
name = findViewById(R.id.name1); age = findViewById(R.id.age1); findViewById(R.id.readfile).setOnClickListener(this); findViewById(R.id.savefile).setOnClickListener(this); myapp = myapplication.getInstance(); }
public void onClick(View v) { if (v.getId()==R.id.readfile){ //将参数存入Application的map集合中 myapp.maps.put("name",name.getText().toString()); myapp.maps.put("age",age.getText().toString());
} else if (v.getId()==R.id.savefile){
}
}}扩展: 单例模式(Singleton Pattern)是 Java 中最简单的设计模式之一。这种类型的设计模式属于创建型模式,它提供了一种创建对象的最佳方式。
这种模式涉及到一个单一的类,该类负责创建自己的对象,同时确保只有单个对象被创建。这个类提供了一种访问其唯一的对象的方式,可以直接访问,不需要实例化该类的对象。
单例模式是一种创建型设计模式,它确保一个类只有一个实例,并提供了一个全局访问点来访问该实例。
利用Room简化数据库操作
Room框架时Google公司推出的数据库处理框架,该框架同样基于SQLite,但它通过注解技术极大地简化了数据库操作,减少了原来编码的工作量
在使用Room之前,要先修改build.gradle文件,往dependencies节点中加入以下配置信息,引入Room库
xxxxxxxxxx// https://mvnrepository.com/artifact/androidx.room/room-runtimeimplementation group: 'androidx.room', name: 'room-runtime', version: '2.6.1'// https://mvnrepository.com/artifact/androidx.room/room-compilerimplementation group: 'androidx.room', name: 'room-compiler', version: '2.6.1'
以录入书籍信息为例,使用Room框架编码分为以下五部:
编写书籍信息表对应的实体类,该类添加"@Entity"注解
编写书籍信息表对应的持久化类,添加@“Dao”注解
编写书籍信息表对应的数据库类,该类从RoomDatabase派生而来,并添加”@Database“注解
在自定义的Application类中声明数据库的唯一实例
在操作书籍信息表的地方,获取数据表的持久化对象
实例:对图书数据库进行增删改查操作 界面布局代码
xxxxxxxxxx <LinearLayout xmlns:android="http://schemas.android.com/apk/res/android" xmlns:tools="http://schemas.android.com/tools" xmlns:app="http://schemas.android.com/apk/res-auto" android:orientation="vertical" android:id="@+id/main" android:layout_width="match_parent" android:layout_height="match_parent" tools:context=".RoomWrite"> <EditText android:layout_width="match_parent" android:layout_height="wrap_content" android:maxLength="10" android:height="48dp" android:hint="请输入书名" android:id="@+id/name"/> <EditText android:layout_width="match_parent" android:layout_height="wrap_content" android:maxLength="10" android:height="48dp" android:hint="请输入作者" android:id="@+id/author"/> <EditText android:layout_width="match_parent" android:layout_height="wrap_content" android:maxLength="10" android:height="48dp" android:hint="请输入出版社" android:id="@+id/publisher"/> <EditText android:layout_width="match_parent" android:layout_height="wrap_content" android:maxLength="10" android:height="48dp" android:hint="请输入售价" android:id="@+id/price"/> <Button android:layout_width="match_parent" android:layout_height="wrap_content" android:id="@+id/insert" android:text="插入数据"/> <Button android:layout_width="match_parent" android:layout_height="wrap_content" android:id="@+id/delete" android:text="删除数据"/> <Button android:layout_width="match_parent" android:layout_height="wrap_content" android:id="@+id/update" android:text="修改数据"/> <Button android:layout_width="match_parent" android:layout_height="wrap_content" android:id="@+id/query" android:text="查询数据"/>
<EditText android:layout_width="match_parent" android:layout_height="wrap_content" android:text="查询结果:" android:gravity="left" android:enabled="false" android:id="@+id/showData" android:minLines="10"/>
</LinearLayout>book实体类
xxxxxxxxxxpackage cn.shuzilearn.xuexipro1.pojo;
import androidx.room.Entity;import androidx.room.PrimaryKey;
public class Book {
(autoGenerate = true) private int id; private String name; private String author; private String publisher; private double price;
public Book(String name, String author, String publisher, double price) {
this.name = name; this.author = author; this.publisher = publisher; this.price = price; }
public Book() { }
public int getId() { return id; }
public void setId(int id) { this.id = id; }
public String getName() { return name; }
public void setName(String name) { this.name = name; }
public String getAuthor() { return author; }
public void setAuthor(String author) { this.author = author; }
public String getPublisher() { return publisher; }
public void setPublisher(String publisher) { this.publisher = publisher; }
public double getPrice() { return price; }
public void setPrice(double price) { this.price = price; }
public String toString() { return "book{" + "书籍ID:" + id + ", 书名:" + name + '\'' + ", 作者:" + author + '\'' + ", 出版社:" + publisher + '\'' + ", 售价:" + price + "元}\n"; }}
数据持久化类
xxxxxxxxxxpackage cn.shuzilearn.xuexipro1.dao;
import androidx.room.*;import cn.shuzilearn.xuexipro1.pojo.Book;
import java.util.List;
public interface BookDao { //Book... book 可变参数
// 插入信息 void insert(Book... book);
// 删除一条信息 void delete(Book... book);
// 删除所有信息 ("DELETE FROM Book") void deleteAll();
// 修改信息 void update(Book... book);
// 查询所有数据 ("select * from book") List<Book> queryALL();
// 查询单条数据 ("SELECT * FROM Book WHERE name =:name order by id desc limit 1") Book queryByName(String name);}
数据库类
xxxxxxxxxxpackage cn.shuzilearn.xuexipro1.database;
import androidx.room.Database;import androidx.room.RoomDatabase;import cn.shuzilearn.xuexipro1.dao.BookDao;import cn.shuzilearn.xuexipro1.pojo.Book;
// entities 数据库有哪些表 version 数据库版本 exportSchema 生成输出数据库信息文件,便于调试(entities = {Book.class}, version = 1,exportSchema = true)public abstract class BookDataBase extends RoomDatabase { // 获取持久化对象 public abstract BookDao bookDao();
}
在自定义的Application类中声明数据库的唯一实例
xxxxxxxxxxpackage cn.shuzilearn.xuexipro1.unit;import android.app.Application;import android.util.Log;import androidx.room.Room;import cn.shuzilearn.xuexipro1.database.BookDataBase;import java.util.HashMap;public class myapplication extends Application {// 将myapplication设计为单例模式private static myapplication instance;public static myapplication getInstance() {return instance;}// 声明一个数据库类private BookDataBase bookDataBase;@Overridepublic void onCreate() {// 程序创建的时候执行Log.d("TAG", "onCreate");super.onCreate();// 构建书籍数据库实例bookDataBase = Room.databaseBuilder(this, BookDataBase.class, "book.db")// 允许迁移数据库(当数据库发生变更时,room默认先删除原来的数据库再创建新的,此操作原来的数据会造成丢失).addMigrations()// 允许在主线程中操作数据库,在项目中不能这样做,因为主线程为UI线程,操作数据库为耗时操作,这样会造成UI卡顿问题.allowMainThreadQueries().build();}// 提供获取数据库的方法public BookDataBase getBookDataBase() {return bookDataBase;}}
activity逻辑代码
xxxxxxxxxxpackage cn.shuzilearn.xuexipro1;
import android.os.Bundle;
import android.view.View;import android.widget.EditText;import androidx.appcompat.app.AppCompatActivity;import cn.shuzilearn.xuexipro1.dao.BookDao;import cn.shuzilearn.xuexipro1.pojo.Book;import cn.shuzilearn.xuexipro1.unit.ToastUnit;import cn.shuzilearn.xuexipro1.unit.myapplication;
import java.util.List;
public class RoomWrite extends AppCompatActivity implements View.OnClickListener {
private EditText name; private EditText author; private EditText publisher; private EditText price; private BookDao bookDao; private EditText showData;
protected void onCreate(Bundle savedInstanceState) { super.onCreate(savedInstanceState); getSupportActionBar().hide(); setContentView(R.layout.activity_room_write);
// 从布局中获取控件 name = findViewById(R.id.name); author = findViewById(R.id.author); publisher = findViewById(R.id.publisher); price = findViewById(R.id.price); showData = findViewById(R.id.showData);
// 为按钮设置事件监听 findViewById(R.id.insert).setOnClickListener(this); findViewById(R.id.delete).setOnClickListener(this); findViewById(R.id.update).setOnClickListener(this); findViewById(R.id.query).setOnClickListener(this);
// 从app对象中获取书籍的唯一持久化对象 bookDao = myapplication.getInstance().getBookDataBase().bookDao();
}
public void onClick(View v) { if (v.getId()==R.id.insert){ // 插入数据逻辑 String nameStr = name.getText().toString(); String authorStr = author.getText().toString(); String publisherStr = publisher.getText().toString(); double priceStr = Double.parseDouble(price.getText().toString()); Book book = new Book(nameStr,authorStr,publisherStr,priceStr); bookDao.insert(book); ToastUnit.toast_show(this,"数据插入成功"); } else if (v.getId()==R.id.delete) {
// 删除数据逻辑 Book book = new Book(); // 删除某条数据 Book b = bookDao.queryByName(name.getText().toString()); bookDao.delete(b); ToastUnit.toast_show(this,book.getName()+"删除数据成功");
// 删除所有数据 //bookDao.deleteAll(); //ToastUnit.toast_show(this,"删除所有数据成功"); } else if (v.getId()==R.id.update) { // 修改数据逻辑 Book b = bookDao.queryByName(name.getText().toString()); String nameStr = name.getText().toString(); String authorStr = author.getText().toString(); String publisherStr = publisher.getText().toString(); double priceStr = Double.parseDouble(price.getText().toString()); b.setName(nameStr); b.setAuthor(authorStr); b.setPublisher(publisherStr); b.setPrice(priceStr); bookDao.update(b); } else if (v.getId()==R.id.query) { // 查询数据逻辑 List<Book> book = bookDao.queryALL(); StringBuffer sb = new StringBuffer(); for (Book book1 : book) { sb.append(book1.toString()); } showData.setText(sb.toString()); ToastUnit.toast_show(this,"数据查询成功");
}
}}
案例:购物车(待补)
需求描述
页面设计代码
逻辑处理代码
内容提供者
在应用之间共享数据
展示案例,一个服务端应用,一个客户端应用,客户端应用向服务端应用传递数据,服务端数据将数据存入到数据库等位置。
ContentProvider封装数据
ContentProvider为App存取内部数据提供统一的外部接口,让不同应用之间得以共享数据
服务搭建 页面
xxxxxxxxxxjava逻辑代码:userinfoProvider
xxxxxxxxxxpackage cn.shuzilearn.service.Provider;import android.content.ContentProvider;import android.content.ContentValues;import android.database.Cursor;import android.database.sqlite.SQLiteDatabase;import android.net.Uri;import cn.shuzilearn.service.database.SQHelper_tools;public class userinfoProvider extends ContentProvider {private SQHelper_tools sqHelper;public boolean onCreate() {// TODO: Implement this to initialize your content provider on startup.sqHelper = SQHelper_tools.getInstance(getContext());return true;}public int delete(Uri uri, String selection, String[] selectionArgs) {// Implement this to handle requests to delete one or more rows.throw new UnsupportedOperationException("Not yet implemented");}public String getType(Uri uri) {// TODO: Implement this to handle requests for the MIME type of the data// at the given URI.throw new UnsupportedOperationException("Not yet implemented");}public Uri insert(Uri uri, ContentValues values) {// TODO: Implement this to handle requests to insert a new row.SQLiteDatabase db = sqHelper.getWritableDatabase();db.insert(SQHelper_tools.TABLE_NAME, null, values);return uri;}public Cursor query(Uri uri, String[] projection, String selection,String[] selectionArgs, String sortOrder) {SQLiteDatabase db = sqHelper.getReadableDatabase();// TODO: Implement this to handle query requests from clients.return db.query(SQHelper_tools.TABLE_NAME, projection, selection, selectionArgs, null, null, null);}public int update(Uri uri, ContentValues values, String selection,String[] selectionArgs) {// TODO: Implement this to handle requests to update one or more rows.throw new UnsupportedOperationException("Not yet implemented");}}JAVA对象:user
xxxxxxxxxxpackage cn.shuzilearn.service.pojo;public class User {private int id;private String name;private int age;public User(String name, int age) {this.name = name;this.age = age;}public User() {}public int getId() {return id;}public void setId(int id) {this.id = id;}public String getName() {return name;}public void setName(String name) {this.name = name;}public int getAge() {return age;}public void setAge(int age) {this.age = age;}public String toString() {return "User{" +"id=" + id +", name='" + name + '\'' +", age=" + age +"}\n";}}SQHelper_tools工具类
xxxxxxxxxxpackage cn.shuzilearn.service.database;import android.annotation.SuppressLint;import android.content.ContentValues;import android.content.Context;import android.database.Cursor;import android.database.sqlite.SQLiteDatabase;import android.database.sqlite.SQLiteOpenHelper;import cn.shuzilearn.service.pojo.User;import java.util.ArrayList;import java.util.List;// sqlite工具类public class SQHelper_tools extends SQLiteOpenHelper {// 数据库名称private static final String DATABASE_NAME = "shuzilearn.db";// 表名public static final String TABLE_NAME = "student";// 数据库版本private static final int DATABASE_VERSION = 1;private static SQHelper_tools mhelper;// 提供度和写的实例private SQLiteDatabase readDB;private SQLiteDatabase writeDB;// 单例模式private SQHelper_tools(Context context) {super(context, DATABASE_NAME, null, DATABASE_VERSION);}public static SQHelper_tools getInstance(Context context) {if (mhelper == null) {mhelper = new SQHelper_tools(context);}return mhelper;}public void onCreate(SQLiteDatabase db) {String CREATE_TABLE_SQL = "CREATE TABLE " + TABLE_NAME +"( id integer primary key autoincrement not null," +" name varchar not null," +" age integer not null" +")";db.execSQL(CREATE_TABLE_SQL);}public void onUpgrade(SQLiteDatabase db, int oldVersion, int newVersion) {}// 数据库的读连接public SQLiteDatabase openReadDB() {if (readDB == null || !readDB.isOpen()) {readDB = mhelper.getReadableDatabase();}return readDB;}// 数据库的写连接public SQLiteDatabase openWriteDB() {if (writeDB == null || !writeDB.isOpen()) {writeDB = mhelper.getWritableDatabase();}return writeDB;}// 关闭连接public void closeDB() {if (readDB != null && readDB.isOpen()) {readDB.close();readDB = null;}if (writeDB != null && writeDB.isOpen()) {writeDB.close();writeDB = null;}}// 插入数据public long insert(User user) {// 创建一个ContentValues实例// 在Android开发中,ContentValues是一个非常重要的类,// 它用于存储一组键值对,其中键是字符串类型,而值是基本数据类型。// 这使得ContentValues类似于Hashtable,但它专门用于Android// 的内容提供者(Content Providers)和数据库操作。ContentValues contentValues = new ContentValues();// 使用put方法添加键值对contentValues.put("name", user.getName());contentValues.put("age", user.getAge());// 使用数据库的insert方法插入数据// return writeDB.insert(TABLE_NAME, null, contentValues);return writeDB.insert(TABLE_NAME, null, contentValues);}// 删除数据public long deleteByname(String name) {return writeDB.delete(TABLE_NAME, "name = ?", new String[]{name});}// 修改数据public long updateByname(User user) {ContentValues contentValues = new ContentValues();contentValues.put("name", user.getName());contentValues.put("age", user.getAge());return writeDB.update(TABLE_NAME, contentValues, "name = ?", new String[]{user.getName()});}// 查询数据("Range")public List<User> selectALL(String name) {List<User> list = new ArrayList<User>();Cursor cursor = readDB.query(TABLE_NAME, null, null, null, null, null, null);while (cursor.moveToNext()) {User user = new User();// user.setName(cursor.getString(cursor.getColumnIndex("name")));// user.setAge(cursor.getInt(cursor.getColumnIndex("age")));user.setName(cursor.getString(0));user.setAge(cursor.getInt(1));list.add(user);}return list;}}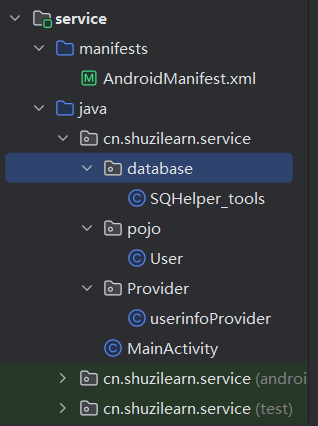
ContentResolver访问数据
利用ContentProvider只实现服务端App的数据封装,如果客户端App想要访问对方内部的数据,就要通过内容解析器ContentResolver进行访问。
客户端搭建
页面
xxxxxxxxxx<LinearLayoutxmlns:android="http://schemas.android.com/apk/res/android"xmlns:tools="http://schemas.android.com/tools"xmlns:app="http://schemas.android.com/apk/res-auto"android:id="@+id/main"android:orientation="vertical"android:layout_width="match_parent"android:layout_height="match_parent"tools:context=".MainActivity"><EditText android:layout_width="match_parent"android:layout_height="50dp"android:hint="请输入姓名"android:id="@+id/name"/><EditText android:layout_width="match_parent"android:hint="请输入年龄"android:layout_height="50dp"android:id="@+id/age"/><Button android:layout_width="match_parent"android:layout_height="wrap_content"android:id="@+id/save"android:text="保存"/><Button android:layout_width="match_parent"android:layout_height="wrap_content"android:id="@+id/delete"android:text="删除"/><Button android:layout_width="match_parent"android:layout_height="wrap_content"android:id="@+id/quary"android:text="查询"/><TextView android:layout_width="match_parent"android:layout_height="wrap_content"android:text="这里显示查询结果"android:textSize="20sp"android:id="@+id/showText"/></LinearLayout>java逻辑代码
xxxxxxxxxxpackage cn.shuzilearn.client;import android.content.ContentValues;import android.database.Cursor;import android.net.Uri;import android.os.Bundle;import android.util.Log;import android.view.View;import android.widget.Button;import android.widget.EditText;import android.widget.TextView;import android.widget.Toast;import androidx.activity.EdgeToEdge;import androidx.appcompat.app.AppCompatActivity;import androidx.core.graphics.Insets;import androidx.core.view.ViewCompat;import androidx.core.view.WindowInsetsCompat;import cn.shuzilearn.client.pojo.User;import java.util.ArrayList;import java.util.List;public class MainActivity extends AppCompatActivity implements View.OnClickListener {private static final String authorities = "cn.shuzilearn.service.Provider.userinfoProvider";// 内容提供器URIprivate static final Uri contentUri = Uri.parse("content://" + authorities + "/user");private EditText name;private EditText age;private Button save;private Button delete;private Button quary;private TextView showtx;protected void onCreate(Bundle savedInstanceState) {super.onCreate(savedInstanceState);setContentView(R.layout.activity_main);name = findViewById(R.id.name);age = findViewById(R.id.age);save = findViewById(R.id.save);delete = findViewById(R.id.delete);quary = findViewById(R.id.quary);showtx = findViewById(R.id.showText);save.setOnClickListener(this);}public void onClick(View v) {if (v.getId() == save.getId()) {ContentValues values = new ContentValues();values.put("name", name.getText().toString());values.put("age", age.getText().toString());getContentResolver().insert(contentUri, values);Toast.makeText(this, "添加成功", Toast.LENGTH_SHORT).show();} else if (v.getId() == R.id.delete) {int r = getContentResolver().delete(contentUri, null, null);if (r > 0) {Toast.makeText(this, "删除成功!", Toast.LENGTH_SHORT).show();showtx.setText("删除的条数:" + r);return;}Toast.makeText(this, "删除失败!!", Toast.LENGTH_SHORT).show();} else if (v.getId() == R.id.quary) {List<User> users = new ArrayList<User>();StringBuffer sb = new StringBuffer();Cursor cursor = getContentResolver().query(contentUri, null, null, null, null);if (cursor != null) {Toast.makeText(this, "查询成功!", Toast.LENGTH_SHORT).show();while (cursor.moveToNext()) {User user = new User();user.setName(cursor.getString(0));user.setAge(cursor.getInt(1));String s = String.format("姓名:%s,年龄%d\n", user.getName(), user.getAge());sb.append(s);users.add(user);}cursor.close();showtx.setText(sb.toString());return;}Toast.makeText(this, "查询失败!!", Toast.LENGTH_SHORT).show();}}}在清单文件中添加以下配置
xxxxxxxxxx<!-- 在Android11后,出于安全考虑,要求应用事先声明需要访问其他软件包 --><queries><!-- <package android:name="cn.shuzilearn.service"/>--><provider android:authorities="cn.shuzilearn.service.Provider.userinfoProvider"/></queries>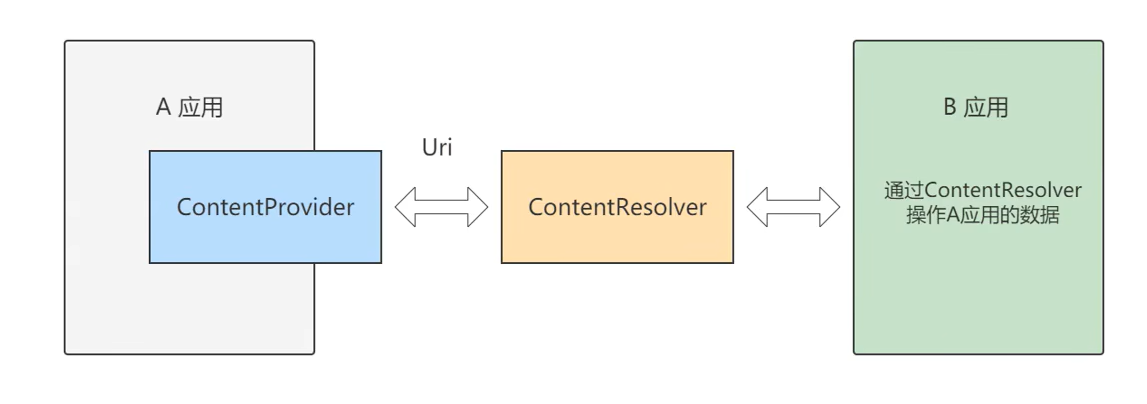
使用内容组件获取通信信息
在运行时动态申请权限
Android系统为了防止一些App滥用权限,从6.0开始引入了运行时权限管理机制,允许App在运行过程中动态检查是否拥有某项权限,一旦发现缺少某项必须权限,则系统会自动弹出小窗提示用户开启权限。
动态申请权限的步骤
检查App是否开启了指定权限 调用ContextCompat的checkSelfPermission方法
请求系统弹窗,以便用户选择是否开启权限 调用ActivityCompat的requestPermissions方法,即可命令系统自动弹出权限申请窗口
判断用户选择的结果 重写活动页面的权限请求回调方法onRequestPermissionsResult,在该方法内部处理权限选择的结果。
Lazy模式 Permission工具类
xxxxxxxxxxpackage cn.shuzilearn.xuexipro1.unit;import android.app.Activity;import android.content.pm.PackageManager;import android.os.Build;import androidx.core.app.ActivityCompat;import androidx.core.content.ContextCompat;public class PermissionUnit {// 检查多个权限是否开启,true为开启,false为未完全开启public static boolean checkPermission(Activity activity, String[] permission, int requestCode) {// 在Android 6.0后采用动态权限管理if (Build.VERSION.SDK_INT >= Build.VERSION_CODES.M) {int result = PackageManager.PERMISSION_GRANTED;for (String s : permission) {result = ContextCompat.checkSelfPermission(activity, s);if (result != PackageManager.PERMISSION_GRANTED) {break;}}if (result != PackageManager.PERMISSION_GRANTED) {ActivityCompat.requestPermissions(activity, permission, requestCode);return false;}}return true;}// 检查结果数组,true为已授权,false为未授权public static boolean checkGrant(int[] grantResults) {if (grantResults!=null && grantResults.length>0) {// 遍历权限数组for (int grantResult : grantResults) {// 未获取权限if (grantResult != PackageManager.PERMISSION_GRANTED) {return false;}}// 已获取权限return true;}return false;}}清单文件中定义权限
xxxxxxxxxx<uses-permission android:name="android.permission.WRITE_CONTACTS"/><uses-permission android:name="android.permission.READ_CONTACTS"/><uses-permission android:name="android.permission.SEND_SMS"/><uses-permission android:name="android.permission.READ_SMS"/>Activity代码
xxxxxxxxxxpackage cn.shuzilearn.xuexipro1;import android.Manifest;import android.os.Bundle;import android.view.View;import android.widget.Toast;import androidx.activity.EdgeToEdge;import androidx.annotation.NonNull;import androidx.appcompat.app.AppCompatActivity;import androidx.core.graphics.Insets;import androidx.core.view.ViewCompat;import androidx.core.view.WindowInsetsCompat;import cn.shuzilearn.xuexipro1.unit.PermissionUnit;import org.jetbrains.annotations.NotNull;public class LazyActivity extends AppCompatActivity implements View.OnClickListener {// 定义权限列表private static final String[] Permission_ct = new String[]{Manifest.permission.READ_CONTACTS,Manifest.permission.WRITE_CONTACTS};private static final String[] Permission_sms = new String[]{Manifest.permission.SEND_SMS,Manifest.permission.READ_SMS};// 定义requestcodeprivate static final int REQUEST_CODE_ct = 1;private static final int REQUEST_CODE_sms = 2;protected void onCreate(Bundle savedInstanceState) {super.onCreate(savedInstanceState);setContentView(R.layout.activity_lazy);findViewById(R.id.duanxin).setOnClickListener(this);findViewById(R.id.tongxunlu).setOnClickListener(this);}public void onRequestPermissionsResult(int requestCode, String[] permissions, int[] grantResults) {super.onRequestPermissionsResult(requestCode, permissions, grantResults);switch (requestCode) {case REQUEST_CODE_ct:if (PermissionUnit.checkGrant(grantResults)){Toast.makeText(this, "通讯录权限获取成功!", Toast.LENGTH_SHORT).show();}else {Toast.makeText(this, "通讯录权限获取失败!", Toast.LENGTH_SHORT).show();}break;case REQUEST_CODE_sms:if (PermissionUnit.checkGrant(grantResults)){Toast.makeText(this, "短信权限获取成功!", Toast.LENGTH_SHORT).show();}else {Toast.makeText(this, "短信权限获取失败!", Toast.LENGTH_SHORT).show();}break;}}public void onClick(View v) {if (v.getId()==R.id.tongxunlu){PermissionUnit.checkPermission(this,Permission_ct,REQUEST_CODE_ct);} else if (v.getId()==R.id.duanxin) {PermissionUnit.checkPermission(this,Permission_sms,REQUEST_CODE_sms);}}}Hungry模式
在一开始就申请需要的全部权限 java代码
xxxxxxxxxxpackage cn.shuzilearn.xuexipro1;import android.Manifest;import android.content.pm.PackageManager;import android.os.Bundle;import android.widget.Toast;import androidx.activity.EdgeToEdge;import androidx.annotation.NonNull;import androidx.appcompat.app.AppCompatActivity;import androidx.core.graphics.Insets;import androidx.core.view.ViewCompat;import androidx.core.view.WindowInsetsCompat;import cn.shuzilearn.xuexipro1.unit.PermissionUnit;import org.jetbrains.annotations.NotNull;public class HungryActivity extends AppCompatActivity {// 定义权限列表private static final String[] Permission_all = new String[]{android.Manifest.permission.READ_CONTACTS,android.Manifest.permission.WRITE_CONTACTS,android.Manifest.permission.SEND_SMS,Manifest.permission.READ_SMS};private static final int REQUEST_CODE_all = 1;protected void onCreate(Bundle savedInstanceState) {super.onCreate(savedInstanceState);setContentView(R.layout.activity_hungry);// 在创建时就申请全部权限PermissionUnit.checkPermission(this, Permission_all, REQUEST_CODE_all);}public void onRequestPermissionsResult(int requestCode, String[] permissions, int[] grantResults) {super.onRequestPermissionsResult(requestCode, permissions, grantResults);if (requestCode == REQUEST_CODE_all && grantResults.length > 0) {if (PermissionUnit.checkGrant(grantResults)) {Toast.makeText(this, "所有权限获取成功!", Toast.LENGTH_SHORT).show();} else {for (int i = 0; i < grantResults.length; i++) {if (grantResults[i] != PackageManager.PERMISSION_GRANTED) {switch (permissions[i]) {case android.Manifest.permission.READ_CONTACTS:case android.Manifest.permission.WRITE_CONTACTS:Toast.makeText(this, "通讯录权限获取失败!", Toast.LENGTH_SHORT).show();break;case android.Manifest.permission.SEND_SMS:case android.Manifest.permission.READ_SMS:Toast.makeText(this, "短信权限获取失败!", Toast.LENGTH_SHORT).show();break;}}}Toast.makeText(this, "权限获取失败!", Toast.LENGTH_SHORT).show();}}}}
ContentResolver读写联系人
xxxxxxxxxxpackage cn.shuzilearn.xuexipro1;
import android.content.ContentProviderOperation;import android.content.ContentResolver;import android.content.ContentUris;import android.content.ContentValues;import android.net.Uri;import android.os.Bundle;
import android.provider.ContactsContract;import android.view.View;import android.widget.Button;import android.widget.EditText;import android.widget.TextView;import androidx.appcompat.app.AppCompatActivity;import cn.shuzilearn.xuexipro1.pojo.Lianxi;
public class lianxiren extends AppCompatActivity implements View.OnClickListener {
private EditText name; private EditText phone; private Button save; private Button read; private TextView show;
protected void onCreate(Bundle savedInstanceState) { super.onCreate(savedInstanceState);
setContentView(R.layout.activity_lianxiren);
name = findViewById(R.id.name); phone = findViewById(R.id.phone); save = findViewById(R.id.save); read = findViewById(R.id.read); show = findViewById(R.id.showRest);
save.setOnClickListener(this); read.setOnClickListener(this);
}
public void onClick(View v) { if (v.getId()==save.getId()){ Lianxi lx = new Lianxi(); lx.name = name.getText().toString().trim(); lx.phone = phone.getText().toString().trim();
// 方法1使用ContentResolver多次写入,每次写入一个字段 addContacts(getContentResolver(),lx);
// 方法2批处理方式 addFullContacts(getContentResolver(),lx); } else if (v.getId()==read.getId()){
} } // 方法2批处理方式 private void addFullContacts(ContentResolver cr,Lianxi lx) { // 创建插入联系人主记录 ContentProviderOperation build = ContentProviderOperation.newInsert(ContactsContract.RawContacts.CONTENT_URI) .build(); }
// 方法1 向通讯录中插入联系人数据,一次一个字段 private void addContacts(ContentResolver contentResolver, Lianxi con) { ContentValues values = new ContentValues(); Uri uri= contentResolver.insert(ContactsContract.RawContacts.CONTENT_URI,values); long rawID = ContentUris.parseId(uri);
ContentValues name = new ContentValues(); // 关联联系人编号 name.put(ContactsContract.Data.RAW_CONTACT_ID, rawID); // 联系人姓名数据类型 name.put(ContactsContract.Contacts.Data.MIMETYPE, ContactsContract.CommonDataKinds.StructuredName.CONTENT_ITEM_TYPE); // 联系人姓名 name.put(ContactsContract.Contacts.Data.DATA2,con.name); // 向提供器中插入姓名数据 contentResolver.insert(ContactsContract.Data.CONTENT_URI,name);
ContentValues phone = new ContentValues(); // 关联联系人编号 phone.put(ContactsContract.Data.RAW_CONTACT_ID, rawID); // 联系人电话数据类型 phone.put(ContactsContract.Contacts.Data.MIMETYPE, ContactsContract.CommonDataKinds.Phone.CONTENT_ITEM_TYPE); // 联系人电话 phone.put(ContactsContract.Contacts.Data.DATA1,con.phone); // 联系人类型 1为家庭2为工作 phone.put(ContactsContract.Contacts.Data.DATA2,ContactsContract.CommonDataKinds.Phone.TYPE_MOBILE); // 向提供器中插入电话数据 contentResolver.insert(ContactsContract.Data.CONTENT_URI,phone);
}
}
ContentObserver监听短信
内容观察器ContentObserver给目标内容注册一个观察器,目标内容一旦发生改变,观察器规定好的逻辑动作将被触发,从而执行开发者预先设计的代码。
xxxxxxxxxxpackage cn.shuzilearn.xuexipro1;
import android.content.Context;import android.database.ContentObserver;import android.database.Cursor;import android.net.Uri;import android.os.Bundle;
import android.os.Handler;import android.os.Looper;import android.util.Log;import androidx.activity.EdgeToEdge;import androidx.annotation.Nullable;import androidx.appcompat.app.AppCompatActivity;import androidx.core.graphics.Insets;import androidx.core.view.ViewCompat;import androidx.core.view.WindowInsetsCompat;
public class ContentObserverActivity extends AppCompatActivity {
private SmsObserver observer;
protected void onCreate(Bundle savedInstanceState) { super.onCreate(savedInstanceState); setContentView(R.layout.activity_content_observer);
// 给指定Uri注册内容观察日期 Uri uri = Uri.parse("content://sms");
observer = new SmsObserver(new Handler(Looper.getMainLooper()),this); getContentResolver().registerContentObserver(uri,true,observer);
}
protected void onDestroy() { super.onDestroy(); // 销毁时取消注册 getContentResolver().unregisterContentObserver(observer); }
private static class SmsObserver extends ContentObserver {
private final Context context;
/** * Creates a content observer. * * @param handler The handler to run {@link #onChange} on, or null if none. */ public SmsObserver(Handler handler, Context context) { super(handler); this.context=context; }
public void onChange(boolean selfChange, Uri uri) { super.onChange(selfChange, uri); if (uri == null) { return; } if (uri.toString().contains("content://sms/raw")|| uri.toString().equals("content://sms")) { return; }
// 通过内容解析其获取符合条件的结果集游标 Cursor query = context.getContentResolver().query(uri, new String[]{"address", "body", "date"}, null, null, "date DESC"); if (query != null&&query.moveToFirst()) { // 短信发送号码 String address = query.getString(0); // 短信内容 String body = query.getString(1); Log.d("11111111111111111",String.format("发送号码:%s,短信内容:%s",address,body)); }
// 关闭游标 query.close(); } }}
ContentObserver还可以对自己的内容进行监听。
应用之间共享文件
从相册选择图片
xxxxxxxxxxpackage cn.shuzilearn.xuexipro1;
import android.content.Context;import android.content.Intent;import android.database.ContentObserver;import android.database.Cursor;import android.net.Uri;import android.os.Bundle;
import android.os.Handler;import android.os.Looper;import android.util.Log;import android.view.View;import android.widget.ImageView;import androidx.activity.EdgeToEdge;import androidx.activity.result.ActivityResult;import androidx.activity.result.ActivityResultCallback;import androidx.activity.result.ActivityResultLauncher;import androidx.activity.result.contract.ActivityResultContracts;import androidx.annotation.Nullable;import androidx.appcompat.app.AppCompatActivity;import androidx.core.graphics.Insets;import androidx.core.view.ViewCompat;import androidx.core.view.WindowInsetsCompat;
public class ContentObserverActivity extends AppCompatActivity {
private SmsObserver observer; private ActivityResultLauncher<Intent> resultLauncher;
protected void onCreate(Bundle savedInstanceState) { super.onCreate(savedInstanceState); setContentView(R.layout.activity_content_observer);
ImageView imageView = findViewById(R.id.chooseImg); imageView.setOnClickListener(v -> { // 跳转到相册。选择图片并返回 Intent intent = new Intent(Intent.ACTION_GET_CONTENT); // 设置内容类型为图片 intent.setType("image/*"); resultLauncher.launch(intent);
});
// 跳转到相册。选择图片并返回 resultLauncher = registerForActivityResult(new ActivityResultContracts.StartActivityForResult(), new ActivityResultCallback<ActivityResult>() { public void onActivityResult(ActivityResult o) { if (o.getResultCode() == RESULT_OK) { Intent data = o.getData(); // 选择图片的路径对象 Uri uri = data.getData(); if (uri != null) { imageView.setImageURI(uri); } }
} }); }
}
通过MediaStore查询图片
xxxxxxxxxxpackage cn.shuzilearn.xuexipro1;
import android.Manifest;import android.database.Cursor;import android.graphics.Bitmap;import android.graphics.BitmapFactory;import android.graphics.ImageDecoder;import android.os.Bundle;
import android.provider.MediaStore;import android.widget.GridView;import android.widget.ImageView;import androidx.activity.EdgeToEdge;import androidx.annotation.NonNull;import androidx.appcompat.app.AppCompatActivity;import androidx.core.graphics.Insets;import androidx.core.view.ViewCompat;import androidx.core.view.WindowInsetsCompat;import cn.shuzilearn.xuexipro1.pojo.ImageInfo;import cn.shuzilearn.xuexipro1.unit.PermissionUnit;import org.jetbrains.annotations.NotNull;
import java.util.ArrayList;import java.util.List;
public class MediaStroeActivity extends AppCompatActivity { private List<ImageInfo> imageInfoList = new ArrayList<>(); private GridView gv; // 定义权限列表 private static final String[] Permission_ct = new String[]{
Manifest.permission.READ_EXTERNAL_STORAGE }; private static final int REQUEST_CODE_all = 1;
public void onRequestPermissionsResult(int requestCode, String[] permissions, int[] grantResults) { super.onRequestPermissionsResult(requestCode, permissions, grantResults); if ( PermissionUnit.checkGrant(grantResults)){ // 加载图片列表 LoodingImg();
// 显示图片 showImg(); }
}
protected void onCreate(Bundle savedInstanceState) { super.onCreate(savedInstanceState);
setContentView(R.layout.activity_media_stroe); gv = findViewById(R.id.glview);
if (PermissionUnit.checkPermission(this,Permission_ct,REQUEST_CODE_all)) { // 加载图片列表 LoodingImg();
// 显示图片 showImg(); }
}
private void showImg() {// gv.removeAllViews(); for (ImageInfo imageInfo : imageInfoList) { ImageView imageView = new ImageView(this); Bitmap bitmap = BitmapFactory.decodeFile(imageInfo.path); imageView.setImageBitmap(bitmap); // 设置图片缩放类型 imageView.setScaleType(ImageView.ScaleType.FIT_XY);
// 添加到网格布局 gv.addView(imageView); } }
// 加载图片列表 private void LoodingImg() { String[] columns = { MediaStore.Images.Media._ID, // 编号 MediaStore.Images.Media.TITLE, // 文件标题 MediaStore.Images.Media.SIZE, // 文件大小 MediaStore.Images.Media.DATA}; // 文件路径
// 查询300kb以内的图片文件 Cursor query = getContentResolver().query( MediaStore.Images.Media.EXTERNAL_CONTENT_URI, columns, "_size<307200", null, "_size desc" ); if (query!=null){ while (query.moveToNext()){ ImageInfo imageInfo = new ImageInfo(); long aLong = query.getLong(query.getColumnIndexOrThrow(columns[0])); String aLong1 = query.getString(query.getColumnIndexOrThrow(columns[1])); long aLong2 = query.getLong(query.getColumnIndexOrThrow(columns[2])); String aLong3 = query.getString(query.getColumnIndexOrThrow(columns[3])); imageInfo.id = aLong; imageInfo.title = aLong1; imageInfo.size = aLong2; imageInfo.path = aLong3; imageInfoList.add(imageInfo);
}
} }}
FileProvider
应用通常需要将自己的一个或多个文件提供给其他应用。例如,图库可能需要向图片编辑器提供文件,或者文件管理应用可能需要允许用户在外部存储设备中的区域之间复制和粘贴文件。发送方应用可以通过响应来自接收方应用的请求来共享文件。
在所有情况下,将文件从您的应用提供给其他应用的唯一安全方式就是向接收方应用发送文件的内容 URI,并授予对该 URI 的临时访问权限。 具有临时 URI 访问权限的内容 URI 是安全的,因为它们仅适用于接收该 URI 的应用,并且会自动过期。Android FileProvider 组件提供了 getUriForFile() 方法,用于生成文件的内容 URI。
高级控件
下拉列表
下拉框Spinner
Spinner用于从一串列表中选择某项。功能类似于单选按钮的组合
xxxxxxxxxx <LinearLayout xmlns:android="http://schemas.android.com/apk/res/android" xmlns:tools="http://schemas.android.com/tools" xmlns:app="http://schemas.android.com/apk/res-auto" android:id="@+id/main" android:orientation="vertical" android:layout_width="match_parent" android:layout_height="match_parent" tools:context=".SpinnerActivity"> <TextView android:layout_width="match_parent" android:layout_height="wrap_content" android:textSize="18sp" android:text="下拉列表"/> <Spinner android:id="@+id/Sp_xiala" android:layout_width="match_parent" android:layout_height="wrap_content" android:spinnerMode="dialog"/>
</LinearLayout>
适配器Adapter
适配器负责从数据集中取出对应的数据,显示到条目布局上。
拓展知识:Adapter继承结构
数组适配器ArrayAdapter
最简单的适配器,只展示一行文字
运用数组适配器分成以下步骤:
编写列表项的XML文件,内部布局只有一个TextView标签
调用ArrayAdapter的构造方法,填入待展示的字符串数组,以及列表项的xml文件
调用下拉列表框控件的setAdapter方法,传入第二部得到的适配器实例
实例:使用ArrayAdapter渲染Spinner
xxxxxxxxxxpackage cn.shuzilearn.chapter1;
import android.os.Bundle;
import android.view.View;import android.widget.AdapterView;import android.widget.ArrayAdapter;import android.widget.Spinner;import android.widget.Toast;import androidx.appcompat.app.AppCompatActivity;
public class SpinnerActivity extends AppCompatActivity {
private Spinner spinner;
protected void onCreate(Bundle savedInstanceState) { super.onCreate(savedInstanceState); getSupportActionBar().hide(); setContentView(R.layout.activity_spinner); spinner = findViewById(R.id.Sp_xiala); String[] data = new String[]{"吃饭","睡觉","打豆豆"};
// 声明一个数组适配器 ArrayAdapter<String> adapter = new ArrayAdapter<>(this,android.R.layout.simple_spinner_item,data); spinner.setAdapter(adapter); // 默认选择第一个 spinner.setSelection(0);
// 设置监听,获取用户选择的选项 spinner.setOnItemSelectedListener(new AdapterView.OnItemSelectedListener() { public void onItemSelected(AdapterView<?> parent, View view, int position, long id) { Toast.makeText(SpinnerActivity.this,"你选择了:"+data[position],Toast.LENGTH_SHORT).show(); }
public void onNothingSelected(AdapterView<?> parent) { Toast.makeText(SpinnerActivity.this, "你什么也没选", Toast.LENGTH_SHORT).show(); } });
}}
简单适配器SimpleAdapter
SimpleAdapter允许在列表项中同时展示图片和文字
xxxxxxxxxxpackage cn.shuzilearn.chapter1;
import android.os.Bundle;import android.widget.SimpleAdapter;import android.widget.Spinner;import androidx.activity.EdgeToEdge;import androidx.appcompat.app.AppCompatActivity;import androidx.core.graphics.Insets;import androidx.core.view.ViewCompat;import androidx.core.view.WindowInsetsCompat;
import java.util.ArrayList;import java.util.HashMap;import java.util.List;import java.util.Map;
public class simpleadapter extends AppCompatActivity {
protected void onCreate(Bundle savedInstanceState) { super.onCreate(savedInstanceState); setContentView(R.layout.activity_simpleadapter); // 图片资源 int[] imgs = { R.drawable.a, R.drawable.b, R.drawable.c, R.drawable.d, R.drawable.e, R.drawable.f }; // 文字资源 String[] titles = {"A", "B", "C", "D", "E", "F"}; List<Map<String, Object>> list = new ArrayList<Map<String, Object>>(); for (int i = 0; i < imgs.length; i++) { Map<String, Object> map = new HashMap<String, Object>(); map.put("img", imgs[i]); map.put("title", titles[i]); list.add(map); }
SimpleAdapter simpleAdapter = new SimpleAdapter(this, list, R.layout.item_simple, new String[]{"img", "title"}, new int[]{R.id.showimg, R.id.showtext});
Spinner spinner = findViewById(R.id.splist); spinner.setAdapter(simpleAdapter); }}// 条目样式
xxxxxxxxxx <LinearLayout xmlns:android="http://schemas.android.com/apk/res/android" android:layout_width="match_parent" android:layout_height="wrap_content" android:orientation="horizontal"> <ImageView android:id="@+id/showimg" android:layout_width="60dp" android:layout_height="60dp" android:src="@drawable/img"/> <TextView android:id="@+id/showtext" android:layout_width="0dp" android:layout_weight="1" android:gravity="center" android:textSize="18sp" android:textColor="#00f" android:layout_height="match_parent" />
</LinearLayout>布局文件
xxxxxxxxxx <LinearLayout xmlns:android="http://schemas.android.com/apk/res/android" xmlns:tools="http://schemas.android.com/tools" xmlns:app="http://schemas.android.com/apk/res-auto" android:id="@+id/main" android:orientation="vertical" android:layout_width="match_parent" android:layout_height="match_parent" tools:context=".SpinnerActivity"> <TextView android:layout_width="match_parent" android:layout_height="wrap_content" android:textSize="18sp" android:text="下拉列表"/> <Spinner android:id="@+id/Sp_xiala" android:layout_width="match_parent" android:layout_height="wrap_content" android:minHeight="48dp" android:spinnerMode="dropdown"/>
</LinearLayout>
列表类视图
基本适配器BaseAdapter
BaseAdapter是一种适应性更强的基本适配器。
注意:BaseAdapter是一个抽象类,需要进行实现
示例代码如下:
xxxxxxxxxxpackage cn.shuzilearn.chapter1;
import android.content.Context;import android.os.Bundle;
import android.view.View;import android.view.ViewGroup;import android.widget.BaseAdapter;import android.widget.ImageView;import android.widget.Spinner;import android.widget.TextView;import androidx.activity.EdgeToEdge;import androidx.appcompat.app.AppCompatActivity;import androidx.core.graphics.Insets;import androidx.core.view.ViewCompat;import androidx.core.view.WindowInsetsCompat;import cn.shuzilearn.chapter1.pojo.zimu;
import java.util.ArrayList;import java.util.HashMap;import java.util.List;import java.util.Map;
public class baseadapter extends AppCompatActivity {
protected void onCreate(Bundle savedInstanceState) { super.onCreate(savedInstanceState); setContentView(R.layout.activity_spinner);
// 图片资源 int[] imgs = { R.drawable.a, R.drawable.b, R.drawable.c, R.drawable.d, R.drawable.e, R.drawable.f }; // 文字资源 String[] titles = {"A", "B", "C", "D", "E", "F"};
// 主体内容资源 String[] items = {"this is A", "this is B", "this is C", "this is D", "this is E", "this is F"};
// 生成数据集合 List<zimu> datas = new ArrayList<>(); for (int i = 0; i < items.length; i++) { datas.add(new zimu(imgs[i],titles[i],items[i])); }
Spinner spinner = findViewById(R.id.Sp_xiala); baseAdapter adapter = new baseAdapter(this,datas); spinner.setAdapter(adapter);
} // 实现BaseAdapter class baseAdapter extends BaseAdapter { private Context context; private List<zimu> list;
public baseAdapter(Context context, List<zimu> list) { this.context = context; this.list = list; }
public int getCount() { return list.size(); }
public Object getItem(int position) { return null; }
public long getItemId(int position) { return 0; }
public View getView(int position, View convertView, ViewGroup parent) { zimu zimu = (zimu) list.get(position); if (convertView == null) { convertView= View.inflate(context,R.layout.item_simple,null); } ImageView img = convertView.findViewById(R.id.showimg); TextView title = convertView.findViewById(R.id.title); TextView text = convertView.findViewById(R.id.texts); img.setImageResource(zimu.img); title.setText(zimu.names); text.setText(zimu.texts); return convertView; } }}条目布局
xxxxxxxxxx <LinearLayout xmlns:android="http://schemas.android.com/apk/res/android" xmlns:tools="http://schemas.android.com/tools" android:layout_width="match_parent" android:layout_height="wrap_content" android:orientation="horizontal"> <ImageView android:id="@+id/showimg" android:layout_width="120dp" android:layout_height="90dp" /> <LinearLayout android:layout_width="0dp" android:layout_weight="1" android:layout_height="match_parent" android:orientation="vertical"> <TextView android:id="@+id/title" android:layout_width="match_parent" android:layout_height="0dp" android:layout_weight="1" /> <TextView android:id="@+id/texts" android:layout_width="match_parent" android:layout_height="0dp" android:layout_weight="3" /> </LinearLayout>
</LinearLayout>convertView复用: 当列表的item从上方滚动出屏幕以外时,会将convertView传入getView,可以重新进行复用,可以节约性能
xxxxxxxxxx// 判断为空,生成新的view,当在复用时,就不会再次生成新的itemif (convertView == null) { convertView= View.inflate(context,R.layout.item_simple,null); }
列表视图ListView
在Android开发中,ListView是一个比较常用的控件。它以列表的形式 展示具体数据内容,并且能够根据数据的长度自适应屏幕显示。
ListView标签常用的属性
| 属性名称 | 属性功能 |
|---|---|
| android:cacheColorHint | 设置拖动的背景色 |
| android:divider | 设置分割线 |
| android:dividerHeight | 设置分割线的高度 |
| android:listSelector | 设置ListView item选中时的颜色 |
| android:scrollbars | 设置Listview的滚动条 |
| android:fadeScrollbars | 设置为true就可以实现滚动条的自动隐藏和显示 |
示例代码:
xxxxxxxxxx <ListView android:id="@+id/list" android:layout_width="match_parent" android:layout_height="wrap_content"/>xxxxxxxxxximport android.content.Context;import android.os.Bundle;
import android.view.View;import android.view.ViewGroup;import android.widget.*;import androidx.appcompat.app.AppCompatActivity;
import java.util.ArrayList;import java.util.List;
public class ListViewActivity extends AppCompatActivity implements AdapterView.OnItemClickListener {
private List<String> listData;
protected void onCreate(Bundle savedInstanceState) { super.onCreate(savedInstanceState); getSupportActionBar().hide(); setContentView(R.layout.activity_list_view);
// 获取控件Listview ListView list = findViewById(R.id.list); // 准备数据集 listData = new ArrayList<>(); // 初始化数据集 for (int i = 0; i < 10; i++) { listData.add("item,data:" + i); } ListAdapter adapter = new ListAdapter(this,listData);
list.setAdapter(adapter); list.setOnItemClickListener(this);
}
public void onItemClick(AdapterView<?> parent, View view, int position, long id) { Toast.makeText(this, "你选择的是:"+ listData.get(position), Toast.LENGTH_SHORT).show(); }
class ListAdapter extends BaseAdapter { private Context context; private List<String> list;
public ListAdapter(Context context, List<String> list) { this.context = context; this.list = list; }
public int getCount() { return list.size(); }
public Object getItem(int position) { return null; }
public long getItemId(int position) { return 0; }
public View getView(int position, View convertView, ViewGroup parent) { if (convertView == null) { convertView = View.inflate(context,R.layout.item_simple,null); } TextView textView = convertView.findViewById(R.id.title); textView.setText(list.get(position)); return convertView; } }}
列表项的点击问题
通常只要调用setOnItemClickListener方法设置点击监听器,点击列表项即可触发列表项的点击事件,但是如果列表项中存在编辑框或者按钮(如:Button,ImageButtom,Checkbox等),点击列表项时就无法出发点击事件了。因为这类控件会抢占焦点。
为了避免焦点抢占问题,列表视图允许开发者自行设置内部视图的焦点抢占方式,该方式在XML文件中使用descendantFocusability属性设置,在代码中使用setDescendantFocusability方法设置。
列表视图焦点抢占方式如下
| 说明 | 焦点抢占类型 | xml属性 |
|---|---|---|
| 在子控件之前处理 | ViewGroup.FOCUS_BEFORE_DESCENDANTS | beforeDescendants |
| 在子控件之后处理 | ViewGroup.FOCUS_AFTER_DESCENDANTS | afterDescendants |
| 不让子控件处理 | ViewGroup.FOCUS_BLOCK_DESCENDANTS | blocksDescendants |
注意!:焦点抢占方式不是由ListView设置的,而是由列表项的根布局设置。
网格视图GridView
网格视图用于分行分裂显示网格信息。
常用的属性
android:columnWidth: 设置网格的列宽
android:gravity: 网格内各个 item 的对齐方式
android:horizontalSpacing: 网格的各个 item 在水平方向上的间距
android:verticalSpacing: 网格的各个 item 在垂直方向上的间距
android:numColumns: 设置列数,可以直接设置距离也可以设置成“auto_fit”让系统自适应
android:stretchMode:
设置网格拉伸模式,可选值如下:
none: 不拉伸
spacingWidth: 将多余空间分摊给网格的间隔空隙
columnWidth: 将多余空间分摊给网格的各个列
spacingWidthUniform: 将多余空间分摊给网格的各个列及其间隔空隙
示例代码
xxxxxxxxxx<!-- item --> <LinearLayout xmlns:android="http://schemas.android.com/apk/res/android" android:orientation="vertical" android:layout_width="wrap_content" android:layout_height="wrap_content"> <ImageView android:layout_width="100dp" android:layout_height="100dp" android:id="@+id/imgs"/> <TextView android:layout_width="100dp" android:layout_height="wrap_content" android:textSize="20sp" android:gravity="center" android:id="@+id/text"/>
</LinearLayout> xxxxxxxxxx<LinearLayout xmlns:android="http://schemas.android.com/apk/res/android" xmlns:tools="http://schemas.android.com/tools" android:orientation="vertical" android:id="@+id/main" android:layout_width="match_parent" android:layout_height="match_parent" tools:context=".GridViewActivity"> <GridView android:layout_width="match_parent" android:layout_height="wrap_content" android:id="@+id/GVplanet" android:numColumns="2"/> <!-- numColumns 列数 --></LinearLayout>xxxxxxxxxxpackage cn.shuzilearn.chapter1;
import android.content.Context;import android.os.Bundle;
import android.view.View;import android.view.ViewGroup;import android.widget.BaseAdapter;import android.widget.GridView;import android.widget.ImageView;import android.widget.TextView;import androidx.activity.EdgeToEdge;import androidx.appcompat.app.AppCompatActivity;import androidx.core.graphics.Insets;import androidx.core.view.ViewCompat;import androidx.core.view.WindowInsetsCompat;
import java.util.ArrayList;import java.util.HashMap;import java.util.List;import java.util.Map;
public class GridViewActivity extends AppCompatActivity {
protected void onCreate(Bundle savedInstanceState) { super.onCreate(savedInstanceState); getSupportActionBar().hide(); setContentView(R.layout.activity_grid_view);
// 图片资源 int[] imgs1 = { R.drawable.a,R.drawable.b, R.drawable.c,R.drawable.d, R.drawable.e,R.drawable.f }; // 文字资源 String[] titles = {"A", "B", "C", "D", "E", "F"}; List<Map<String, Object>> list = new ArrayList<Map<String, Object>>(); for (int i = 0; i < imgs1.length; i++) { Map<String, Object> map = new HashMap<String, Object>(); map.put("img", imgs1[i]); map.put("title", titles[i]); list.add(map); }
GridView gridView = findViewById(R.id.GVplanet); GridViewAdapter gridViewAdapter = new GridViewAdapter(this, list); gridView.setAdapter(gridViewAdapter);
}
class GridViewAdapter extends BaseAdapter { private Context mContext; private List<Map<String, Object>> mList;
public GridViewAdapter(Context mContext, List<Map<String, Object>> mList) { this.mContext = mContext; this.mList = mList; }
public int getCount() { return mList.size(); }
public Object getItem(int position) { return null; }
public long getItemId(int position) { return 0; }
public View getView(int position, View convertView, ViewGroup parent) { if (convertView == null) { convertView = View.inflate(mContext, R.layout.item_gridview, null); }
Map<String, Object> map = mList.get(position); ImageView img = convertView.findViewById(R.id.imgs); TextView tx = convertView.findViewById(R.id.text);
// Check if the image resource is valid Integer imageRes = (Integer) map.get("img"); if (imageRes != null) { img.setImageResource(imageRes); // Set the image if it's not null } else { // Handle the case where image resource is null (optional) img.setImageResource(R.drawable.a); // Example default image }
// Check if the title is valid String title = (String) map.get("title"); if (title != null) { tx.setText(title); // Set the title if it's not null } else { tx.setText("No Title"); // Default text if title is null }
return convertView; } }}
翻页类视图
使用下面两个控件,可以制作应用引导页。
翻页视图ViewPage
翻页视图允许页面在水平方向上左右滚动。可以做轮播图效果。
xxxxxxxxxx <LinearLayout xmlns:android="http://schemas.android.com/apk/res/android" xmlns:tools="http://schemas.android.com/tools" xmlns:app="http://schemas.android.com/apk/res-auto" android:id="@+id/main" android:orientation="vertical" android:layout_width="match_parent" android:layout_height="match_parent" tools:context=".ViewPageActivity"> <androidx.viewpager.widget.ViewPager android:layout_width="match_parent" android:layout_height="300dp" android:id="@+id/viewpager"/></LinearLayout>xxxxxxxxxximport android.content.Context;import android.os.Bundle;
import android.view.View;import android.view.ViewGroup;import android.widget.ImageView;import androidx.activity.EdgeToEdge;import androidx.annotation.NonNull;import androidx.appcompat.app.AppCompatActivity;import androidx.core.graphics.Insets;import androidx.core.view.ViewCompat;import androidx.core.view.WindowInsetsCompat;import androidx.viewpager.widget.PagerAdapter;import androidx.viewpager.widget.ViewPager;import org.jetbrains.annotations.NotNull;
public class ViewPageActivity extends AppCompatActivity {
protected void onCreate(Bundle savedInstanceState) { super.onCreate(savedInstanceState); getSupportActionBar().hide(); setContentView(R.layout.activity_view_page); ViewPager viewPager = findViewById(R.id.viewpager); int[] imgs = { R.drawable.a, R.drawable.b, R.drawable.c, R.drawable.d, R.drawable.e, R.drawable.f }; imgadapter adapter = new imgadapter(this, imgs); viewPager.setAdapter(adapter);
} class imgadapter extends PagerAdapter { private Context mContext; private int[] imgs;
public imgadapter(Context mContext, int[] imgs) { this.mContext = mContext; this.imgs = imgs; }
public int getCount() { return imgs.length; }
public boolean isViewFromObject( View view, Object o) { return view==o; }
public Object instantiateItem( ViewGroup container, int position) { ImageView imageView = new ImageView(mContext); imageView.setLayoutParams(new ViewGroup.LayoutParams( ViewGroup.LayoutParams.MATCH_PARENT, ViewGroup.LayoutParams.MATCH_PARENT)); imageView.setScaleType(ImageView.ScaleType.CENTER_CROP); // 或者根据需求设置其他的缩放类型 imageView.setImageResource(imgs[position]); container.addView(imageView); return imageView; }
public void destroyItem( ViewGroup container, int position, Object object) { container.removeView((View) object); } }}
翻页标签栏PagerTabStrip
翻页标签栏能在翻页视图的上方显示页面标题,点击标题即可切换到对应页面。
<LinearLayout xmlns:android="http://schemas.android.com/apk/res/android" xmlns:tools="http://schemas.android.com/tools" android:orientation="vertical" xmlns:app="http://schemas.android.com/apk/res-auto" android:id="@+id/main" android:layout_width="match_parent" android:layout_height="match_parent" tools:context=".PagerTabActivity"> <androidx.viewpager.widget.ViewPager android:id="@+id/vpager" android:layout_width="match_parent" android:layout_height="wrap_content"> <androidx.viewpager.widget.PagerTabStrip android:id="@+id/pagertab" android:layout_width="wrap_content" android:layout_height="wrap_content" /> </androidx.viewpager.widget.ViewPager></LinearLayout>x
import android.content.Context;import android.graphics.Color;import android.os.Bundle;import android.util.TypedValue;import android.view.View;import android.view.ViewGroup;import android.widget.ImageView;import androidx.activity.EdgeToEdge;import androidx.annotation.NonNull;import androidx.annotation.Nullable;import androidx.appcompat.app.AppCompatActivity;import androidx.viewpager.widget.PagerAdapter;import androidx.viewpager.widget.PagerTabStrip;import androidx.viewpager.widget.ViewPager;import org.jetbrains.annotations.NotNull;import java.util.ArrayList;import java.util.HashMap;import java.util.List;import java.util.Map;
public class PagerTabActivity extends AppCompatActivity {
protected void onCreate(Bundle savedInstanceState) { super.onCreate(savedInstanceState); getSupportActionBar().hide(); setContentView(R.layout.activity_pager_tab); initviewPager(); initviewtab(); }
// 初始化标签栏 private void initviewtab() { PagerTabStrip pts = findViewById(R.id.pagertab); // 设置字号 pts.setTextSize(TypedValue.COMPLEX_UNIT_SP, 20); // 字体颜色 pts.setTextColor(Color.RED);
}
// 初始化viewpager翻页视图 private void initviewPager() { ViewPager viewPager = findViewById(R.id.vpager); int[] imgs = { R.drawable.a, R.drawable.b, R.drawable.c, R.drawable.d, R.drawable.e, R.drawable.f }; // 文字资源 String[] titles = {"A", "B", "C", "D", "E", "F"}; List<Map<String, Object>> list = new ArrayList<Map<String, Object>>(); for (int i = 0; i < imgs.length; i++) { Map<String, Object> map = new HashMap<String, Object>(); map.put("img", imgs[i]); map.put("title", titles[i]); list.add(map); } imgadapter adapter = new imgadapter(this, list); viewPager.setAdapter(adapter); }
class imgadapter extends PagerAdapter { private Context mContext; private List<Map<String, Object>> list;
public imgadapter(Context mContext, List<Map<String, Object>> list) { this.mContext = mContext; this.list = list; }
public int getCount() { return list.size(); }
public boolean isViewFromObject( View view, Object o) { return view==o; }
public Object instantiateItem( ViewGroup container, int position) { ImageView imageView = new ImageView(mContext); imageView.setLayoutParams(new ViewGroup.LayoutParams( ViewGroup.LayoutParams.MATCH_PARENT, ViewGroup.LayoutParams.MATCH_PARENT)); imageView.setScaleType(ImageView.ScaleType.CENTER_CROP); // 或者根据需求设置其他的缩放类型 imageView.setImageResource((Integer) list.get(position).get("img")); container.addView(imageView); return imageView; }
public void destroyItem( ViewGroup container, int position, Object object) { container.removeView((View) object); }
// 重写这个方法获取获取标签栏数据
.jetbrains.annotations.Nullable public CharSequence getPageTitle(int position) { return list.get(position).get("title").toString(); } }}
碎片Fragment
传统的Activity并不能很好的处理大屏啥问题,需要使用碎片化的工具能够划分区域展示内容,且有自己独立的操作控件,于是就出现了Fragment
Fragmentz注册方式分为静态注册(在布局文件中直接指定Fragment)和动态注册(在JAVA代码中动态添加Fragment)
Fragment生命周期
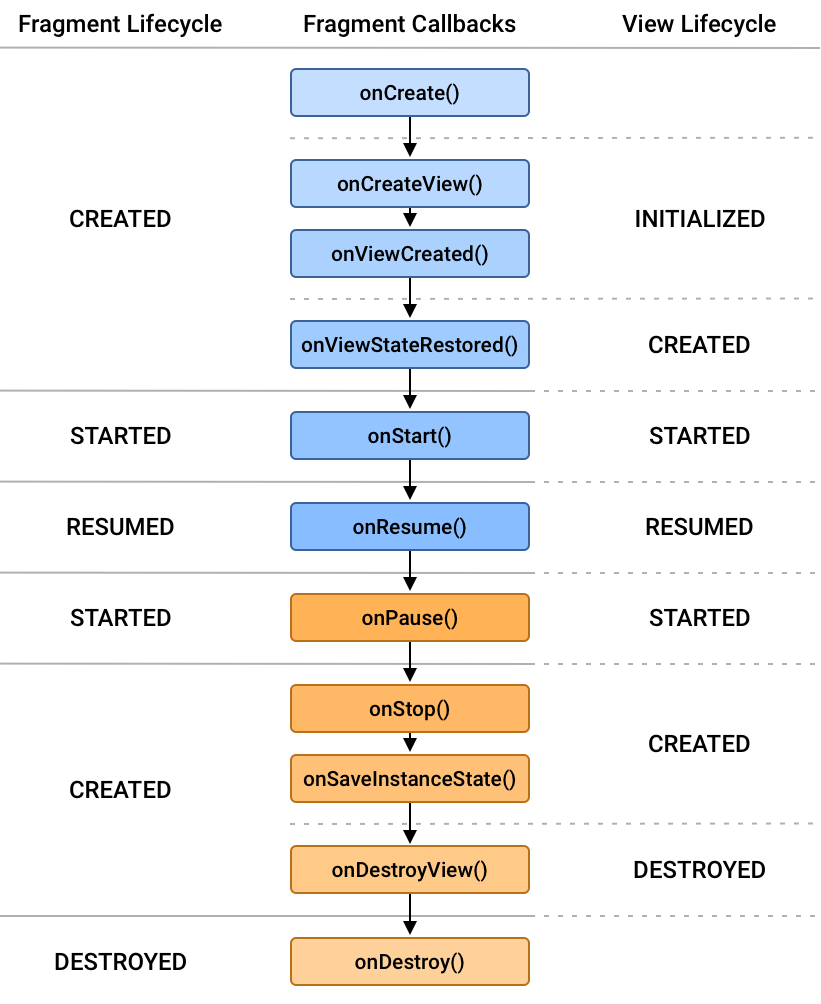
碎片的静态注册
Activity页面
xxxxxxxxxx<?xml version="1.0" encoding="utf-8"?><LinearLayoutxmlns:android="http://schemas.android.com/apk/res/android"xmlns:tools="http://schemas.android.com/tools"xmlns:app="http://schemas.android.com/apk/res-auto"android:id="@+id/main"android:orientation="vertical"android:layout_width="match_parent"android:layout_height="match_parent"tools:context=".FragmentActivity"><fragment android:layout_width="match_parent"android:layout_height="60dp"android:name="cn.shuzilearn.xuexipro1.fragment.BlankFragment"android:id="@+id/sta_fragment"/><TextView android:layout_width="match_parent"android:layout_height="wrap_content"android:minHeight="48dp"android:id="@+id/showText"android:text="这里显示文本内容"android:textSize="22sp"/></LinearLayout>
新建Fragment,会自动生成一个Fragment.java和Fragment.xml文件,将想要的Fragment布局写入到布局文件
xxxxxxxxxx<?xml version="1.0" encoding="utf-8"?><LinearLayout xmlns:android="http://schemas.android.com/apk/res/android"             xmlns:tools="http://schemas.android.com/tools"             android:layout_width="match_parent"              android:orientation="horizontal"             android:layout_height="wrap_content"              tools:context=".fragment.BlankFragment">
    <!-- TODO: Update blank fragment layout -->    <ImageView android:layout_width="30dp"               android:layout_height="30dp"               android:src="@drawable/flower"
    />    <TextView            android:layout_width="0dp"            android:layout_weight="1"            android:layout_height="match_parent"            android:textSize="20sp"            android:text="第一个页面"/>

</LinearLayout>xxxxxxxxxxpackage cn.shuzilearn.xuexipro1.fragment;
import android.os.Bundle;import androidx.fragment.app.Fragment;import android.view.LayoutInflater;import android.view.View;import android.view.ViewGroup;import cn.shuzilearn.xuexipro1.R;
public class BlankFragment extends Fragment {
public View onCreateView(LayoutInflater inflater, ViewGroup container, Bundle savedInstanceState) { // Inflate the layout for this fragment return inflater.inflate(R.layout.fragment_blank, container, false); }}
碎片的动态注册
示例:两个FrameLayout切换
创建一个Activity,再布局文件中设置FrameLayout
xxxxxxxxxx <LinearLayout xmlns:android="http://schemas.android.com/apk/res/android" xmlns:tools="http://schemas.android.com/tools" xmlns:app="http://schemas.android.com/apk/res-auto" android:id="@+id/main" android:orientation="vertical" android:layout_width="match_parent" android:layout_height="wrap_content" tools:context=".FragmentActivity_dongtai">
<Button android:layout_width="match_parent" android:layout_height="wrap_content" android:textSize="20sp" android:text="切换至第二个fragment" android:id="@+id/change2"/> <Button android:layout_width="match_parent" android:layout_height="wrap_content" android:textSize="20sp" android:text="切换至第一个fragment" android:id="@+id/change1"/> <FrameLayout android:layout_width="match_parent" android:layout_height="match_parent" android:id="@+id/fram1"/></LinearLayout>创建两个fragment
再Activity中进行切换fragment
xxxxxxxxxxpackage cn.shuzilearn.xuexipro1;
import android.os.Bundle;
import android.view.View;import androidx.activity.EdgeToEdge;import androidx.appcompat.app.AppCompatActivity;import androidx.core.graphics.Insets;import androidx.core.view.ViewCompat;import androidx.core.view.WindowInsetsCompat;import androidx.fragment.app.Fragment;import androidx.fragment.app.FragmentManager;import androidx.fragment.app.FragmentTransaction;import cn.shuzilearn.xuexipro1.fragment.dongtaiFragment;import cn.shuzilearn.xuexipro1.fragment.dongtaiFragment2;
public class FragmentActivity_dongtai extends AppCompatActivity implements View.OnClickListener {
protected void onCreate(Bundle savedInstanceState) { super.onCreate(savedInstanceState);
setContentView(R.layout.activity_fragment_dongtai);
findViewById(R.id.change1).setOnClickListener(this); findViewById(R.id.change2).setOnClickListener(this); }
public void onClick(View v) { if(v.getId()==R.id.change1){ replacefm(new dongtaiFragment2());
} else if (v.getId()== R.id.change2) { replacefm(new dongtaiFragment());
} }
// 动态切换Fragment private void replacefm(Fragment fragment) { FragmentManager fragmentManager = getSupportFragmentManager(); FragmentTransaction transaction = fragmentManager.beginTransaction(); transaction.replace(R.id.fram1,fragment); transaction.commit(); }}
广播
广播是一种数据传输方式。
在Android中,发送一条广播,可以被不同的广播接收者所接收。广播接收者收到广播后,再进行逻辑处理。
收发标准广播
广播收发的过程分为以下三步:
发送标准广播
定义广播接收器
开关广播接收器
四大组件
1.1 Activity组件,它一个单独的窗口,程序流程都必须在Activity中运行。
1.2 service组件,用于在后台完成用户指定的操作。
1.3 content provider组件,会为所有的应用准备一个内容窗口,并且保留数据库、文件。
1.4 broadcast receiver组件,是程序之间传递信息时的一种机制,作用就是接收或者发送通知。
broadcast receiver简介
2.1 broadcast receiver做为四大组件之一,负责组件之间消息的传递和接收。
2.2 采用观察者模式,基于消息的发布/订阅事件模型,通过Binder机制进行消息的注册和接收。
2.3 广播中的角色:
消息订阅者(广播接收者)
消息发布者(广播发布者)
消息中心(AMS,即Activity Manager Service)
2.4 广播的工作流程:
广播接收者通过 Binder机制在AMS注册
广播发送者通过 Binder 机制向AMS发送广播
AMS根据广播发送者要求,在已注册列表中,寻找合适的广播接收者(寻找依据:IntentFilter / Permission)
AMS将广播发送到合适的广播接收者相应的消息循环队列中;
广播接收者通过消息循环拿到此广播,并回调 onReceive()
所有的广播接收者都要继承BroadcastReceiver
xxxxxxxxxxpublic class broadcastreceiver extends BroadcastReceiver { // 一旦接收到标准广播,马上触发接收器的onReceive public void onReceive(Context context, Intent intent) { }}
广播的注册
3.1 注册类型有两种:静态注册和动态注册
3.2 静态注册,即在清单文件中注册
第一步:创建一个广播接收器BroadcastReceiver ,广播也是通过Intent来传递数据。
x
public class MyReceiver extends BroadcastReceiver {
private static final String TAG = "MyReceiver";
public void onReceive(Context context, Intent intent) { String msg=intent.getStringExtra("msg"); Log.e(TAG, "onReceive: "+msg); }}第二步,清单文件注册该广播
x
<application android:allowBackup="true" android:icon="@mipmap/ic_launcher" android:label="@string/app_name" android:supportsRtl="true" android:theme="@style/Theme.MyApplication"> <receiver android:name=".receiver.MyReceiver" android:exported="true"/></application>第三步:在其它组件里面发送广播,比如Activity里面
xxxxxxxxxxprivate void buttonClick(){ Intent intent = new Intent(this, MyReceiver.class); sendBroadcast(intent);}3.3 注意:
android 8.0以后版本对静态注册的广播做了限制,自定义的接收器会接收不到发送方发送的广播。发送方需要在intent中设定接收方的package,接收方才会接收到。如下:
xxxxxxxxxxIntent intent = new Intent();intent.setAction("cn.dinghe.test");intent.setClass(this,Class.forName("cn.dinghe.test.MyReceiver"));sendBroadcast(intent);3.4 动态注册:即通过 registerReceiver 注册
第一步:一样先创建广播接收器
xxxxxxxxxxpublic class MyReceiver extends BroadcastReceiver { private static final String TAG = "MyReceiver"; public void onReceive(Context context, Intent intent) { String msg=intent.getStringExtra("msg"); Log.e(TAG, "onReceive: "+msg); }}第二步:在组件如Activity里面动态注册广播
xxxxxxxxxxpublic class MainActivity extends AppCompatActivity {
MyReceiver myReceiver;
protected void onCreate(Bundle savedInstanceState) { super.onCreate(savedInstanceState); setContentView(R.layout.activity_main);
//动态注册广播 myReceiver=new MyReceiver(); IntentFilter intentFilter=new IntentFilter(); intentFilter.addAction("com.dinghe.test.myAction"); registerReceiver(myReceiver,intentFilter); }}第三步:在任意组件里面发送广播
xxxxxxxxxxprivate void buttonClick(){ Intent intent=new Intent(); intent.setAction("com.dinghe.test"); intent.putExtra("mag","你好啊"); sendBroadcast(intent);}第四步:取消注册,不然容易造成内存泄漏
xxxxxxxxxxprotected void onDestroy() { super.onDestroy(); if (myReceiver!=null){ unregisterReceiver(myReceiver); }}
有序广播
5.1 有序广播介绍:
有序广播是一种同步执行的广播,广播发出之后,优先级高的广播接收器就可以先接收到广播消息。
执行完该广播接收器的逻辑后,可以选择截断正在传递的广播或者继续传递,如果广播消息被截断,之后的广播接收器则无法收到广播消息。
有序广播中的“有序”是针对广播接收者而言的。有序广播的定义过程与普通广播无异,只是其发送方式变为:sendOrderedBroadcast()。
有序广播的接收者们将按照事先命的优先级依次接收,数越大优先级越高(取值范围:-1000~10000)
优先级可以声明在
也可以调用IntentFilter对象的 setPriority() 设置
调用abortBroadcast()方法即可终止,一旦终止后面接收者就无法接受广播
5.2 实战:
第一步,创建有序广播接收器
x
public class MyOrderBroadcastReceiver extends BroadcastReceiver { private static final String TAG = "MyOrderBroadcastReceive";
public void onReceive(Context context, Intent intent) { String action=intent.getAction(); String msg=intent.getStringExtra("msg");
switch (action){ case "BROADCAST_ACTION1": break; case "BROADCAST_ACTION2": break; } }}第二步:清单文件里面注册有序广播 ,并设置优先级
xxxxxxxxxx<receiver     android:name=".MyOrderBroadcastReceiver" >
    <!-- priority优先级:数字越高优先级越高 -->    <intent-filter android:priority="2">        <action android:name="BROADCAST_ACTION2" />    </intent-filter>
    <intent-filter android:priority="1">        <action android:name="BROADCAST_ACTION1" />    </intent-filter>
</receiver>
或者动态注册并设置广播优先级
xxxxxxxxxxIntentFilter intentFilter = new IntentFilter();intentFilter.addAction("BROADCAST_ACTION2");intentFilter.setPriority(2);registerReceiver(mBroadcastReceiver, intentFilter);第三步:发送广播
xxxxxxxxxxIntent intent = new Intent();
intent.setAction("BROADCAST_ACTION2");intent.putExtra("msg","你好啊");sendOrderedBroadcast(intent, null);
第四步:拦截有序广播,在接收器里面拦截abortBroadcast();
x
public class MyOrderBroadcastReceiver extends BroadcastReceiver { private static final String TAG = "MyOrderBroadcastReceive"; public void onReceive(Context context, Intent intent) { String action=intent.getAction(); String msg=intent.getStringExtra("msg");
switch (action){ case "BROADCAST_ACTION1": break; case "BROADCAST_ACTION2": //优先级高,先收到消息,可以拦截断开有序广播,不再执行下一广播 abortBroadcast(); break; } }}
应用内广播
6.1 Android中的广播可以跨进程甚至跨App直接通信,且注册是exported对于有intent-filter的情况下默认值是true,由此将可能出现安全隐患如下:
其他App可能会针对性的发出与当前App intent-filter相匹配的广播,由此导致当前App不断接收到广播并处理;
其他App可以注册与当前App一致的intent-filter用于接收广播,获取广播具体信息。
6.2 解决款进程上面隐患方案如下:
对于同一App内部发送和接收广播,将exported属性人为设置成false,使得非本App内部发出的此广播不被接收;
在广播发送和接收时,都增加上相应的permission,用于权限验证;
发送广播时,指定特定广播接收器所在的包名,具体是通过intent.setPackage(packageName)指定在,这样此广播将只会发送到此包中的App内与之相匹配的有效广播接收器中。
6.3 LocalBroadcastManage处理App内广播
Android v4兼容包中给出了封装好的LocalBroadcastManager类,用于统一处理App应用内的广播问题,使用方式上与通常的全局广播几乎相同,只是注册/取消注册广播接收器和发送广播时将主调context变成了LocalBroadcastManager的单一实例。使用方式如下:
xxxxxxxxxx//registerReceiver(mBroadcastReceiver, intentFilter);//注册应用内广播接收器LocalBroadcastManager localBroadcastManager = LocalBroadcastManager.getInstance(this);localBroadcastManager.registerReceiver(mBroadcastReceiver, intentFilter);//unregisterReceiver(mBroadcastReceiver);//取消注册应用内广播接收器localBroadcastManager.unregisterReceiver(mBroadcastReceiver);
Intent intent = new Intent();intent.setAction(BROADCAST_ACTION);
//sendBroadcast(intent);//发送应用内广播localBroadcastManager.sendBroadcast(intent);
常用系统广播
7.1 Android中内置了多个系统广播:只要涉及到手机的基本操作(如开机、网络状态变化、拍照等等),都会发出相应的广播。
7.2 当使用系统广播时,只需要在注册广播接收者时定义相关的action即可,并不需要手动发送广播,当系统有相关操作时会自动进行系统广播
7.3 每个广播都有特定的Intent - Filter(包括具体的action),Android系统广播action如下:
监听网络变化 android.net.conn.CONNECTIVITY_CHANGE
关闭或打开飞行模式 Intent.ACTION_AIRPLANE_MODE_CHANGED
充电时或电量发生变化 Intent.ACTION_BATTERY_CHANGED
电池电量低 Intent.ACTION_BATTERY_LOW
电池电量 Intent.ACTION_BATTERY_OKAY
系统启动完成后(仅广播一次) Intent.ACTION_BOOT_COMPLETED
按下照相时的拍照按键(硬件按键)时 Intent.ACTION_CAMERA_BUTTON
屏幕锁屏 Intent.ACTION_CLOSE_SYSTEM_DIALOGS
设备当前设置被改变时(界面语言、设备方向等) Intent.ACTION_CONFIGURATION_CHANGED
插入耳机时 Intent.ACTION_HEADSET_PLUG
未正确移除SD卡但已取出来时(正确移除方法:设置--SD卡和设备内存--卸载SD卡) Intent.ACTION_MEDIA_BAD_REMOVAL
插入外部储存装置(如SD卡) Intent.ACTION_MEDIA_CHECKING
成功安装APK Intent.ACTION_PACKAGE_ADDED
成功删除APK Intent.ACTION_PACKAGE_REMOVED
重启设备 Intent.ACTION_REBOOT
屏幕被关闭 Intent.ACTION_SCREEN_OFF
屏幕被打开 Intent.ACTION_SCREEN_ON
关闭系统时 Intent.ACTION_SHUTDOWN
重启设备 Intent.ACTION_REBOOT
7.4 示例,比如监听事件分钟变化
第一步:创建时间变化监听器
xxxxxxxxxx/** * 时间更新监听 */BroadcastReceiver mTimeUpdateReceiver = new BroadcastReceiver() { public void onReceive(Context context, Intent intent) { if (intent == null) { return; }
String action = intent.getAction(); if (action == null || action.isEmpty()) { return; }
if (action.equals(Intent.ACTION_TIME_TICK)) { //system every 1 min send broadcast Log.e(TAG, "onReceive: " + Config.FOOTPRINTTIME); } }};第二步:注册系统监听
x
/** * 注册时间监听 */
private void registerUpdateTimeReceiver() { //register time update IntentFilter filter = new IntentFilter(); filter.addAction(Intent.ACTION_TIME_TICK); registerReceiver(mTimeUpdateReceiver, filter);
}第三步:取消系统时间监听
x
/** * 注销时间监听 */
private void unRegisterUpdateTimeReceiver() { if (mTimeUpdateReceiver != null) { unregisterReceiver(mTimeUpdateReceiver); }}
广播的其它方式
8.1 广播的作用就是会主动监听并接收数据变化,但广播是系统组件,需要传上下文,使用不规范可能会造成内存泄漏。而且系统的更新可能会限制广播的某些功能使用,于是也出现了基于发布/订阅模式的其它框架,比如使用非常广泛的EventBus。
8.2 EventBus 优点:
调度灵活,不依赖于 Context,使用时无需像广播一样关注 Context 的注入与传递。
父类对于通知的监听和处理可以继承给子类,这对于简化代码至关重要。
通知的优先级,能够保证 Subscriber 关注最重要的通知。
粘滞事件 (sticky events) 能够保证通知不会因 Subscriber 的不在场而忽略
8.3 当然使用广播和EventBus都能达到监听消息的机制,可以根据自己情况选择。还有其它类似的发送/接收机制的框架,比如配合网络请求使用的RxJava,LiveData等。
笔记到此结束!完成!2025/1/1
总词数:约25378词