Vue2+Vue3教程——By Bug
前言
本笔记为站长学习过程中做的笔记内容,可能有遗漏或错误等,本笔记仅供参考,一切以官方文档为准,谢谢!
笔记参考资料:
前端最新Vue2+Vue3基础入门到实战项目全套教程_(哔哩哔哩)
前端新版Vue2+Vue3基础入门到实战项目全套教程 (itheima.com)
Vue.js - 渐进式 JavaScript 框架 | Vue.js (vuejs.org)
Vue入门
什么是Vue
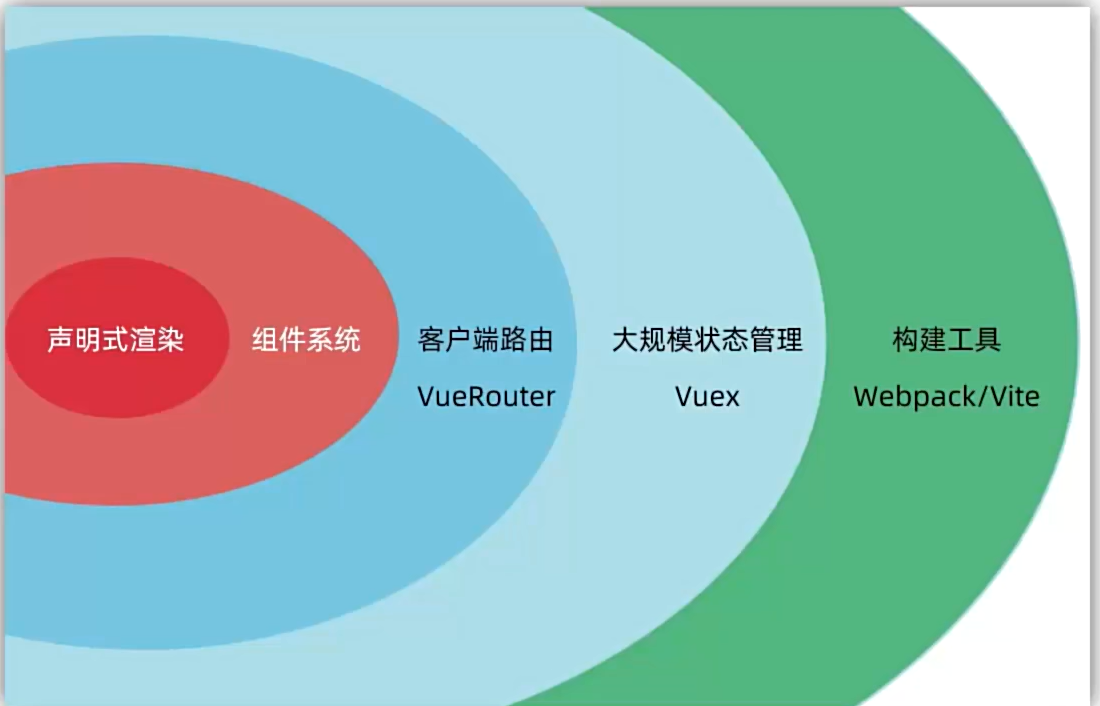
Vue是一个构建用户界面的渐进式 框架 构建用户界面:基于数据渲染出用户所看到的界面
优点:大大提升开发效率
缺点:需要记忆一些规则
Vue的两种使用方式:
Vue核心包开发 场景:局部模块改造
Vue核心包&Vue插件工程化开发 场景:整站开发
创建Vue实例
安装
xxxxxxxxxx<script src="https://cdn.jsdelivr.net/npm/vue@2.7.16/dist/vue.js"></script>
四个核心步骤:
准备容器
引包(开发版本/生产版本)
创建Vue实例(new Vue())
指定配置项→渲染数据
xxxxxxxxxx<!-- 准备容器 --><div id="tex">    {{msg}}</div><!-- 引包-开发版本-包含完整注释和错误警告 --><!-- 一旦引入软件包,全局环境中就包含了Vue构造函数 --><script src="https://cdn.jsdelivr.net/npm/vue@2.7.16/dist/vue.js"></script><script>    // 创建实例    const a = new Vue({        // 配置项        el: '#tex',//指定容器        data: {//提供数据            msg: "1222234aa1a"
        }
    })</script>
插值表达式
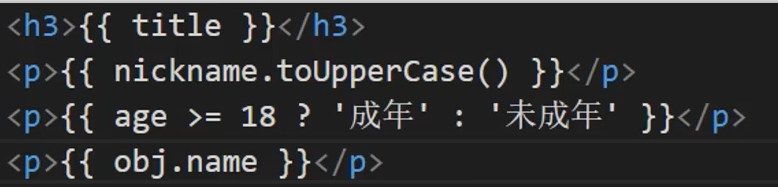
插值表达式是Vue的一种模板语法。
作用:利用表达式进行插值,将数据渲染到页面中。
语法:{{ 表达式 }}
xxxxxxxxxx<div id="tex"> {{msg}} </div>data: {//提供数据 msg: "1222234aa1a"}注意:
使用的数据必须存在
支持的是表达式,而不是语句:(if,for等不支持)
不能在标签属性中使用
响应式特征
数据响应式处理:数据变化时,视图自动更新
数据访问及修改方法:实例名.属性=值
例如:在下面的代码中,msg数据:abc先渲染到页面中,3秒之后变为123456并重新渲染到页面上
xxxxxxxxxx<div id="tex"> {{msg}}</div><!-- 引包-开发版本-包含完整注释和错误警告 --><!-- 一旦引入软件包,全局环境中就包含了Vue构造函数 --><script src="https://cdn.jsdelivr.net/npm/vue@2.7.16/dist/vue.js"></script><script> // 创建实例 const a = new Vue({ // 配置项 el: '#tex',//指定容器 data: {//提供数据 msg: "abc" } }) setTimeout(() => { a.msg = "123456" }, 3000);</script>
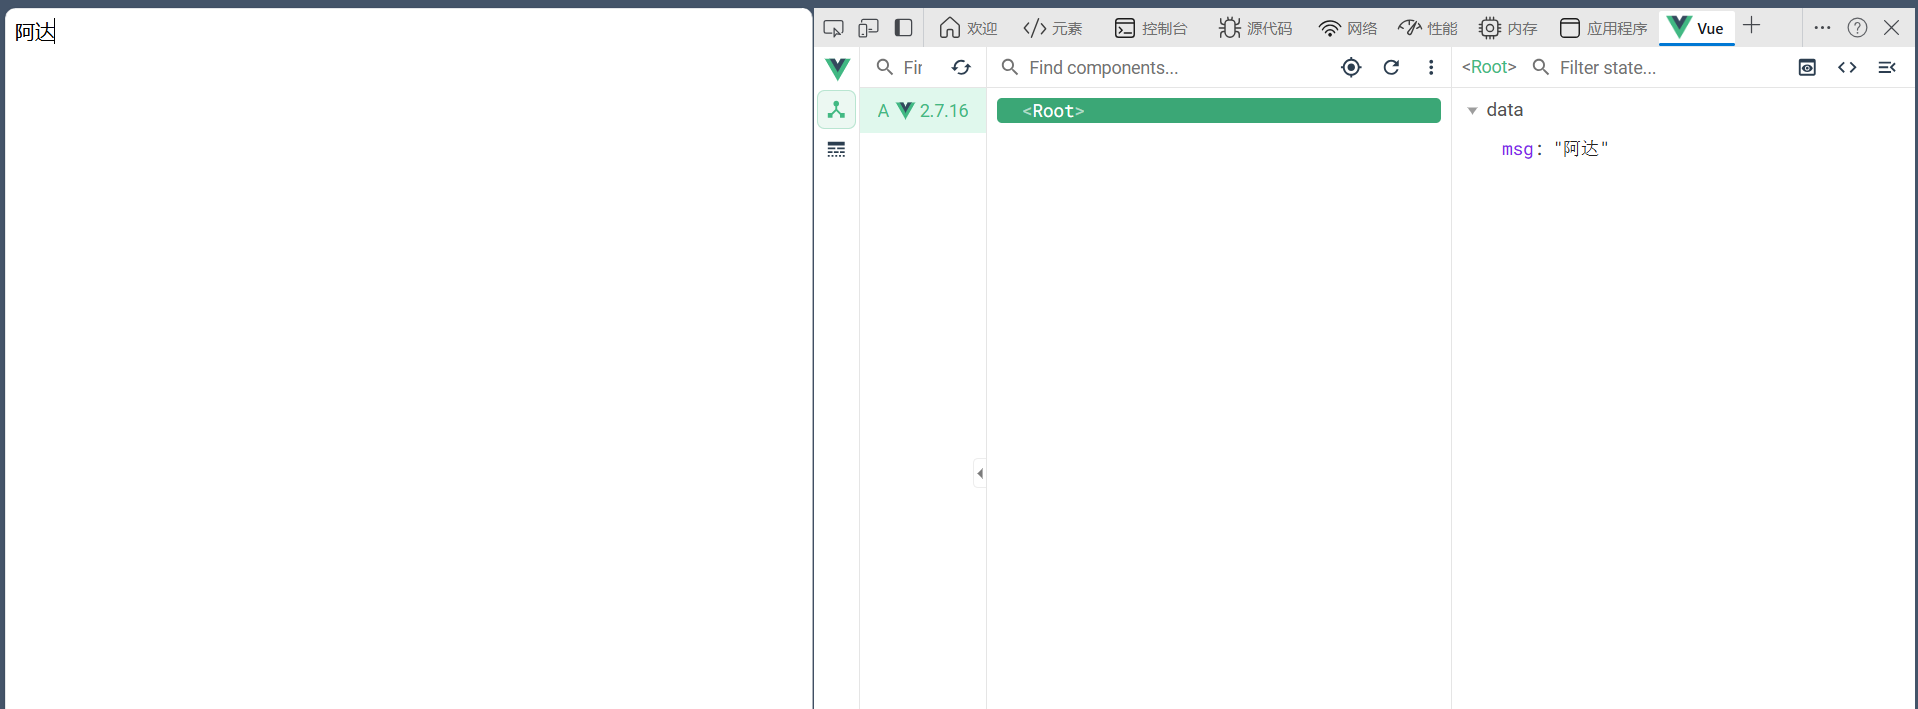
Vue开发者工具安装
浏览器Vue插件,使用插件可以方便快捷的修改数据

在权限设置中开启允许访问文件地址
将浏览器重启,插件生效。
Vue指令
Vue会根据不同的指令,针对标签实现不同的功能
指令:带有v-前缀的特殊标签属性
V-html
和innerhtml作用相同,可以把标签内容动态解析到标签中
插值表达式无法完成这个功能 当使用插值表达式插入标签时,会将标签以纯文本形式插入,而不会解析标签,如下所示
xxxxxxxxxx//使用插值表达式data: {//提供数据 msg: `<a href="http://baidu.com">111</a>`}
如果使用v-html属性插入,如下所示
xxxxxxxxxx<div id="tex" v-html="msg"></div><script src="https://cdn.jsdelivr.net/npm/vue@2.7.16/dist/vue.js"></script><script>    // 创建实例    const a = new Vue({        // 配置项        el: '#tex',//指定容器        data: {//提供数据            msg: `<a href="http://baidu.com">点击我,跳转到百度</a>`        }
    })
</script>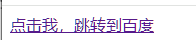
V-show&&V-if
这两个属性都是控制元素的显示和隐藏的。 其中V-if是条件渲染 当条件为true时显示,为false时隐藏元素
V-show
作用:控制元素的显示和隐藏 语法:v-show=”表达式“ 表达式值true显示,false隐藏 原理:相当于使用display:none来控制元素的显示和隐藏。 场景:适合频繁切换显示和隐藏的场景(例如:二级菜单等)
V-if
作用:控制元素的显示和隐藏 语法:v-if=”表达式“ 表达式值true显示,false隐藏 原理:根据条件控制元素的创建和移除来控制元素的显示和隐藏。 场景:要么显示,要么隐藏,不频繁切换的场景(例如:页面广告等)
v-else&&v-else-if
作用:辅助v-if进行判断渲染
xxxxxxxxxx<div id="tex">    <p v-if="gen===1">男</p>    <p v-else-if="gen===2">女</p>    <p v-if="sc>=80">优</p>    <p v-else-if="sc>=60">良</p>    <p v-else-if="sc<60">差</p></div><script src="https://cdn.jsdelivr.net/npm/vue@2.7.16/dist/vue.js"></script><script>    const a = new Vue({        el: '#tex',        data: {            gen: 2,            sc: 44        }    })
</script>
v-on
作用:注册事件=添加时间监听+提供处理逻辑 语法:
v-on:事件名=”内联语句“
v-on:事件名=”methods中的函数名“
为了方便 v-on: 可简写为@
内联语句
实例:控制数字加减
xxxxxxxxxx<div id="tex"> <button v-on:click="gen--">-</button> <span>{{gen}}</span> <button v-on:click="gen++">+</button></div><script src="https://cdn.jsdelivr.net/npm/vue@2.7.16/dist/vue.js"></script><script> const a = new Vue({ el: '#tex', data: { gen: 100 } })</script>
methods函数
xxxxxxxxxx<div id="a1"> <button @click="sho">显示/隐藏</button> <h1 v-show="s1">这是一段话</h1></div><script> const a = new Vue({ el: "#a1", data: { s1: true }, methods: { sho() { this.s1 = !this.s1 } } })</script>v-on调用传参
xxxxxxxxxx<button @click="sho(参数1,参数2,参数n...)">显示/隐藏</button>
案例:自动取款机
xxxxxxxxxx<div id="a1">    <h1>自动取款机</h1>    <button @click="sho(-100)">取100元</button>    <button @click="sho(-400)">取400元</button>    <button @click="sho(200)">存200元</button>    <h4>当前余额:{{money}}</h4>
</div><script>    const a = new Vue({        el: "#a1",        data: {            money: 1200        },        methods: {            sho(a) {                if (this.money + a < 0) {                    alert("余额不足")                }                else {                    this.money += a                }            }        }    })</script>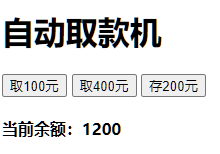
v-bind
作用:动态的设置html的标签属性(src,url,title等)
语法:v-bind:属性名=“表达式” v-bind可以省略 直接写 :属性名=“表达式”
例如:我们想要动态渲染img标签的图片地址,宽度等
xxxxxxxxxx<div id="a2"> <img src="" :src="imgsrc" :width="w" alt=""></div><script> const a2 = new Vue({ el: "#a2", data: { imgsrc: "img/2.png", w: 300 } })</script>案例:图片轮播效果
xxxxxxxxxx<div id="a2">    <img src="" :src="imgsrc" :width="w" :h="h" alt=""></div><script>    const a2 = new Vue({        el: "#a2",        data: {            imgsrc: "",            w: 300,            h: 300        }    })    let n = 1;
    const a3 = setInterval(() => {        if (n > 5) {            n = 1        }        else {
            a2.imgsrc = `./img/${n++}.png`            console.log(a2.imgsrc)        }    }, 1500);
v-bind操作class
语法::class="对象、数组"
对象→key就是类名,值就是布尔值,值为true则有这个类,为false则没有这个类
xxxxxxxxxx<div class="box" :class="{ 类名1:布尔值,类名2:布尔值}"></div>、数组→数组中所有的类,都添加到盒子上,本质就是一个class列表
xxxxxxxxxx<div class="box" :class="[类名1,类名2,类名3]"></div>
实例:为导航栏点击加背景颜色
xxxxxxxxxx<style> .pink { background-color: pink; }</style><ul id="a"> <li v-for="(a,b) in list" :class="{pink:b===act}" :key="a.id" @click="act=b">{{a.tx}}</li></ul><script> const aa = new Vue({ el: "#a", data: { act: 0, list: [ { id: 1, tx: "首页" }, { id: 2, tx: "秒杀" }, { id: 3, tx: "特价" } ], } })</script>v-bind操作style
语法::style="样式对象"
xxxxxxxxxx<div :style="{color:'red','font-size':'30px'}">1</div>
v-for
作用:基于数据循环,多次渲染整个元素 v-for支持:数组、对象、数字
遍历数组语法: v-for=”(item,index) in 数组名“
xxxxxxxxxx<ul id="a5"> <li v-for="(item,index) in a6">{{item}}</li></ul><script> const ac = new Vue({ el: "#a5", data: { a6: ["吃饭", "睡觉", "打豆豆"] } })</script>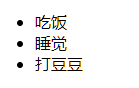
案例:书架
xxxxxxxxxx<ul id="a7"> <li v-for="(item,index) in a8"> <span>{{item.name}}</span>- <span>{{item.author}}</span> <button @click="del(item.id)">删除</button> </li></ul><script> const ad = new Vue({ el: "#a7", data: { shows: true, a8: [ { id: 1, name: "《西游记》", author: "吴承恩" }, { id: 2, name: "《红楼梦》", author: "曹雪芹" }, { id: 3, name: "《水浒传》", author: "施耐庵" }, { id: 4, name: "《三国演义》", author: "罗贯中" } ] }, methods: { del(id) { this.a8 = this.a8.filter(item => item.id !== id) console.log(this.a8) } } })</script>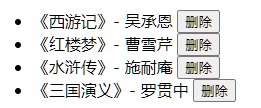
v-for中的key
语法::key=“唯一标识”
作用:给列表添加唯一标识,便于Vue进行列表项的正确排序复用
xxxxxxxxxx<ul id="a7"> <li v-for="(item,index) in a8" :key="item.id"> <span>{{item.name}}</span>- <span>{{item.author}}</span> <button @click="del(item.id)">删除</button> </li></ul>注意:
key只能是字符串或数字类型
key的值必须具有唯一性
推荐使用id作为key,不推荐使用数组下标
v-model
作用:给表单元素使用,双向绑定→可以快速或设置表单元素
数据变化→视图自动更新 视图变化→数据自动更新
语法:v-model="变量"
实例:登录
xxxxxxxxxx<div id="logform"> <input type="text" placeholder="请输入账号" v-model="users"><br> <input type="password" placeholder="请输入密码" v-model="pwds"> <button @click="loginbt">登录</button> <button @click="restbt">重置</button></div><script> const lg = new Vue({ el: "#logform", data: { users: "1", pwds: "123" }, methods: { loginbt() { console.log(`登录成功,账号:${this.users},密码:${this.pwds}`) }, restbt() { console.log("重置完成") this.users = "" this.pwds = "" } } })</script>应用于其他表单元素
常见的表单元素都可以用v-model绑定关联→快速设置和获取表单元素的值 它会根据控件的类型自动选取正确的方法,无需手动设置
输入框:input:text——value 文本域:textarea——value 复选框:input:checkbox——checked 下拉菜单:select——value
v-model原理
原理本质上是一个语法简写,例如应用在输入框上,就是value属性和input事件的合写 作用:提供数据的双向绑定 数据变,视图跟着变 :value 视图变,数据跟着变 @input
比如:子组件在设置下拉菜单传来的值时,是无法直接修改的,需要把v-model进行拆分
v-model等价于 :value ——@input
xxxxxxxxxx<template><div class="as"> <input type="text" v-model="msg"> <input type="text" :value="msg1" @input="msg1 =$event.target.value"> </div></template><script> export default { data(){ return{ msg:1, msg1:2 } } }</script>
注意:$event用于在模板中,获取事件的形参
v-model应用于组件
像类似地址选择下拉菜单等常用的模块经常封装成组件,以便进行复用,这便会涉及到组件间的数据通信问题
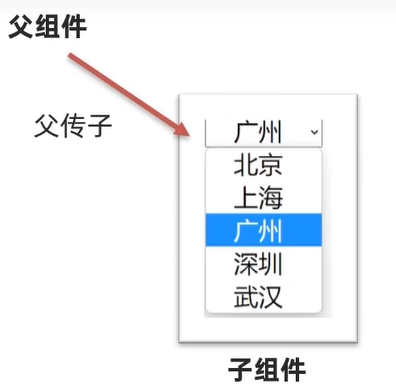
实例:下拉菜单组件
x
// xiala.vue<template> <div> <select name="" id="" :value="value" @change="chooseCity"> <option value="101">北京</option> <option value="102">上海</option> <option value="103">广州</option> <option value="104">深圳</option> <option value="105">成都</option> </select> </div></template>
<script>
export default { props:{ value:String }, methods:{ chooseCity(e){ console.log("你选择的是:"+e.target.value) this.$emit("input",e.target.value) } }
}</script>
<style>
</style>xxxxxxxxxx// APP.vue<template> <div id="app"> <Xiala v-model="CityID"></Xiala> </div></template>
<script>
import Xiala from './components/XiaLa'export default { data() { return { CityID:"101" } }, components:{ Xiala }, watch:{ CityID(){ console.log(this.CityID) } } }</script>
<style scoped>#app{ width: 600px; margin: 100px auto; border: 1px solid red; border-radius: 5px; background-color: antiquewhite;}</style>
表单类组件封装
父传子:数据从父组件中传递过来,v-model拆解绑定数据
子传父:监听输入,子传父值给父组件进行修改
xxxxxxxxxx//父组件中<子组件标签 :ids='sc' @事件名='sc=$event'></子组件标签>
xxxxxxxxxx//子组件中<标签 :value='n' @change='ab'></标签>props:{ n:类型},methods:{ change(e){ this.$emit('事件名',e.target.value) }}v-model简化代码
子组件中:props通过value接收,事件触发input
父组件中:v-model给组件直接绑定数据
xxxxxxxxxx// 父组件<BaseSelect v-model="selectId"></BaseSelect>
xxxxxxxxxx//子组件<select :value="value"@change="handlechange">...</select>props:{ value: String},methods: { handleChange (e) { this.$emit('input', e.target.value) }}简化的代码:
xxxxxxxxxx// APP.VUE<template>  <div id="app">    <Xiala v-model="CityID"></Xiala>  </div></template>
<script>
import Xiala from './components/XiaLa'export default { data() { return { CityID:"101" } }, components:{ Xiala }, watch:{ CityID(){ console.log(this.CityID) } } }</script>xxxxxxxxxx// xiala.vue<template> <div> <select name="" id="" :value="value" @change="chooseCity"> <option value="101">北京</option> <option value="102">上海</option> <option value="103">广州</option> <option value="104">深圳</option> <option value="105">成都</option> </select> </div></template>
<script>
export default { props:{ value:String }, methods:{ chooseCity(e){ console.log("你选择的是:"+e.target.value) this.$emit("input",e.target.value) } }
}</script>
指令修饰符
通过 “.” 指名一些指令的后缀,不同的后缀封装了不同的操作→简化代码
按键修饰符 @keyup.enter→键盘回车键监听
v-model修饰符 v-model.trim→去除首尾空格 v-model.number→转数字
事件修饰符 @事件名.stop→阻止冒泡 @事件名.prevent→阻止默认行为
更多指令修饰符,见官方文档
计算属性
基于现有的数据,计算出来的新属性。依赖的数据变化,自动重新计算
语法:
声明在computed配置项中,一个计算属性对应一个函数
使e'e'e'e方法和普通属性一样——{{ 计算属性名 }}
xxxxxxxxxxcomputed: {计算属性名() {计算逻辑代码return 计算结果;},
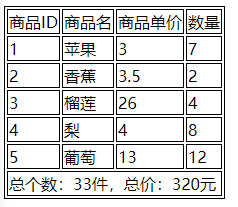
实例:购物车统计
xxxxxxxxxx<style>    tr,    td {        border: 1px solid;    }</style><table style="border: 1px solid;" id="sp">    <thead>        <tr>            <td>商品ID</td>            <td>商品名</td>            <td>商品单价</td>            <td>数量</td>        </tr>    <tbody>        <tr v-for="(a,b) in list" :key="a.id">            <td>{{a.id}}</td>            <td>{{a.name}}</td>            <td>{{a.price}}</td>            <td>{{a.num}}</td>        </tr>        <tr>            <td colspan="4"><span>总个数:{{sum}}件,总价:{{sump}}元</span></td>        </tr>    </tbody>    </thead>
</table><script>    const shop = new Vue({        el: " #sp", data: {            list: [                { id: 1, name: "苹果", price: 3, num: 7 },                { id: 2, name: "香蕉", price: 3.5, num: 2 },                { id: 3, name: "榴莲", price: 26, num: 4 },                { id: 4, name: "梨", price: 4, num: 8 },                { id: 5, name: "葡萄", price: 13, num: 12 }            ]        }, computed: {            sum() {                return this.list.reduce((sum, it) =>                                        sum + it.num, 0)            },            sump() { return this.list.reduce((sum, it) => sum + (it.price * it.num), 0) }        }
    })</script>
computed和methods的区别 computed计算出结果后可以缓存,下次在使用时直接使用缓存数据,除非数据变了才会重新计算 methods每使用一次就会被调用一次
计算属性的完整的写法
计算属性的默认写法是只能访问,不能修改的。 若要想修改,需要使用计算属性的完整写法。
语法如下:
xxxxxxxxxxcomputed: {计算属性名() {get(){计算逻辑代码return 计算结果;},set(){修改逻辑代码}}
watch 侦听器
作用:监视数据的变化,执行一些逻辑或异步操作 需求:翻译应用,左侧输入,右侧展示翻译结果
语法:
简单写法
xxxxxxxxxxdata:{name:"zhangsan",num:1},watch:{//数据属性和要监视的属性同名数据属性名(新数据,旧数据){业务逻辑、操作}}实例:文本实时展示框
xxxxxxxxxx<div id="tx"><textarea name="" id="" rows="10" v-model="oldv"></textarea><textarea name="" id="" rows="10" v-model="newv"></textarea></div><script>const b = new Vue({el: "#tx",data: {oldv: "",newv: ""},watch: {oldv(n) {n += "翻译完成"this.newv = n}}})</script>完整写法
添加额外的配置项
deep:true——对复杂类型深度监视
immediate:true——初始化立即执行一次handler方法
xxxxxxxxxxdata:{obj:{name:"zhangsan",num:1}},watch:{//数据属性和要监视的属性同名obj:{deep:true,函数名(新数据,旧数据){业务逻辑、操作}}}
综合案例:笔记本
xxxxxxxxxx<body>    <style>        * {            margin: 0;            padding: 0;            box-sizing: border-box;        }
        body {            background-color: cadetblue;        }
        #box {            position: relative;            width: 500px;            margin: 200px auto;
            background-color: wheat;        }
        #box h1 {            width: 100%;            text-align: center;            margin-bottom: 30px;        }
        #box input {            width: 480px;            height: 50px;            padding-left: 10px;            font-size: 30px;            border: 2px solid red;            border-radius: 10px;            margin-left: 10px;        }
        #box input:focus {            outline: 0;        }
        #box button {            position: absolute;            top: 72px;            right: 10px;            height: 50px;            width: 100px;            border: 0;            background-color: red;            border-radius: 0 10px 10px 0;            font-size: 20px;            color: white;
        }
        ul:last-child {            margin-bottom: 10px;        }
        li img {            float: right;            margin-top: 5px;            height: 30px;            margin-right: 20px;            display: none;        }
        li:hover img {            display: block;        }
        li {            list-style: none;            border-bottom: 1px solid #c9c5c5;            font-size: 30px;            color: #888;            padding: 10px 0;        }
        #box font {            display: inline-block;            width: 40px;            height: 40px;            padding-left: 10px;        }
        #btm {            margin-top: 5px;            background-color: wheat;            height: 30px;            color: #4d4b4b;        }
        #btm :first-child {            position: absolute;            left: 10px;
        }
        #btm :last-child {            position: absolute;            right: 10px;
        }
        #btm :last-child:hover {            cursor: default;        }    </style>    <div id="box">        <h1>黄桑的记事本</h1>        <input type="text" v-model="tex" placeholder="请输入任务">        <button @click="adddata">添加任务</button>        <ul>            <li v-for="(a,b) in list" :key="a.id">                <font>{{b+1}}.</font>{{a.tex}}                <img src="./img/del.png" alt="" title="删除" @click="deldata(a.id)">            </li>        </ul>        <div id="btm">            <span>总计:{{list.length}} 个任务</span>            <span @click="clsdata">清除任务</span>        </div>    </div>
    <script>        const box = new Vue({            el: "#box",            data: {                tex: "",                imgshow: false,                list: []            },            methods: {                deldata(id) {                    this.list = this.list.filter(itm => itm.id !== id)                },                clsdata() {                    this.list = []                },                adddata() {                    if (this.tex.trim() != "") {                        let j = { id: +new Date(), tex: this.tex }                        this.list.push(j)                        this.tex = ""                    }                }            }        })    </script>
</body>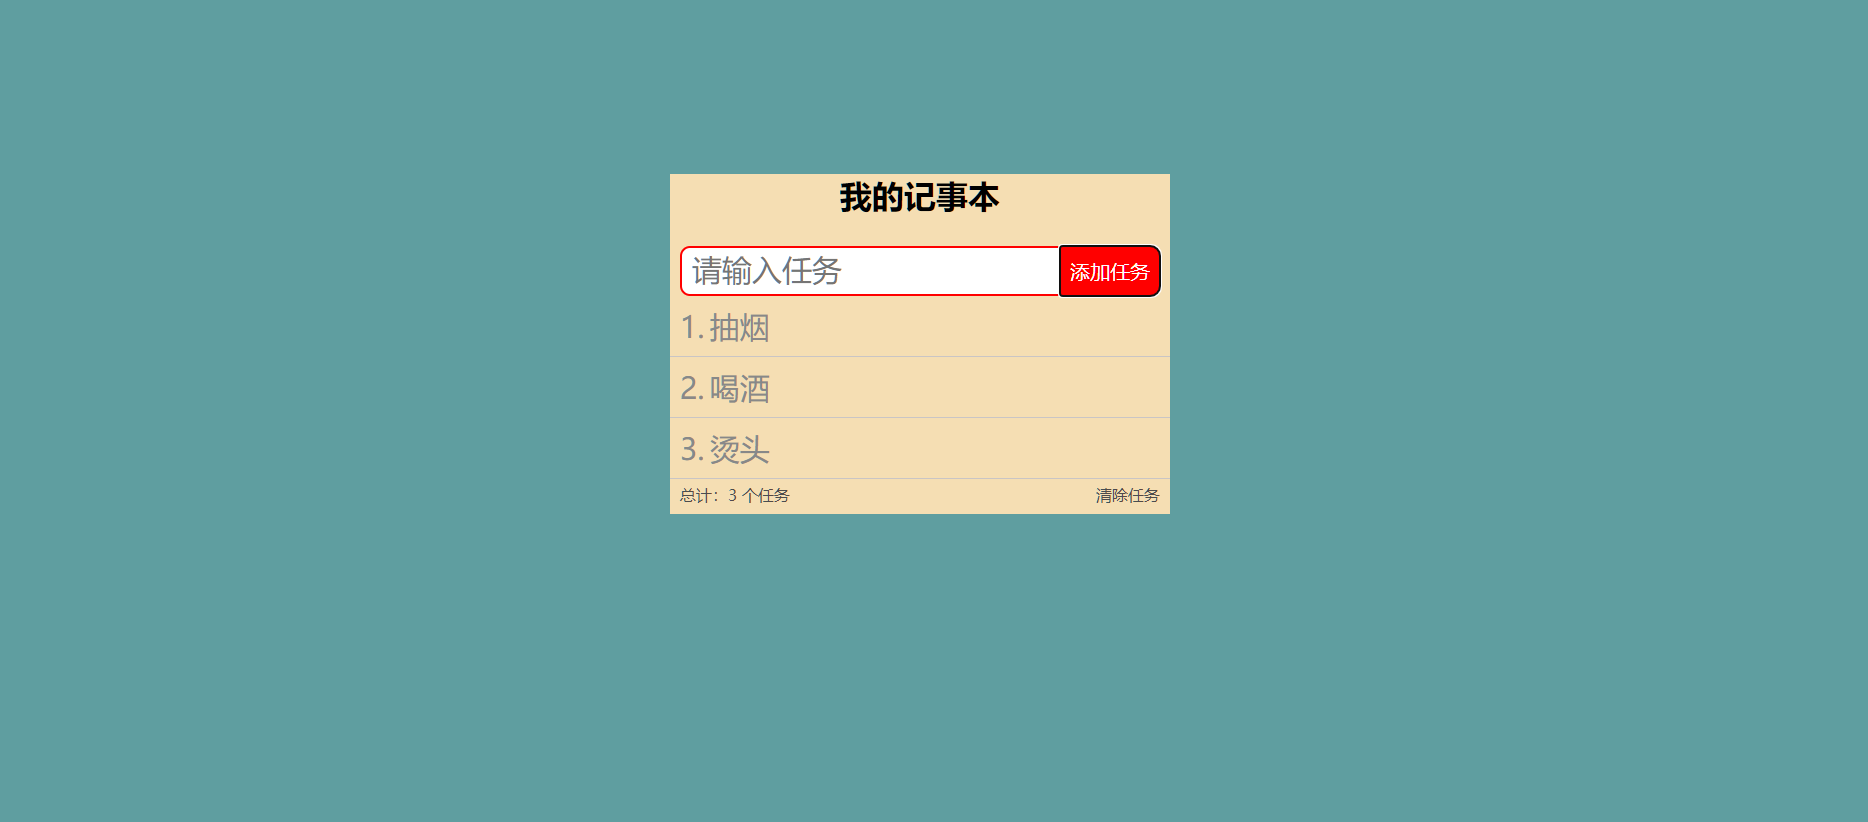
综合案例:水果购物车
xxxxxxxxxx<body>    <style>        * {            margin: 0;            padding: 0;            box-sizing: border-box;        }
        table {            width: 520px;            margin: 10px auto;            border-collapse: collapse;        }
        td,        tr {            border: 1px solid;            text-align: center;        }
        thead {            height: 25px;            line-height: 25px;            background-color: wheat;        }
        .bgc {            background-color: #eadddd;        }
        tr img {            width: 60px;        }
        .numbox button {            width: 25px;            height: 25px;
        }
        .numbox span {            display: inline-block;            width: 30px;        }
        .del {            background-color: red;            border: 0;            padding: 4px 8px;            color: white;            border-radius: 5px;        }
        tbody tr>:first-child,        tbody tr>:nth-child(2),        tbody tr>:nth-child(3),        tbody tr>:nth-child(6) {            width: 80px;        }
        tbody tr>:nth-child(4),        tbody tr>:nth-child(5) {            width: 100px;        }
        tfoot {            height: 50px;        }
        .allcheck {            float: left;            margin-left: 30px;            line-height: 50px;        }
        .allcheck input {            margin-right: 6px;        }
        .sumpbox {            color: rgb(32, 140, 247);            font-size: 30px;            line-height: 50px;            float: left;            margin-left: 160px;        }
        .jiesuan {            float: right;            margin-top: 10px;            margin-right: 30px;            width: 80px;            height: 30px;            border: 0;            background-color: rgb(101, 147, 245);            border-radius: 10px;            font-size: 14px;            font-weight: 900;            color: white;            line-height: 30px;            text-align: center;        }    </style>    <table id="shopcar">        <thead>            <tr :style="{ height:'40px'}">                <td colspan="6">                    <h2>水果购物车</h2>                </td>            </tr>            <tr>                <td>选择</td>                <td>图片</td>                <td>单价</td>                <td>个数</td>                <td>小计</td>                <td>操作</td>            </tr>        </thead>        <tbody v-if="list.length>0">            <tr v-for="a in list" :key="a.id" :class="{bgc:a.checked}">                <td><input type="checkbox" v-model="a.checked" v-model="chooseone" id=""></td>                <td><img :src="a.imgurl" alt=""></td>                <td>{{a.price}}</td>                <td class="numbox">                    <button :disabled="a.num<=0" @click="a.num--">-</button>                    <span> {{a.num}}</span>                    <button @click="a.num++">+</button>                </td>                <td>{{(a.price*a.num).toFixed(2)}}</td>                <td><button class="del" @click="deldata(a.id)">删除</button></td>            </tr>        </tbody>        <tbody v-else>            <tr>                <td colspan="6" style="font-size: 30px; padding: 20px 30px; text-align: center; width: 500px;">                    🛒购物车被你清空啦!</td>            </tr>        </tbody>        <tfoot>            <tr>                <td colspan="6">                    <span class="allcheck"><input type="checkbox" name="" id="" v-model="chooseall">全选</span>                    <span class="sumpbox">{{topr}}元</span><button @click="jiesuan"                        class="jiesuan">结算({{tosum}})</button>                </td>            </tr>        </tfoot>    </table>    <script>        const dflist = [            { id: 1, checked: true, imgurl: "./img/fruit/菠萝.png", price: 6, num: 1 },            { id: 2, checked: true, imgurl: "./img/fruit/草莓.png", price: 3, num: 12 },            { id: 3, checked: true, imgurl: "./img/fruit/橙子.png", price: 4.4, num: 3 },            { id: 4, checked: true, imgurl: "./img/fruit/哈密瓜.png", price: 3.4, num: 3 },            { id: 5, checked: true, imgurl: "./img/fruit/梨子.png", price: 7.5, num: 7 },            { id: 6, checked: true, imgurl: "./img/fruit/荔枝.png", price: 6.5, num: 9 },            { id: 7, checked: true, imgurl: "./img/fruit/芒果.png", price: 6.8, num: 9 },            { id: 8, checked: true, imgurl: "./img/fruit/猕猴桃.png", price: 2.6, num: 6 },            { id: 9, checked: true, imgurl: "./img/fruit/苹果.png", price: 5.6, num: 5 },            { id: 10, checked: true, imgurl: "./img/fruit/桃子.png", price: 3.1, num: 5 },            { id: 11, checked: true, imgurl: "./img/fruit/西瓜.png", price: 0.9, num: 12 },            { id: 12, checked: true, imgurl: "./img/fruit/香蕉.png", price: 4.8, num: 9 }        ]        const a = new Vue({            el: "#shopcar",            data: {                list: JSON.parse(localStorage.getItem('list')) || dflist            },            methods: {                deldata(id) {                    this.list = this.list.filter(it => it.id !== id)                },                jiesuan() {                    alert('结算成功!')                    this.list = this.list.filter((it, b) => it.checked !== true)
                }            },            computed: {
                chooseall: {                    get() {                        return this.list.every(it => it.checked)                    },                    set(v) {                        this.list.forEach(a => a.checked = v)                    }                },                tosum() {                    return this.list.reduce((sum, a) => a.checked ? sum + a.num : sum, 0)                },                topr() {                    return (this.list.reduce((sum, a) => a.checked ? sum + (a.num * a.price) : sum, 0)).toFixed(2)                }            },            watch: {                list: {                    deep: true,                    handler(n) {                        localStorage.setItem('list', JSON.stringify(n))                    }                }            }        })    </script></body>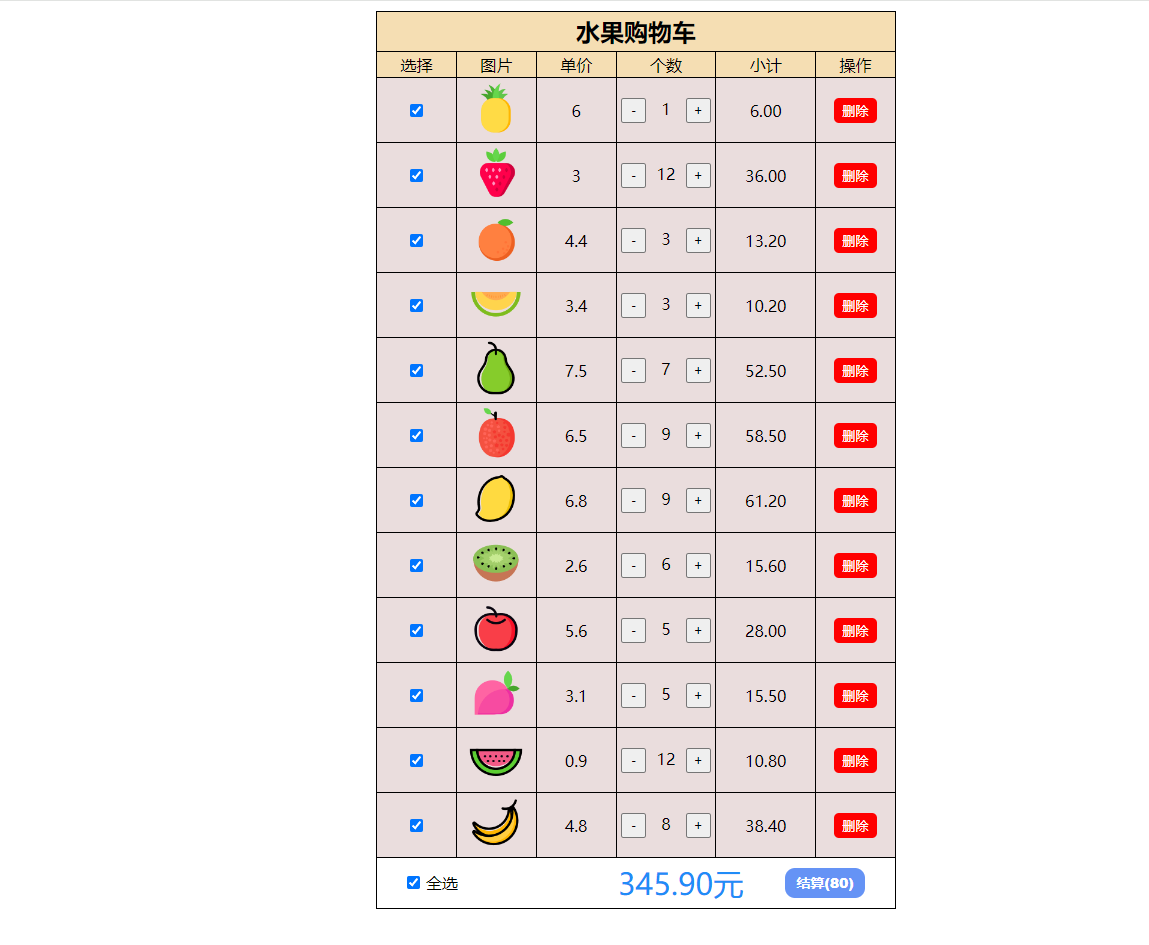
Vue生命周期
什么是生命周期
Vue的生命周期:一个Vue实例从创建到销毁的整个过程
生命周期的4个阶段
创建阶段
只会执行一次
将普通数据转换成响应式数据
挂载阶段
只会执行一次
渲染模板
更新阶段
可以执行多次
修改数据更新视图
销毁阶段
销毁实例
生命周期钩子
生命周期函数 vue生命周期过程中,会自动运行一些函数,被称为【生命周期钩子】,可以让开发者在【特定阶段】运行自己的代码
八个(4组)钩子函数
before Create(创建阶段前)
created(创建阶段后)——发送初始化渲染请求
before Mount(挂载阶段前)
mounted(挂载阶段后)——操作dom
before Update(更新阶段前)
updated(更新阶段后)
before Destroy(销毁阶段前)——释放Vue外的资源(定时器等)
destroyed(销毁阶段后)
案例:记账本
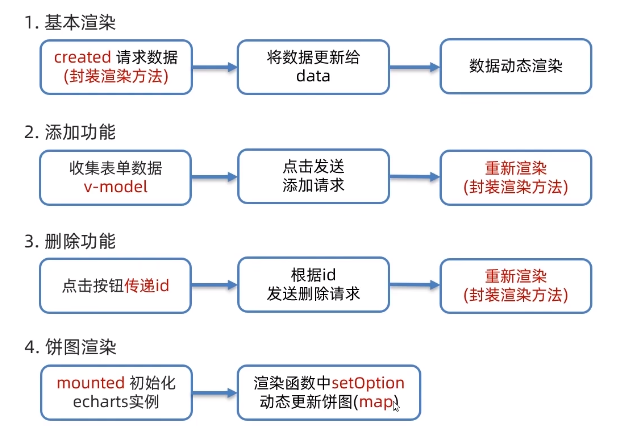
xxxxxxxxxx<body>    <style>        * {            margin: 0;            padding: 0;            box-sizing: border-box;        }    </style>    <div id="bigbox">        <div class="headbox">            <input v-model="names" type="text">            <input v-model.number="prices" type="text">            <button @click="adddata">添加账单</button>        </div>        <table>            <thead>                <tr>                    <td>编号</td>                    <td>消费项目</td>                    <td>消费金额</td>                    <td>操作</td>                </tr>            </thead>            <tbody>                <tr v-for="(a,b) in list" :key="a.id">                    <td>{{b+1}}</td>                    <td>{{a.name}}</td>                    <td>{{a.price.toFixed(2)}}</td>                    <td><a href="" @click.prevent="del(a.id)">删除</a></td>                </tr>            </tbody>            <tfoot>                <tr>                    <td colspan="4">总计:{{sumprice}}元</td>                </tr>            </tfoot>        </table>        <div :style="{width:'400px',height:'400px'}" id="main"></div>    </div>
    <script>        const a = new Vue({            el: "#bigbox",            data: {                names: '',                prices: "",                list: []            },            methods: {                async del(id) {                    const d = await axios.delete(`https://applet-base-api-t.itheima.net/bill/${id}`)                    this.getlist()                },                async adddata() {                    if (!this.names.trim()) {                        alert("名称不能为空")                    }                    if (typeof this.prices !== 'number') {                        alert("请输入正确价格")
                    }
                    const add = await axios.post('https://applet-base-api-t.itheima.net/bill',                        { creator: "huangsir", name: this.names, price: this.prices })                    this.getlist()                    this.names = ""                     this.prices = ""                },                async getlist() {                    const req = await axios.get('https://applet-base-api-t.itheima.net/bill',                        {                            params: {                                creator: "huangsir"                            }                        }                    )                    this.list = req.data.data                    this.myChart.setOption({                        series: [                            {                                // data: [{ value: 123, name: "12" }]                                data: this.list.map(a => ({ value: a.price, name: a.name }))                            }                        ]                    })                }
            },            computed: {                sumprice() {                    return this.list.reduce((sum, item) => sum + item.price, 0).toFixed(2)                }            },            async created() {                this.getlist()
            },            mounted() {                this.myChart = echarts.init(document.getElementById('main'));                // 指定图表的配置项和数据                let a = []                this.list.forEach(element => {                    a.push({ value: element.price, name: element.name })                });                console.log(a)                option = {                    title: {                        text: "消费账单",                        left: 'center'                    },                    legend: {                        orient: "vertical",                        left: "left"                    },                    series: [                        {                            type: 'pie',                            name: "消费项目",                            radius: "50%",                            // data: [{ value: 123, name: "12" }]                            data: a                        }                    ]                };                // 使用刚指定的配置项和数据显示图表。                this.myChart.setOption(option);            }

        })
    </script></body>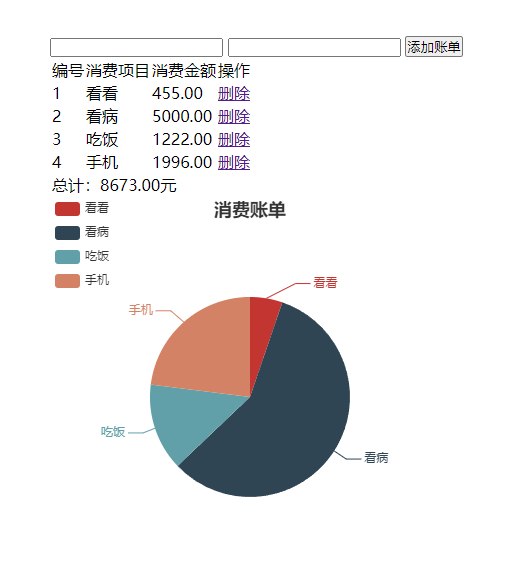
示例:渲染哔哩哔哩日榜
xxxxxxxxxx<html lang="en"><head> <meta charset="UTF-8"> <meta name="viewport" content="width=device-width, initial-scale=1.0"> <title>Document</title> <script src="https://cdn.jsdelivr.net/npm/vue@2.7.16/dist/vue.js"></script> <script src="https://unpkg.com/axios/dist/axios.min.js"></script></head><body> <div id="box"> <table> <thead> <tr> <td colspan="2"><h3>{{ newslist.name+newslist.subtitle }}</h3></td> </tr> <tr> <td>标题</td> <td>热度</td> </tr></thead> <tbody> <tr v-for="item in newslist.data"> <td><a :href="item.url">{{ item.title }}</a></td> <td>{{ item.hot }}</td> </tr> </tbody> </table> </div> <script> const app = new Vue({ el: "#box", data: { newslist: [] }, created() { async function get_news_list() { const response = await axios.get('https://api.vvhan.com/api/hotlist/bili'); this.newslist = response.data } get_news_list.call(this); } }); </script> <style> td,tr { border: 1px solid; text-align: center; padding: 3px; } </style></body></html>
工程化开发入门
开发Vue的两种方式:
核心包传统开发模式:基于html/css/js文件,直接引l入核心包,开发Vue。
工程化开发模式:基于构建工具(例如:webpack)的环境中开发Vue。 源代码→自动化编译压缩组合→运行的代码
工程化开发&&vue脚手架
介绍: Vue CLI是vue官方提供的一个全局命令工具 它可以帮我们快速创建一个开发Vue项目的标准基础架子(集成了webpack配置)
使用步骤
全局安装:yarn global add @vue/cli 或 npm i @vue/cli -g
查看vue版本:vue --version
创建项目架子:vue create 项目名(非中文)


启动项目:yarn serve 或 npm run serve(找到package.json配置serve启动名称)
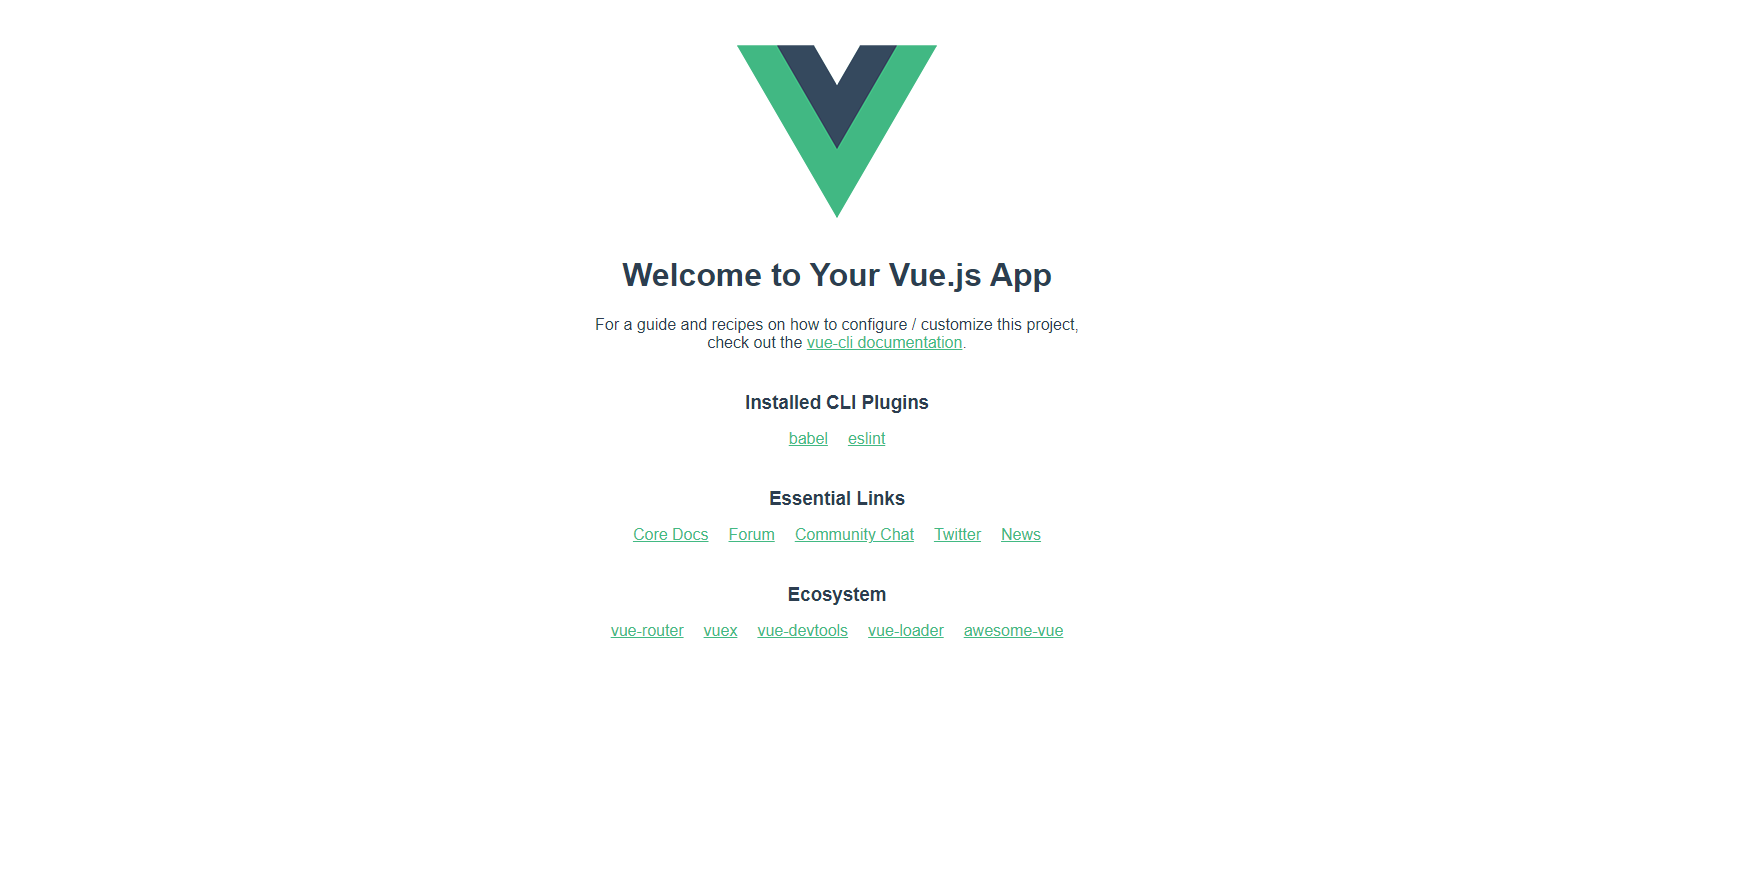
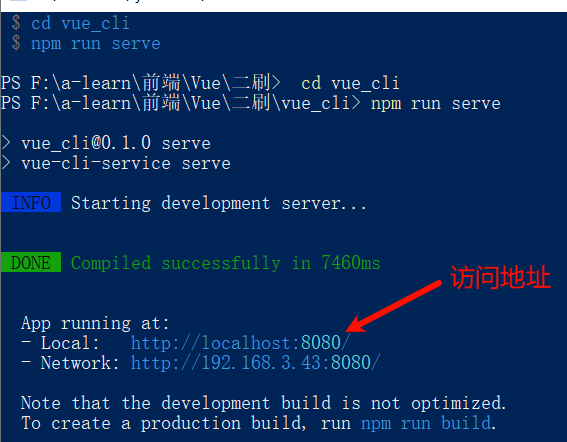 启动成功
启动成功
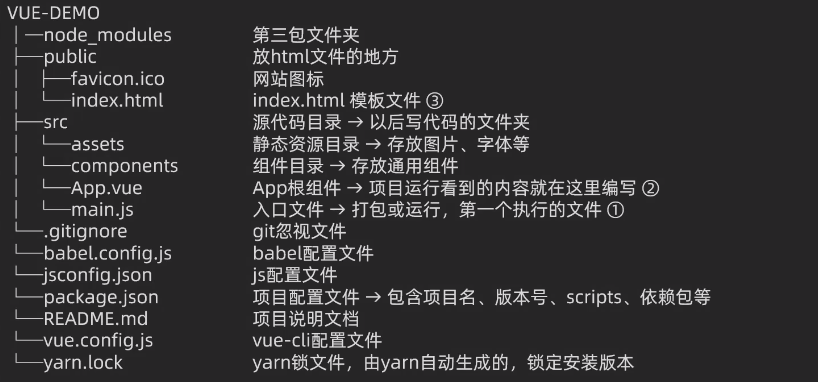
脚手架目录文件介绍
组件化开发
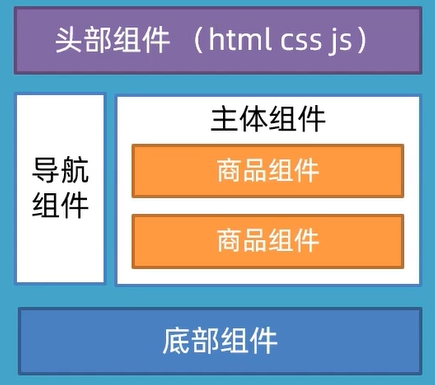
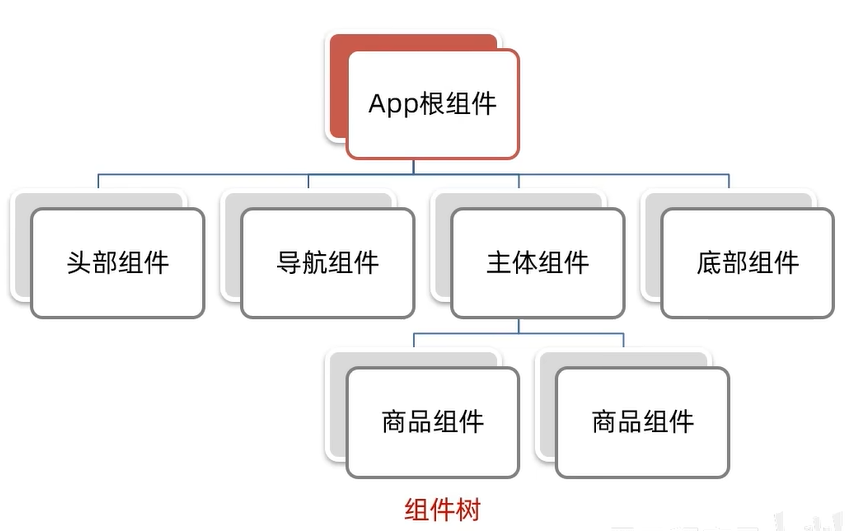
组件化:一个页面可以拆分成一个个组件,每个组件都有自己独立的结构,样式和行为。 优点:便于维护,利于复用,提升开发效率 组件类型:普通组件、根组件
根组件:整个应用最上层的组件,包裹着所有普通的小组件
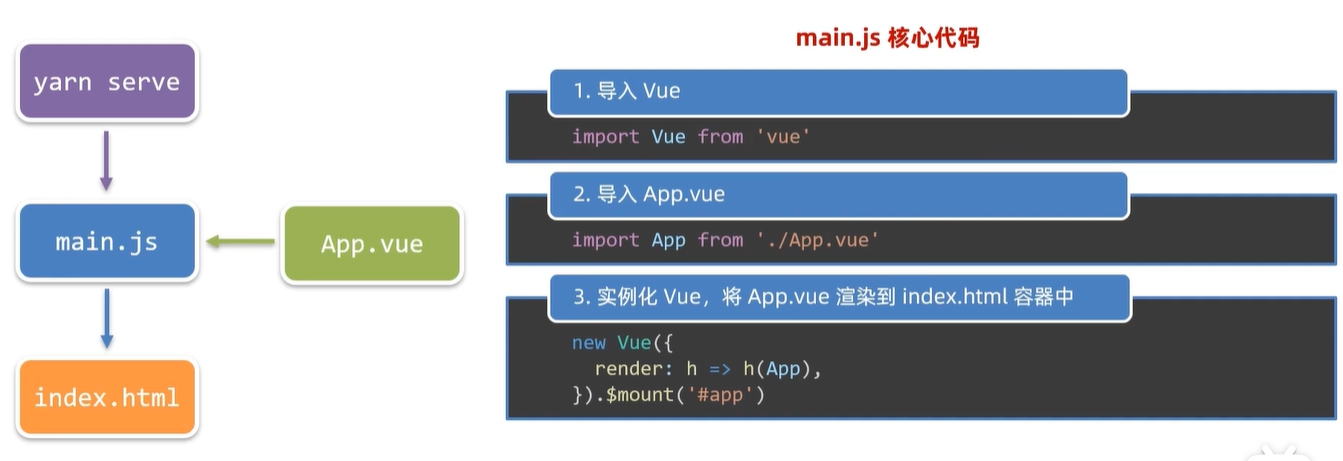
App.vue文件(单文件组件)的三个组成部分
结构(template)--只有一个根节点
样式(style)--支持less,需要安装less和less-loader
给style加上lang="less"
安装依赖包
xxxxxxxxxxyarn add less less-loader
行为(script)
默认情况下,编译器无法对vue文件代码进行高亮显示,需要安装以下插件

组件注册
普通组件的局部注册
局部注册:只能在注册的范围内部使用
创建.Vue文件(三个组成部分),在components目录中创建

在使用的组件内导入并注册
注意:组件名使用大驼峰命名法
语法:
xxxxxxxxxx//先创建一个小vue组件import 组件对象 from 'vue文件路径'export default{components:{//局部注册"组件name":组件对象}}使用: 直接将组件名当作HTML标签使用即可。即:<组件名></组件名>
示例:完成下面的效果图
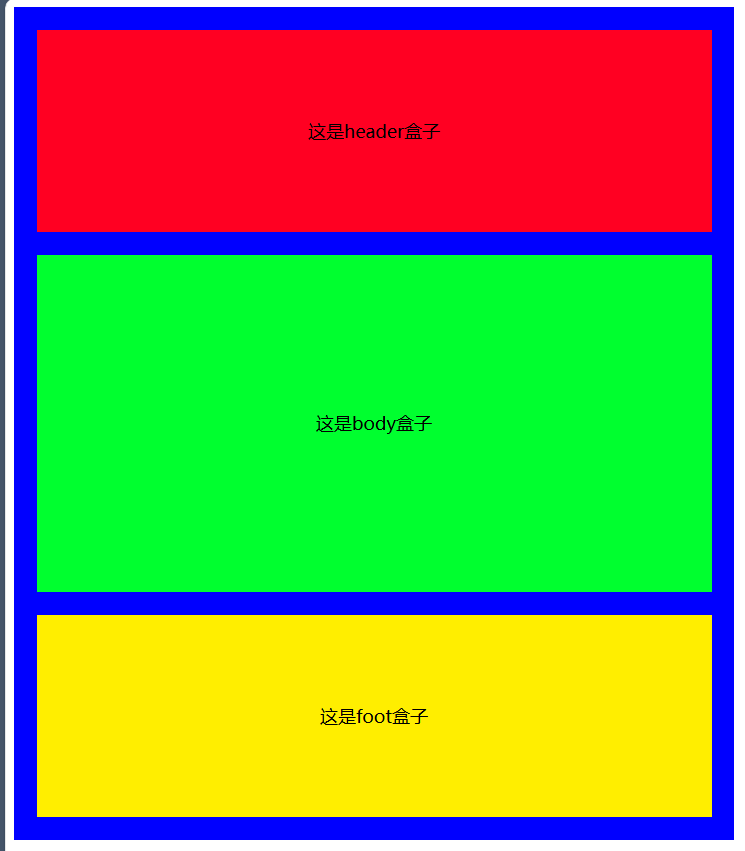
代码展示:
APP.vue
xxxxxxxxxx<template><div id="big"><PageHeader></PageHeader><PageBody></PageBody><PageFoot></PageFoot></div></template><script>import PageHeader from './components/PageHeader.vue';import PageBody from './components/PageBody.vue';import PageFoot from './components/PageFoot.vue';export default {components:{PageHeader,PageBody,PageFoot}}</script><style>#big{width: 600px;height:700px;background-color: blue;padding: 20px;}</style>PageHeader.vue
xxxxxxxxxx<template><div id="phead">这是header盒子</div></template><script>export default {}</script><style>#phead {text-align: center;width: 100%;line-height: 180px;height: 180px;background-color: rgb(255, 0, 34);}</style>PageBody.vue
xxxxxxxxxx<template><div id="pbody">这是body盒子</div></template><script>export default {}</script><style>#pbody {width: 100%;height: 300px;background-color: rgb(0, 255, 47);text-align: center;margin-top: 20px;line-height: 300px;margin-bottom: 20px;}</style>PageFoot.vue
xxxxxxxxxx<template><div id="pfood">这是foot盒子</div></template><script>export default {}</script><style>#pfood {width: 100%;height: 180px;text-align: center;line-height: 180px;background-color: rgb(255, 238, 0);}</style>技巧
输入HmFooter按tab可以让其成为标签
如果HmFooter+tab出不来→需要配置vscode 设置中搜索 trigger on tab →勾上
普通组件的全局注册
全局注册:所有组件内部都可以使用
创建.vue文件
main.js进行全局注册
xxxxxxxxxx//在main.js中进行操作//导入组件import 组件对象 from 'vue文件路径'//调用Vue.component进行全局注册,一次只能注册一个组件//Vue.component('组件名',组件对象)Vue.component('组件名',组件对象)使用方法和局部注册方法相同,作为HTML标签使用
渲染组件内容
首先,在 data 中准备渲染的数据:
xxxxxxxxxxdata() { return { items: [ { title: 'Box 1', imgSrc: 'path/to/image1.jpg' }, { title: 'Box 2', imgSrc: 'path/to/image2.jpg' }, { title: 'Box 3', imgSrc: 'path/to/image3.jpg' }, // 添加更多数据 ] };}然后,在模板中使用 v-for 渲染这些数据:
xxxxxxxxxx<template> <div> <LittleBox v-for="(item, index) in items" :key="index" :title="item.title" :img-src="item.imgSrc" /> </div></template>在 LittleBox 组件中,你可以通过 props 来接收数据:
xxxxxxxxxxexport default { props: { title: String, imgSrc: String }}最后,在 LittleBox 组件的模板中显示数据:
xxxxxxxxxx<template> <div class="little-box"> <h3>{{ title }}</h3> <img :src="imgSrc" alt="Image" /> </div></template>这样,就可以通过 v-for 动态渲染数据到多个 LittleBox 组件中了
scoped样式冲突
全局样式(默认):会影响所有组件,会造成多个组件之间的样式冲突问题
局部样式:scoped下的样式,只作用于当前组件,为style标签加上scoped属性
scoped原理:
当前组件内的标签都被添加了data-v-hash值的自定义属性
css选择器也被添加了该自定义属性
效果:必须是当前组件的元素,才会有这个自定义属性,样式才会被生效
xxxxxxxxxx<style scoped></style>
data函数
一个组件的data选项必须是一个函数。→保证每一个组件实例,维护独立的一份数据对象。
语法如下:
xxxxxxxxxxdata(){return{数据name:值}}
组件通信
组件通信即组件与组件之间的数据传递
组件的数据是独立的,无法直接访问其他组件的数据
想要访问其他组件的数据,需要使用组件通信
组件通信解决方案
父子关系:props 和 $emit 非父子关系:provide 和 inject eventbus 通用解决方案:Vuex(适合复杂业务场景)
组件通信语法
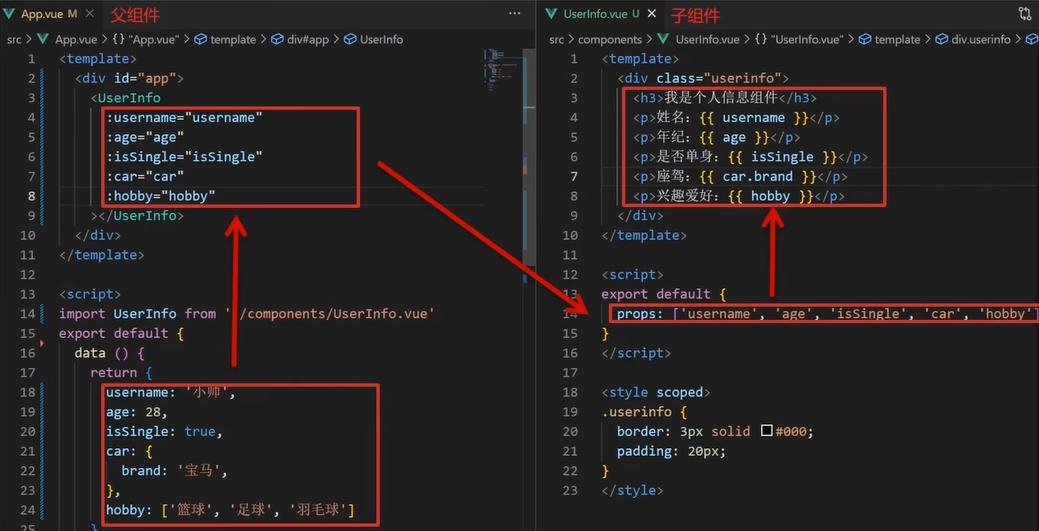
父传子
父组件通过props将数据传递给子组件
子传父
子组件使用#emit通知父组件修改更新
父组件对消息进行监听
父组件提供修改逻辑
非父子通信
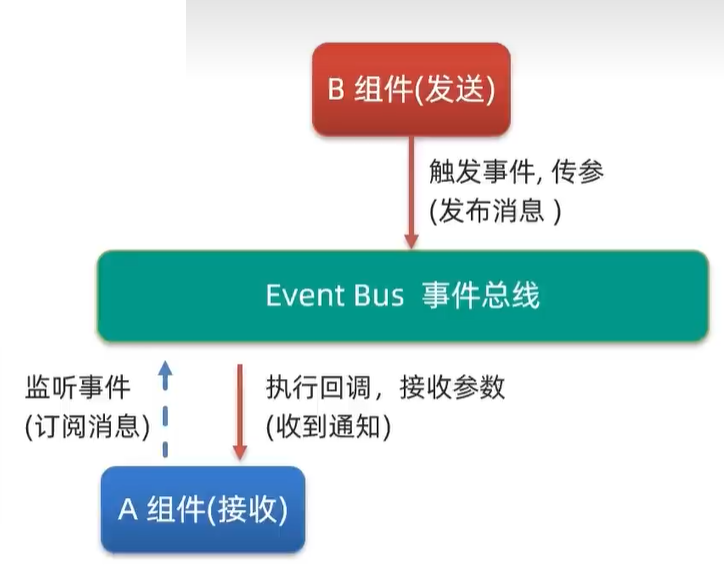
event bus事件总线
作用:非父子组件之间,进行简易消息传递。(复杂场景→Vuex)
创建一个都能访问到的事件总线(空Vue实例)→utils/EventBus.js
xxxxxxxxxximport Vue from'vueconst Bus =new Vue()export default BusA组件(接收方),监听Bus实例的事件
xxxxxxxxxximport Bus from '../utils/EventBus‘......created (){Bus.$on('sendMsg',(msg) => {this.msg = msg})}B组件(发送方),触发Bus实例的事件
xxxxxxxxxxBus.$emit('sendMsg',‘这是一个消息')
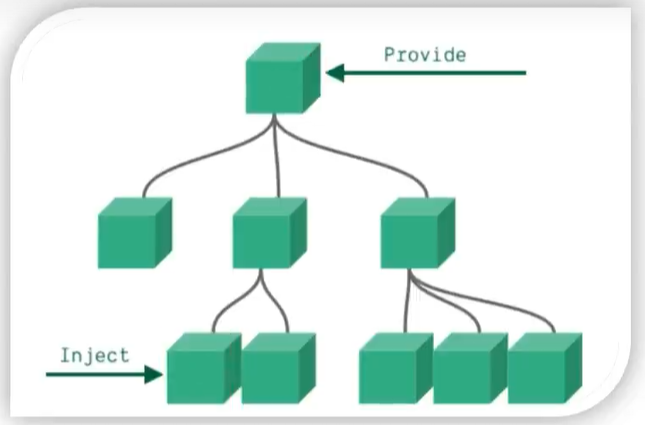
provide 和 inject 实现跨层级的数据共享,即在顶层元素中提供一组数据,使得子孙后代中的所有数据都可以访问到
在父组件provide中提供数据
xxxxxxxxxxprovide:{return{//普通类型数据(非响应式数据)color: this.color,//复杂类型的数据(响应式数据)userInfo: this.userInfo,}}
在子孙组件中接收
xxxxxxxxxxinject:['color','userInfo']
prop详解
什么是prop? 组件上注册一些自定义属性
prop作用:向子组件传递数据
特点:
可以传递任意数量的prop
可以传递任意类型的prop
prop校验
作用:为组件的prop指定验证要求,不符合要求的,控制台会显示错误提示,帮助开发者快速发现错误
四种校验:
类型校验
非空校验
默认值校验
自定义校验
语法:
xxxxxxxxxxprops:{校验的属性名:类型}
完整写法
xxxxxxxxxxprops:{校验的属性名:{type:类型,//类型校验required:true,//是否必填(非空)default:值,//默认值validator(value){//自定义校验逻辑return 是否通过校验}}}
prop&data、单向数据流 共同点:都可以给组件提供数据。 区别:
data的数据是自己的>随便改
prop 的数据是外部的→不能直接改,要遵循单向数据流
单项数据流,父组件数据更新,会单项向下流动,影响子组件,这个数据流动是单向的
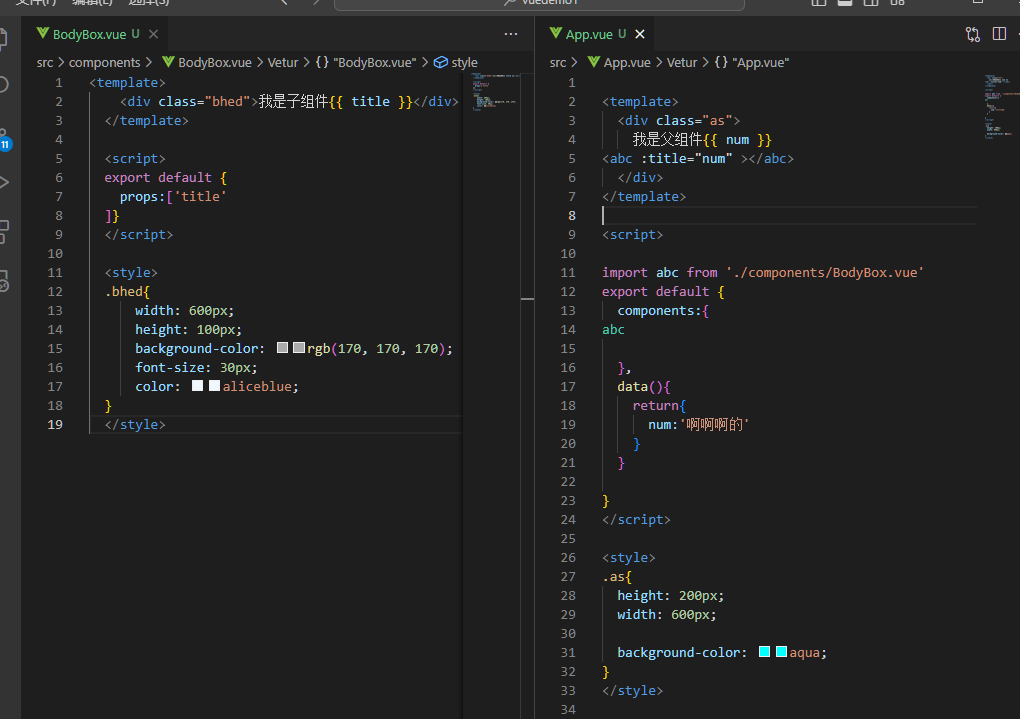
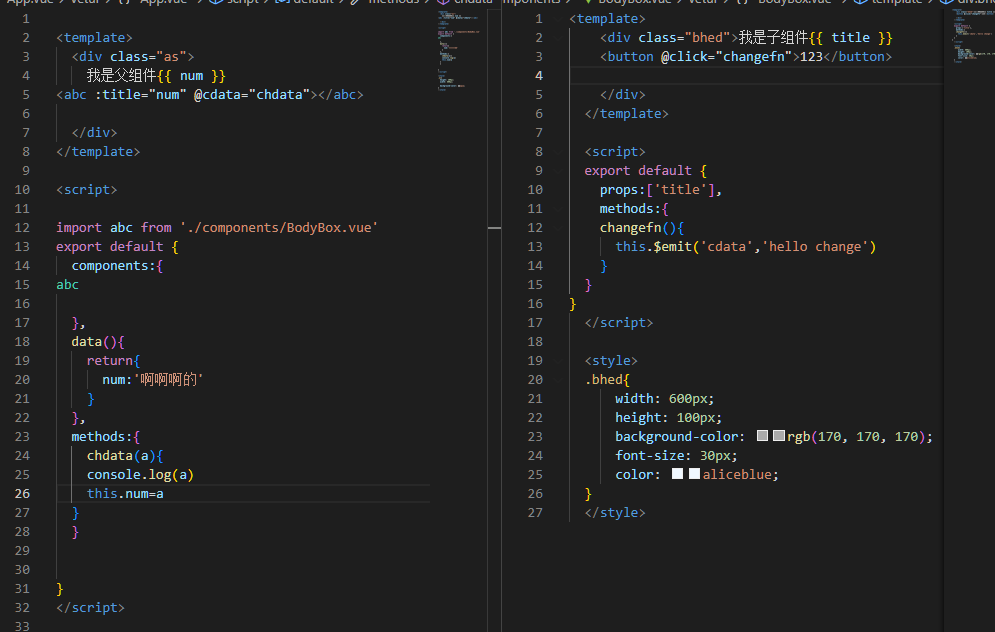
实例:商品数量加减
xxxxxxxxxx//父VUE
<template> <div class="as"> 我是父组件<abc :title="num" @cdata="chdata"></abc>
</div></template>
<script>
import abc from './components/BodyBox.vue'export default { components:{abc }, data(){ return{ num:123 } }, methods:{ chdata(a){ console.log(a) this.num=a } }}</script>
<style>.as{ height: 200px; width: 600px; background-color: aqua;}</style>
xxxxxxxxxx//子模块<template> <div class="bhed"> <button @click="changeadd">-</button> <button @click="changeadd">+</button> </div> </template> <script> export default { props:['title'], methods:{ changeadd(){ this.$emit('cdata',this.title+1) }, changesub(){ this.$emit('cdata',this.title-1) } }} </script> <style> .bhed{ width: 600px; height: 100px; background-color: rgb(170, 170, 170); font-size: 30px; color: aliceblue; } </style>
实例:小黑记事本组件版
进阶语法
sync修饰符
作用:实现子组件和父组件的双向绑定,简化代码
特点:prop属性名可以自定,非固定为value
本质::属性名 和 @update:属性名 的合写
xxxxxxxxxx<子组件标签 :属性名.sync='name'></子组件标签>
xxxxxxxxxx//示例://父组件<template><div class="as"> 我是父组件 <abc :title.sync='num'></abc> </div></template>
<script> import abc from './components/BodyBox.vue' export default { components:{ abc }, data(){ return{ num:123, } }, methods:{ chdata(a){ this.num=a } } }</script>
<style>
</style>
//子组件<template><div class="bhed"> <button @click="changesub">-</button> <button @click="changeadd">+</button> </div></template>
<script> export default { props:{ title:Number }, methods:{ changeadd(){ // 子组件中使用(update:xxx)更新父组件中的数据 this.$emit('update:title',this.title+1) }, changesub(){ this.$emit('update:title',this.title-1) } } }</script>
<style>
</style>
ref和$refs
作用:利用ref和$refs可以获取dom元素和组件实例
特点:查找范围--当前组件内(更加精准)
获取dom
目标标签--为目标标签添加ref属性
xxxxxxxxxx<div ref='name'> </div>在恰当时机(dom元素渲染完成后 )时,可以通过this.$refs.name的方法获取目标标签
获取组件实例
目标组件--为目标组件添加ref属性
xxxxxxxxxx<组件名 ref='name'> </组件名>在恰当时机(dom元素渲染完成后 )时,可以通过this.$refs.name.组件方法() 获取目标组件方法
$nextTick、Vue异步更新
$nextTick:等待DOM元素更新完成之后,才会触发执行此方法内部的函数
语法:
x
this.$nextTick(()=>{ //操作逻辑})需求:点击编辑标题,编辑框自动聚焦
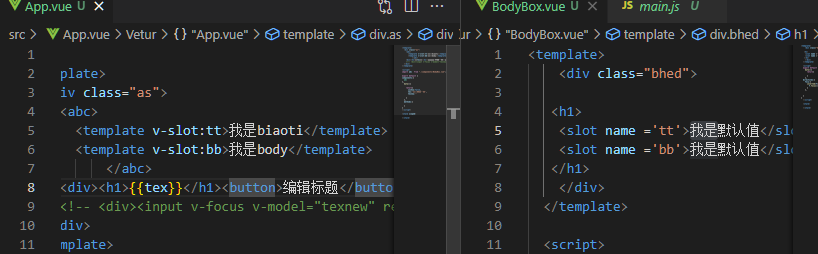
xxxxxxxxxx<template><div class="as"> <div v-if="!isshow"><h1></h1><button @click="show">编辑标题</button></div> <div v-else><input v-model="texnew" ref="inp" type="text"><button @click="yes()">确认</button></div> </div></template>
<script> export default { data(){ return{ isshow:false, tex:'我是默认标题', texnew:'' } }, methods:{ show(){ this.isshow=true this.$nextTick(()=>{ this.$refs.inp.focus() }) }, yes(){ this.isshow=false this.tex=this.texnew this.texnew='' } } }</script>
自定义指令
之前的(v-model,v-html,v-for,等)称为内置指令
自定义指令:自己定义的,封装了一些dom操作,扩展额外功能的指令
自定义指令可以应对更加复杂的场景
基本语法
局部注册(封装获取焦点的自定义指令)
inserted(),当元素被插入到页面时触发
xxxxxxxxxx<template><div class="bhed">    <input v-focu type="text">    </div></template>
<script>    export default {        methods:{},        directives:{            focu:{                inserted(f){                    f.focus()                }            }        }    }</script>
<style>
</style>
全局注册
xxxxxxxxxx//在main.js中进行全局注册Vue.directive('focus', { inserted(f) { f.focus() }})使用:
xxxxxxxxxx<input v-指令名 type="text">
指令的值
需求:实现一个color指令——传入不同的颜色,给标签设置不同的文字颜色
语法:在绑定指令时,通过 ’=‘ 的形式作为指令 绑定 具体的参数值
xxxxxxxxxx<div v-color='color'>我是改变颜色的文字</div>
通过binding.value可以拿到指令的值,指令值修改会触发update函数
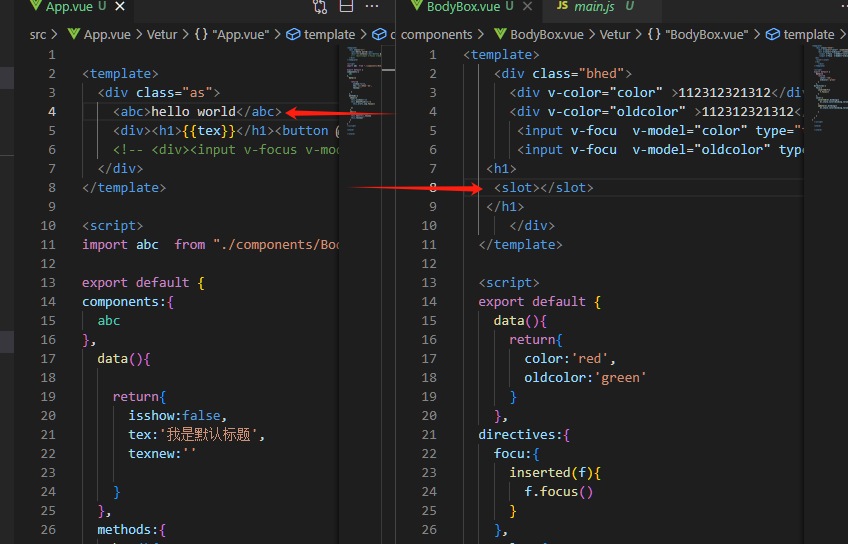
v-color指令的封装
案例:输入框输入一个颜色,修改字体颜色
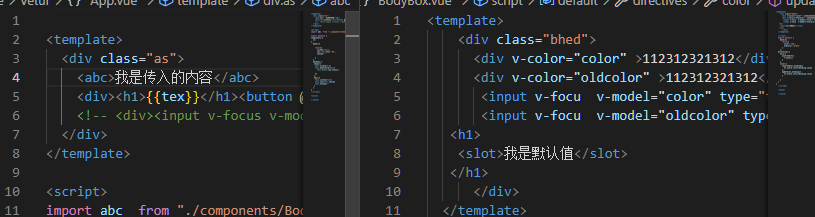
xxxxxxxxxx<template><div class="bhed">    <div v-color="color" >112312321312</div>    <div v-color="oldcolor" >112312321312</div>    <input v-focu  v-model="color" type="text">    <input v-focu  v-model="oldcolor" type="text">    </div></template>
<script>    export default {        data(){            return{                color:'red',                oldcolor:'green'            }        },        directives:{            focu:{                inserted(f){                    f.focus()                }            },            color:{                inserted(el,binding){                    el.style.color=binding.value                },                update(el,binding){                    el.style.color=binding.value                }            }        }    }
练习:封装v-loading指令
场景:实际开发过程中,发送请求需要时间,在请求的数据未回来时,页面会处于空白状态=>用户体验不好
需求:封装一个v-loading指令,实现加载中的效果
分析:
本质loading效果就是一个蒙层,盖在了盒子上
数据请求中,开启loading状态,添加蒙层
数据请求完毕,关闭loading状态,移除蒙层
实现:
准备一个loading类,通过伪元素定位,设置宽高,实现蒙层
开启关闭loading状态(添加移除蒙层),本质只需要添加移除类即可
结合自定义指令的语法进行封装复用
xxxxxxxxxx.loading:before{ content:""; position:absolute; left:0; top:0; width:100%; height:100%; background:#fff url("./loading·gif") no-repeat center;}
封装v-loading
xxxxxxxxxxdirectives:{ loading:{ inserted (el,binding){ binding.value ? el.classList.add('loading') :el.classList.remove('loading') }, update (el,binding){ binding.value ? el.classList.add('loading') : el.classList.remove('loading') } }}
插槽
作用:可以让组件内部的一些结构支持自定义
需求:一个弹窗提示框,结构相同,内容不同,希望内容部分支持自定义
默认插槽
插槽的基本语法:
组件内需要定制的结构部分,改用<slot></slot>进行占位
在使用组件时,<组件></组件>标签内部,传入结构替换slot
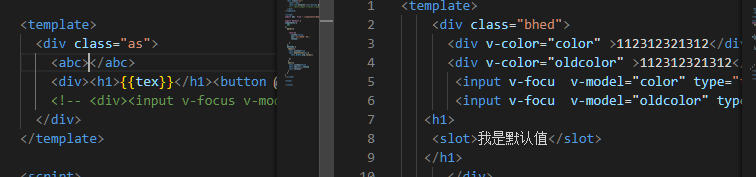
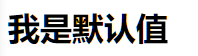
后备内容(插槽默认值)
通过插槽完成内容的定制,传入什么内容就显示什么内容。如果什么都不显示,则是空白内容。影响效果,所以为插槽要设置默认内容
插槽后背内容:封装组件时,可以为<slot>插槽提供后备内容

具名插槽
在开发中,一个组件内部可能有多处结构,需要传入多个内容进行定制。默认问题无法满足需求,需要使用具名插槽。
语法:
多个slot使用name属性区分名字
使用 <template v-slot:name></template>传入对应的值
注意:v-slot:name可以简写为#name
xxxxxxxxxx<template #name></template>
作用域插槽
作用域插槽是插槽的一个传参语法,并不属于插槽的分类
作用域插槽:定义slot插槽的同时是可以传值的。给插槽上可以绑定数据,将来使用组件时可以用
应用场景:封装表格组件。如图
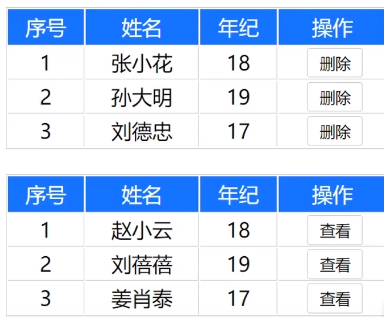
父传子,动态渲染表格内容
使用默认插槽,定制操作列
删除或查看都需要用到当前项的ID,属于组件内部的数据通过作用域插槽传值绑定,进而使用。
基本使用步骤:
给solt标签,用添加属性的方式传值
xxxxxxxxxx<solt :id='itme.id' msg='测试文本内容'></solt>所有添加的属性,都会被收集到一个对象中。
xxxxxxxxxx{id:xxx,msg:'测试文本内容'}在template中,通过‘ #插槽名=“boj” ’的方法接收,默认插槽名为default
xxxxxxxxxx<组件 #default='abc'>//若在button按钮中使用id<button @click='函数(abc.id)'></button></组件>
路由
单页应用程序
SPA-Single Page Application
所有功能都在一个html页面实现
例如:网易云音乐官网
| 类型 | 实现方式 | 页面性能 | 开发效率 | 体验 | 首屏加载 | SEO |
|---|---|---|---|---|---|---|
| 单页 | 一个html页面 | 按需更新 性能高 | 高 | 很好 | 慢 | 差 |
| 多页 | 多个html页面 | 整页更新 性能低 | 中 | 一般 | 快 | 好 |
两种网站的应用场景
单页面应用 系统类网站/内部网站/文档类网站
多页面应用 公司官网/电商类网站
单页面应用程序,之所以开发效率高,性能高,用户体验好 最大的原因就是:页面按需更新
路由概念
单页面应用需要按需更新,首先要明确:访问路径和组件的对应关系
Vue中的路由:反映 路径和组件的映射关系
vueRouter(插件)基本使用
vue官方的路由插件,是一个第三方插件包 官方文档:介绍 | Vue Router (vuejs.org)
作用:修改地址栏路径时,切换显示匹配的组件
使用步骤(main.js中的操作)(5+2)
5个基础步骤
下载模块(vue2使用3.6.5版本)
xxxxxxxxxxnpm i vue-route@3.6.5引入
xxxxxxxxxximport vuer from 'vue-router'安装注册
xxxxxxxxxxVue.use(vuer)创建路由对象
xxxxxxxxxxconst router = new vuer()注入,将路由对象注入到new vue实例中,建立关联
xxxxxxxxxxnew Vue({render: h => h(App),router}).$mount('#app')完成后可以看到地址栏出现(/#/),即为安装成功
xxxxxxxxxximport Vue from 'vue'import App from './App.vue'import vuer from 'vue-router'
Vue.config.productionTip = falseVue.use(vuer)
const router = new vuer()new Vue({  render: h => h(App),  router}).$mount('#app')
2个核心步骤
创建需要的组件(views)目录,配置路由规则
xxxxxxxxxximport hello from './views/ShowHello.vue'import world from './views/ShowWorld.vue'const router = new vuer({routes: [{ path: '/hello', component: hello },{ path: '/world', component: world }]})配置导航,配置路由出口(路径匹配的组件显示的位置)
xxxxxxxxxx<div><a href="#/hello">123</a>,<a href="#/world">456</a></div><div><!-- 使用router-view控制组件显示的位置 --><router-view></router-view></div>
组件目录存放
组件分类的主要目的:更加便于维护
.vue文件分2类;页面组件&复用组件
src/views文件夹
存放页面组件--用于展示页面--配合路由使用
src/components文件夹
存放复用组件--展示数据--常用于复用
路由模块封装
所有路由配置都堆在main.js中不合适,需要将路由模块抽离出来,拆分的模块更加利于维护
将原来main.js中的路由配置信息写到一个新的js文件中(如:index.js)
xxxxxxxxxx//导包import Vue from 'vue'import vuer from 'vue-router'// 初始化Vue.use(vuer)// 导入组件import hello from '../views/ShowHello.vue'import world from '../views/ShowWorld.vue'// 创建对象const router = new vuer({ routes: [ { path: '/hello', component: hello }, { path: '/world', component: world } ]})export default router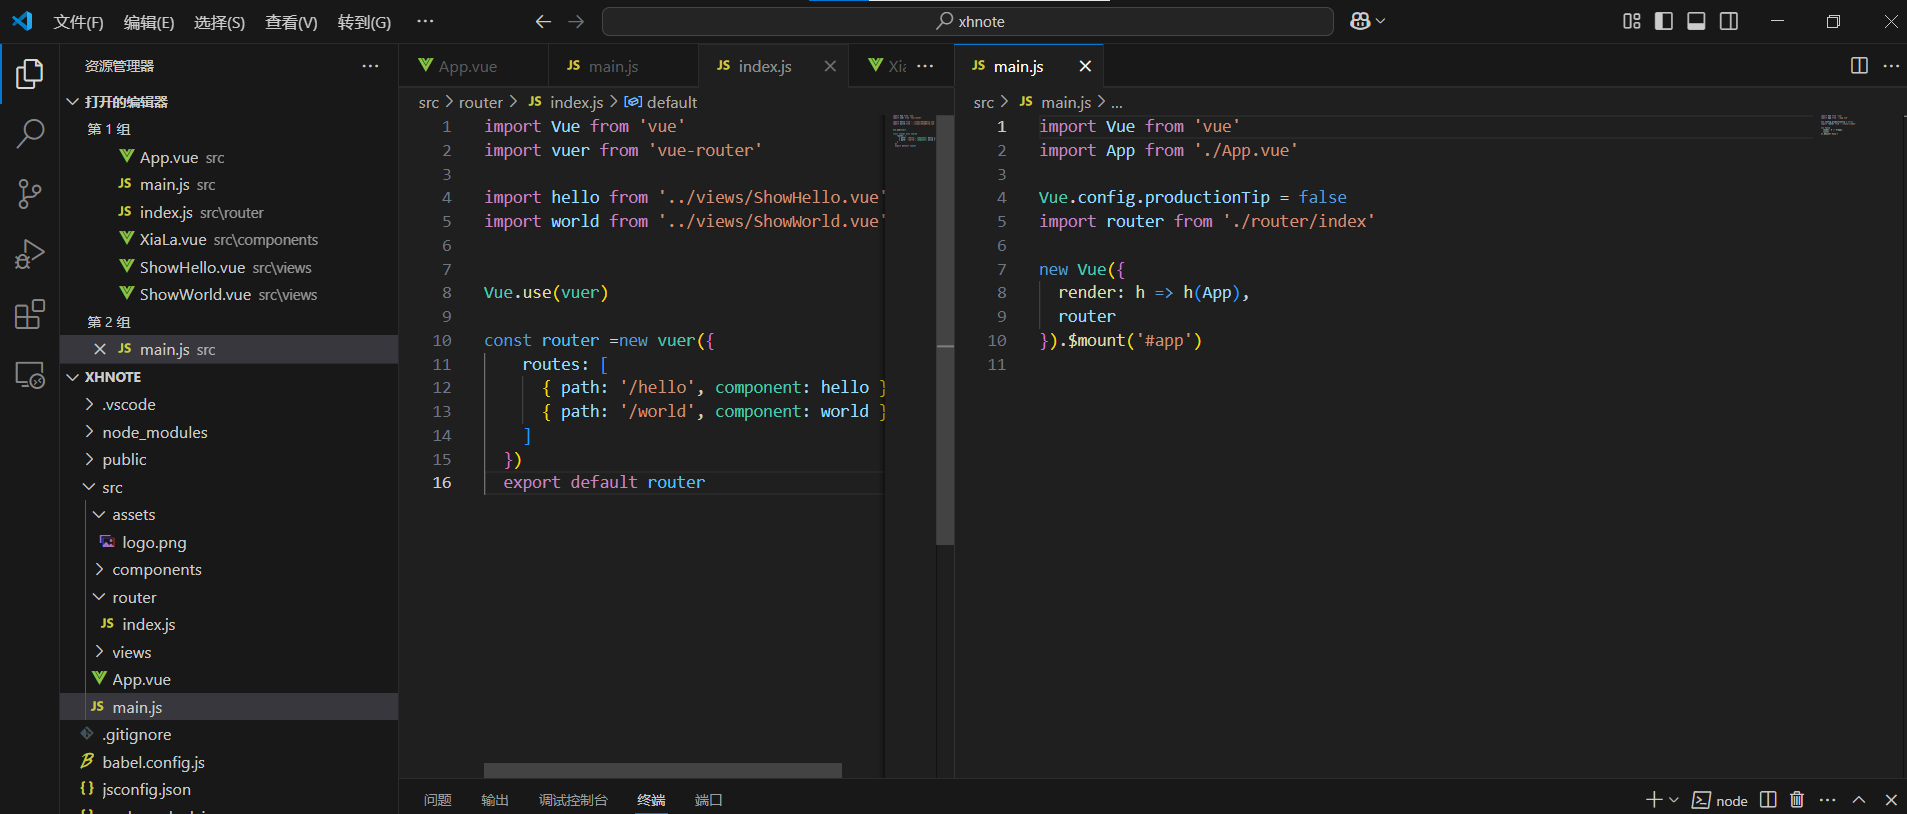
声明式导航&导航高亮
导航高亮
需求:实现导航高亮
vue-router提供了一个全局组件,用于取代a标签
xxxxxxxxxx<router-link to=""></router-link>
特点:
能跳转,配置to属性指定路径(必须)。本质还是a标签,to无需#
能高亮,默认就会提供高亮类名,可以直接设置高亮样式
xxxxxxxxxxto与href作用相同,提供地址,是必填选项<router-link to="/hello">显示hello</router-link>
xxxxxxxxxx<div> <router-link to="/hello">显示hello</router-link><br> <router-link to="/world">显示world</router-link> <!-- <a href="#/hello">显示hello</a>,<a href="#/world">显示world</a> --></div>当元素被选中时,会自动添加class属性

xxxxxxxxxxrouter-link-exact-active router-link-active
可以通过这两个属性为导航元素添加高亮属性
xxxxxxxxxxa.router-link-active{background-color: red;}
xxxxxxxxxx<template>  <div id="app">    <!-- <Xiala v-model="CityID"></Xiala> -->    <div>        <router-link to="/hello">123</router-link>        <router-link to="/world">456</router-link>    </div>    <div>      <!-- 使用router-view控制组件显示的位置 -->      <router-view></router-view>    </div>  </div></template>
<script>
// import Xiala from './components/XiaLa'export default {  data() {    return {      CityID: "101"    }  },  components: {    // Xiala  },  watch: {    CityID() {      console.log(this.CityID)    }  }
}</script>
<style scoped>#app {  width: 600px;  margin: 100px auto;  border: 1px solid red;  border-radius: 5px;  background-color: antiquewhite;}a.router-link-active{  background: red;}</style>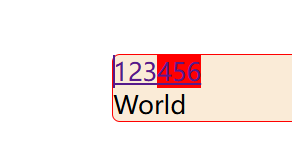
两个类名的作用
router-link-active 模糊匹配(用的多) 可以匹配to="/my" /my/a /my/b 。。。
router-link-exact-active 精确匹配 只能匹配to="/my"
自定义高亮类名
在创建对象时使用 linkActiveClass: '类名1', linkExactActiveClass: '类名2',配置 模糊匹配类名 和 精准匹配类名
xxxxxxxxxxconst router = new vuer({ routes: [ { path: '/hello', component: hello },//模糊匹配类名 { path: '/world', component: world }//精确匹配类名 ], linkActiveClass: 'lac', linkExactActiveClass: 'leac'})
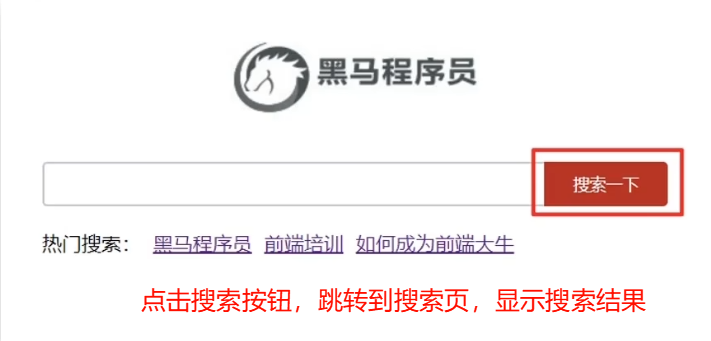
跳转传参
目标:在跳转路由时进行传值
方法1:查询参数传参
语法格式如下: to='/路径?参数名=值&参数名=值...'
取得传过来的值 $route.query.参数名 在created等函数中,使用该值需要使用this.$route.query.参数名取值
xxxxxxxxxx//home.vue<template>  <div>    <form action="" method="get">        <input type="text" name="name">        <input type="submit" value="提交">    </form>    <router-link to="/search?name=今日油价">今日油价</router-link>    <router-link to="/search?name=今日粮食">今日粮价</router-link>    <router-link to="/search?name=今日汇率">今日汇率</router-link>    </div></template>
<script>export default {
}</script>
<style>
</style>xxxxxxxxxx// search.vue<template> <div> <div class="box"> </div> </div></template>
<script>export default {
}</script>
<style>
</style>
方法2:动态路由传参
配置动态路由,path: '/路径/:words'(:不能省略)
xxxxxxxxxxconst router = new vuer({routes: [{ path: '/hello/:words', component: hello },{ path: '/world/:words', component: world }]})配置导航链接
xxxxxxxxxx<router-link to="/路径/参数">xxx</router-link><br><router-link to="/hello/showhello">显示hello</router-link><br><router-link to="/world/showworld">显示world</router-link>对应页面组件接收传递过来的值
xxxxxxxxxx$route.params.参数名
动态路由参数可选符
注意:该参数表示必传参数,若不传入参数,就无法匹配到页面,因此可以加可选符‘?’
xxxxxxxxxxconst router = new vuer({ routes: [ { path: '/hello/:words?', component: hello }, { path: '/world/:words?', component: world }//words?表示该参数为可选参数 ]})
两种传参方式的区别
查询参数传参 (比较适合传多个参数) ①跳转:to="/path?参数名=值&参数名2=值 ②获取:$route.query.参数名
动态路由传参(优雅简洁,传单个参数比较方便) ①配置动态路由:path:"/path/参数名 ②跳转:to="/path/参数值" ③获取:$route.params.参数名
VUE路由重定向
网页打开时,url默认是 /路径,未匹配到组件时,会出现网页空白问题,影响体验
重定向:匹配到某一路径后,强制跳转到path路径。
语法:{path:匹配的路径,redirect:重定向的路径}
xxxxxxxxxxconst router = new vuer({routes: [{ path: '/hello/:words?', component: hello },{ path: '/world/:words?', component: world },{ path: '/world', redirect: home }]})
路由404
xxxxxxxxxx//导包import Vue from 'vue'import vuer from 'vue-router'// 初始化Vue.use(vuer)// 导入组件import hello from '../views/ShowHello.vue'import world from '../views/ShowWorld.vue'import nofind from '../views/NoFind.vue'//导入404组件
// 创建对象const router = new vuer({    routes: [        { path: '/', redirect: '/hello' },        { path: '/hello/:words?', component: hello },        { path: '/world/:words?', component: world },        { path: '*', component: nofind }//未找到网页组件时,使用404组件
    ]})export default router
路由模式
hash路由(默认):地址栏中带有# http://localhost:8080/#/hello
history路由(常用):http://localhost:8080/hello (需要服务器支持)
xxxxxxxxxx//配置方法const router = new vuer({mode: 'history'})
编程式导航
需求:点击按钮实现跳转效果。
编程式导航:使用js代码进行跳转
两种语法:
path路径跳转(简单方便)
xxxxxxxxxxthis.$router.push('路由路径')xxxxxxxxxx<button @click="gowd">显示world</button><script>export default {methods: {gowd() {this.$router.push({path: '/world'})}}}</script>name命名路由跳转,适合path路径长的场景 首先要为路由起名字
xxxxxxxxxxconst router = new vuer({routes: [{ name: 'wd', path: '/world/:words?', component: world },],mode: 'history'})xxxxxxxxxxmethods: {gowd() {this.$router.push({name: 'wd'//使用})}}
编程式导航传参
编程式导航的两种语法均支持查询参数传参和路由传参
传参语法见: 声明式导航传参方法
xxxxxxxxxxmethods: { gowd() { this.$router.push({ path: "/world", query: { tex: "我成功完成传参啦!" } }) }}//完整的写法更适合传参/*this.$router.push({ path: "路径", query: { 参数名1:"值1", 参数名2:"值2" } })*/动态路由传参
xxxxxxxxxxthis.$router.push({path: "路径",params: {参数名1:"值1",参数名2:"值2"}})
一级路由与二级路由
在一级路由中使用children关键字配置嵌套子路由
xxxxxxxxxxconst router =new vuer({ mode:'history', routes: [ // 一级路由 { path: '/index', component: index // 配置二级路由 ,children:[ {path:'/list',component:MyList}, {path:'/mypage',component:MyPage} ] }, { path: '/search', component: Xiangqing } ] }) export default router
组件缓存keep-alive
需求:一个网站文章列表有大量文章,当点开一篇文章再返回文章列表时,希望从刚刚的位置继续浏览,而不是从头开始
路由跳转特点:路由跳转后,组件被销毁了,返回回来组件又被重建了,所以数据重新被加载了
解决:利用keep-alive将组件缓存下来
Keep-alive介绍
keep-alive是什么
keep-alive是Vue的内置组件,当它包裹动态组件时,会缓存不活动的组件实例,而不是销毁它们。
keep-alive是一个抽象组件:它自身不会渲染成一个DOM元素,也不会出现在父组件链中。
keep-alive的优点
在组件切换过程中把切换出去的组件保留在内存中,防止重复渲染DOM,
减少加载时间及性能消耗,提高用户体验性。
xxxxxxxxxx<template><div class="h5-wrapper"> // <keep-alive>标签包裹 <keep-alive> <router-view></router-view> </keep-alive> </div></template>
问题:使用<keep-alive>缓存了所有被包裹的一级(同级)路由组件,而内部的有些组件我们并不希望被缓存
可以使用下面的属性进行配置
keep-alive的三个属性
include:组件名数组,只有匹配的组件会被缓存
exclude:组件名数组,任何匹配的组件都不会被缓存
max:最多可以缓存多少组件实例
被缓存的组件会多两个生命周期钩子:
actived:激活时,组件被看到时触发
deactived:失活时,离开页面组件看不见
自定义创建项目
基于VueCli自定义创建项目架子
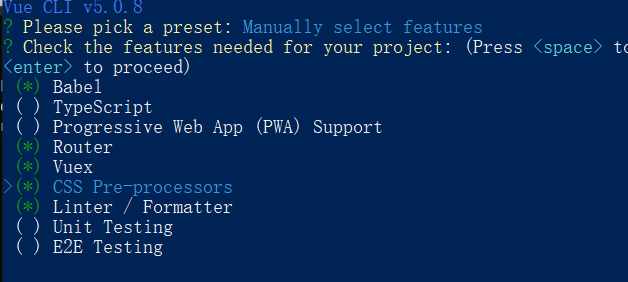
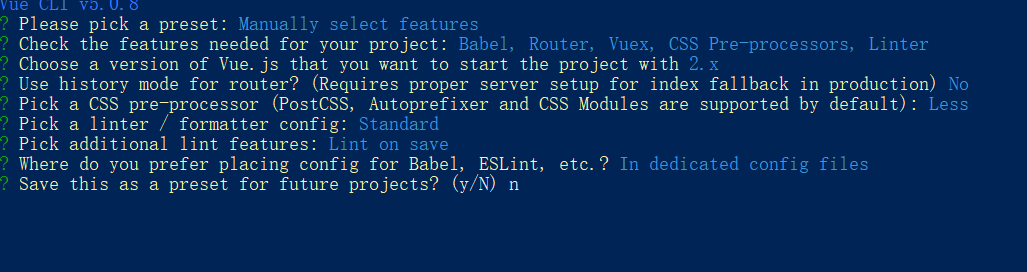
创建项目
安装脚手架→创建项目→选择自定义
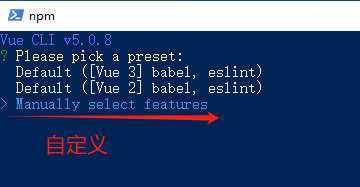
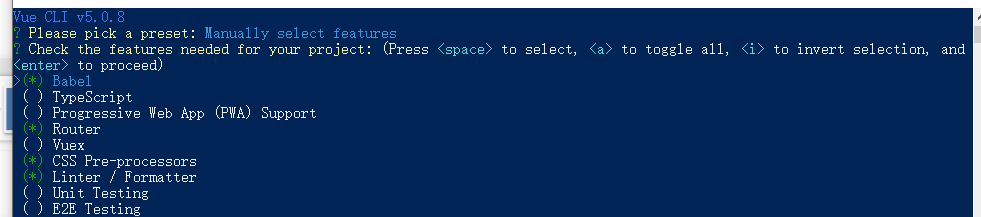
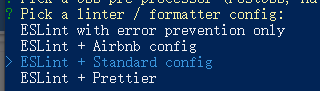
选择项目 babel、router、css、linter
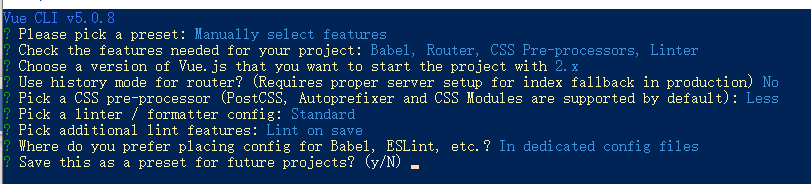
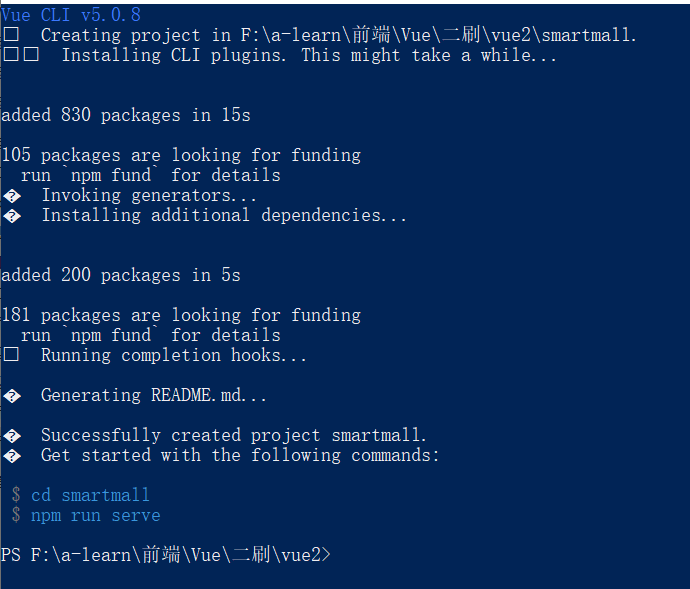
等待项目创建完成......
ESlint代码规范
代码规范:一套写代码的规则。
手动修正代码规范
根据错误提示的位置,一项一项进行手动修正。
可以在EsLint规则表中查找错误含义
自动修正代码规范
基于vscode插件ESlint高亮错误,并配置自动修复错误

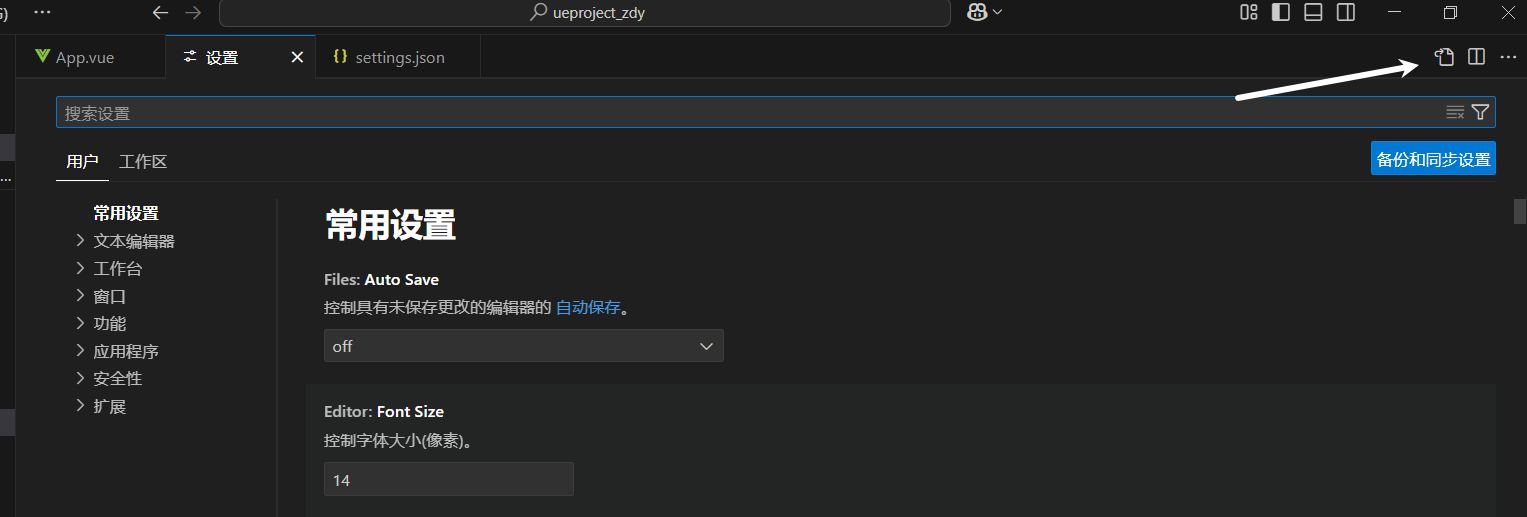
添加vs code配置
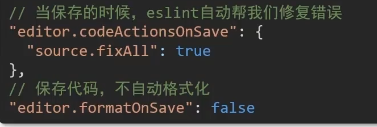
xxxxxxxxxx// 保存时自动修复错误"editor.codeActionsOnSave": {"source.fixAll": true},// 保存时不自动格式化代码"editor.formatOnSave": false
vuex
vuex:是一个状态(数据)管理工具,管理vue通用数据(多组件共享的数据)
使用场景
某个状态在很多组件中都要使用(个人信息)
多个组件共同维护一份数据(购物车信息)
优势:
共同维护了一份数据,数据集中化管理
响应式变化
操作简捷(vuex提供了一些辅助函数)
使用方法
基于脚手架创建项目,构建多组件共享数据环境 创建一个根组件和两个子组件
创建一个空仓库
安装vuex
xxxxxxxxxxnpm install vuex@3yarn add vuex@3新建vuex模块文件 在store文件夹下创建index.js,存放vuex
创建仓库 Vue.use(Vuex) 创建仓库new Vuex.Store()
main.js导入挂载
xxxxxxxxxximport Vuex from '../../node_modules/vuex'import Vue from 'vue'Vue.use(Vuex)const store = new Vuex.Store({})export default store
提供、访问vuex数据
提供数据——在创建的仓库内添加store配置对象
xxxxxxxxxxconst store = new Vuex.Store({state: {texts: '我是仓库中的内容!',dea: 123}})使用store直接 访问数据——this.$store
在模板中:{{ $store.state.dea }}
在组件逻辑内:this.$store.state.dea
在JS模块内:store.state.dea
xxxxxxxxxx//app.vue<template><div id="app"><div>我是跟组件-----</div><com1></com1><com2></com2></div></template><script>import com1 from './components/SonCom1.vue'import com2 from './components/SonCom2.vue'export default {components: {com1, com2}}</script>//子组件1<template><div>我是组件1-----<button @click="change">+1</button></div></template><script>export default {methods: {change () {this.$store.state.dea++console.log(this.$store.state.dea)}}}</script>//子组件2<template><div>我是组件2-----<button @click="change">-1</button></div></template><script>export default {methods: {change () {this.$store.state.dea--console.log(this.$store.state.dea)}}}</script>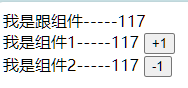
所有组件都可以使用到仓库有内部的数据
通过辅助函数 mapState是辅助函数,可以帮我们把store中的数据自动映射到组件的计算属性中。
xxxxxxxxxximport { mapState } from 'vuex'export default {computed: {...mapState(['dea', 'texts'])//展开}}
修改数据
mutations
state中的数据不能直接修改,需要使用mutations
目标:明确vuex同样遵循单向数据流,组件中不能直接修改仓库的数据
通过strict:true可以开启严格模式(有利于初学者检测不规范的代码,但上线时需要移除,会消耗服务器性能)
定义mutations对象,对象中存放了修改state的方法 所有mutations函数的第一个形式参数都是state
xxxxxxxxxxconst store = new Vuex.Store({strict: true,//开启严格模式state: {texts: '我是仓库中的内容!',dea: 123},mutations: {addnum (s) {s.dea += 1},subnum (s) {s.dea -= 1}}})在组件中使用定义的方法
xxxxxxxxxxthis.$store.commit('方法名')在组件传参
xxxxxxxxxxthis.$store.commit('方法名',参数)
mapMutations
辅助函数mapMutations,映射方法,和mapstate相似,它是把位于Mutations中的方法提取出来,映射到组件methods中 在函数中可以使用this.方法名调用
xxxxxxxxxx<template><div>我是组件1-----
<button @click="addnum">+1</button> </div>
</template>
<script> import { mapMutations } from 'vuex' export default { methods: { mapMutations(['addnum', 'subnum']), change () { this.addnum() } } }</script>
actions
actions:处理异步操作 需求:1秒之后,修改xxx数据
使用方法:
提供actions方法
xxxxxxxxxxactions:{setnum('仓库数据name','需要修改的值'){setTimeout(()=>{//逻辑代码},1000)}}在页面中调用(dispatch)
xxxxxxxxxxthis.$store.dispatch(异步方法名,值)
实例:一秒修改一次数值
xxxxxxxxxx//在main.js中添加actionsactions: { changenumauto (contex, num) { setInterval(() => { contex.commit('addnum', num) }, 1000) }}xxxxxxxxxx//在模块中调用设置好的异步方法methods: { //this.$store.dispatch('异步方法名', 传参) change () { this.$store.dispatch('changenumauto', 100) }}辅助方法mapAcitons,映射方法 mapAcitons把位于actions中的方法提取处理,映射到组件methods中
xxxxxxxxxximport { mapState, mapMutations, mapActions } from 'vuex'methods: {...mapActions(['changenumauto']),}
//使用 <button @click="changenumauto(100)">一直mapaction</button>
getter
作用:类似于计算属性 除了state之外,还要从state中派生出一些状态,这些状态都是依赖state的,此时会用到getters 例如: 在state中定义一个list数组,存储1-10的数据,在组件中显示所有大于5的数据
定义getters
getters的第一个形参必须是state
getters函数必须有返回值
访问getters
通过store访问
使用辅助函数mapgetters映射
xxxxxxxxxx<template> <div>我是组件1-----
<button @click="addnum">+1</button> <div>$store</div> <div>辅助函数</div> </div>
</template>
<script>import { mapMutations, mapGetters } from 'vuex'
export default { methods: { mapMutations(['addnum', 'subnum']), mapGetters(['fillist']), change () { this.addnum() } }}</script>xxxxxxxxxxconst store = new Vuex.Store({ state: { texts: '我是仓库中的内容!', dea: 123, lisnt: [1, 2, 3, 4, 5, 6, 7, 8, 9, 10] }, mutations: { addnum (s, num) { s.dea += num }, subnum (s) { s.dea -= 1 } }, actions: { changenumauto (contex, num) { setInterval(() => { contex.commit('addnum', num) }, 1000) }
}, getters: { fillist (state) { return state.lisnt.filter(f => f >= 5) } }})
分模块开发module
由于vuex使用单一状态树,应用的所有状态都集中到一个较大的对象中。当应用非常复杂时,store对象就会变得非常臃肿,难以维护。
模块拆分
新建文件夹 store/modules
在modules文件夹下新建模块的js文件
xxxxxxxxxx//声明配置项const store = {}const mutations = {}const actions = {}const getters = {}//导出模块export default {store, mutations, actions, getters}
将模块挂载到index.js(store)
xxxxxxxxxximport Vue from 'vue'import Vuex from 'vuex'import user from '@/store/modules/user'Vue.use(Vuex)const store = new Vuex.Store({modules: {user}})export default store访问子模块中的数据
直接使用模块名访问:$store.state.模块名.xxx
通过默认的mapState[xxx,xxx])映射访问 mapState("子模块名",[xxx,xxx]),需要在导出项中开启命名空间,
namespaced: truexxxxxxxxxxexport default {namespaced: true,store,mutations,actions,getters}xxxxxxxxxx<template><div>我是组件1-----<div>访问user模块的数据👇<div></div><div></div><hr></div></div></template><script>import { mapMutations, mapGetters, mapState } from 'vuex'export default {computed: {mapState('user', ['name', 'data'])}}</script>getters中的数据访问方式
通过模块名访问:$store.getters["模块名/xxx"]
通过mapGetters映射获取
默认根级别映射:mapGetters(["xxx"])
子模块映射:mapGetters('模块名',['xxx','xxx'])
mutations,actions的使用
注意:模块中的mutations,actions默认会被挂载到全局,需要开启命名空间,才会挂载到子模块中
mutations调用
直接通过模块名调用:$store.commit("模块名/xxx",额外参数)
通过mapMutations映射
根级别:mapMutations(['xxx'])
子模块级别:mapMutations("模块名",['xxx'])
actions调用方法和mutations调用方法相同
直接通过模块名调用:$store.dispatch("模块名/xxx",额外参数)
mapAcitons辅助函数导入
扩展:快速获得一个增删改查的API
可以使用json-server工具
安装
xxxxxxxxxxnpm install json-server -g
启动
xxxxxxxxxxjson-server xxx.json
Vue3新特性
Vue.js - 渐进式 JavaScript 框架 | Vue.js
Vue3优势
更易维护
组合式API
更好的TypeScript支持
更小体积
良好的TreeShaking
按需引入
更快速度
重写diff算法
模版编译优化
更高效的组件初始化
更优的数据响应式 Proxy
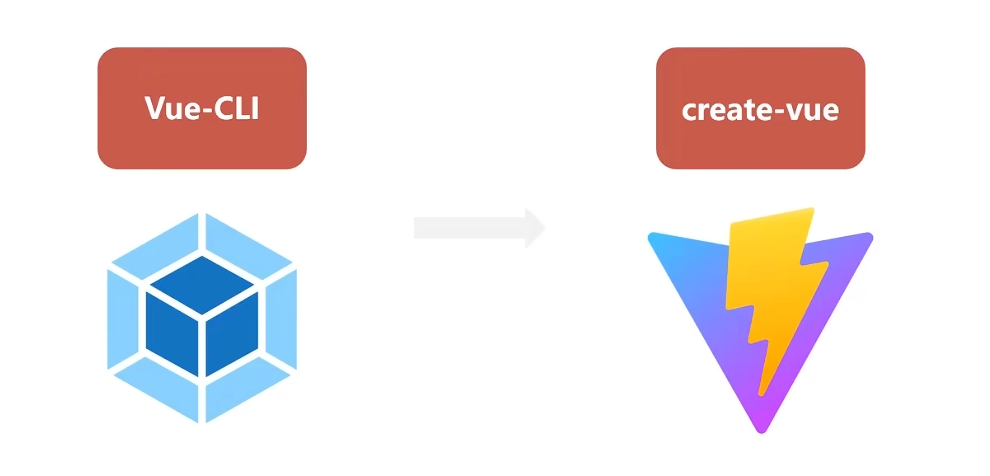
Create-vue
create-vue是Vue官方新的脚手架工具,底层切换到了vite(下一代构建工具),为开发提供极速响应|
前提环境条件 已安装16.0或更高版本的Node.js
xxxxxxxxxxnode -v创建一个Vue应用
xxxxxxxxxxnpm init vue@latest这一指令将会安装并执行create-vue
使用Create-vue创建项目
npm init vue@latest,并输入项目名称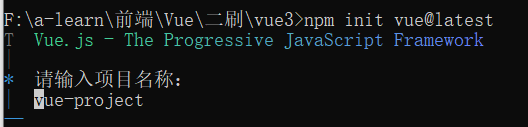
选择模块
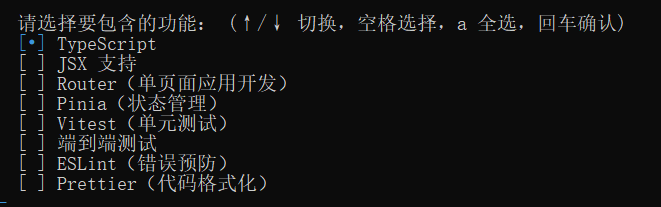
选择完成后进行项目初始化,完成后启动项目
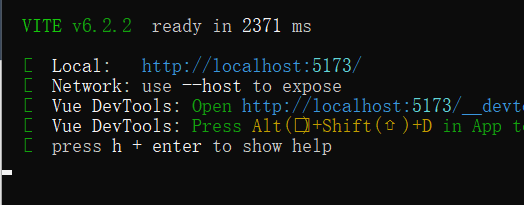
xxxxxxxxxxcd vue_demo1npm installnpm run dev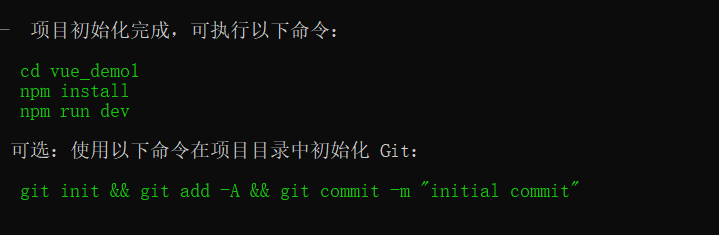
启动成功!
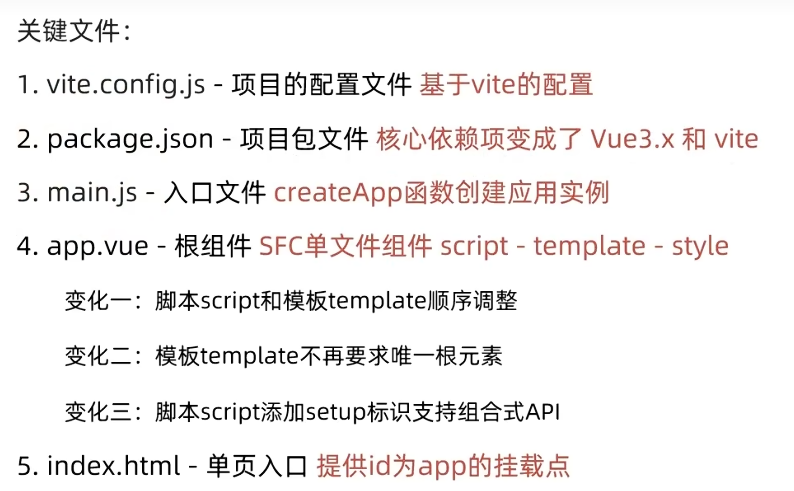
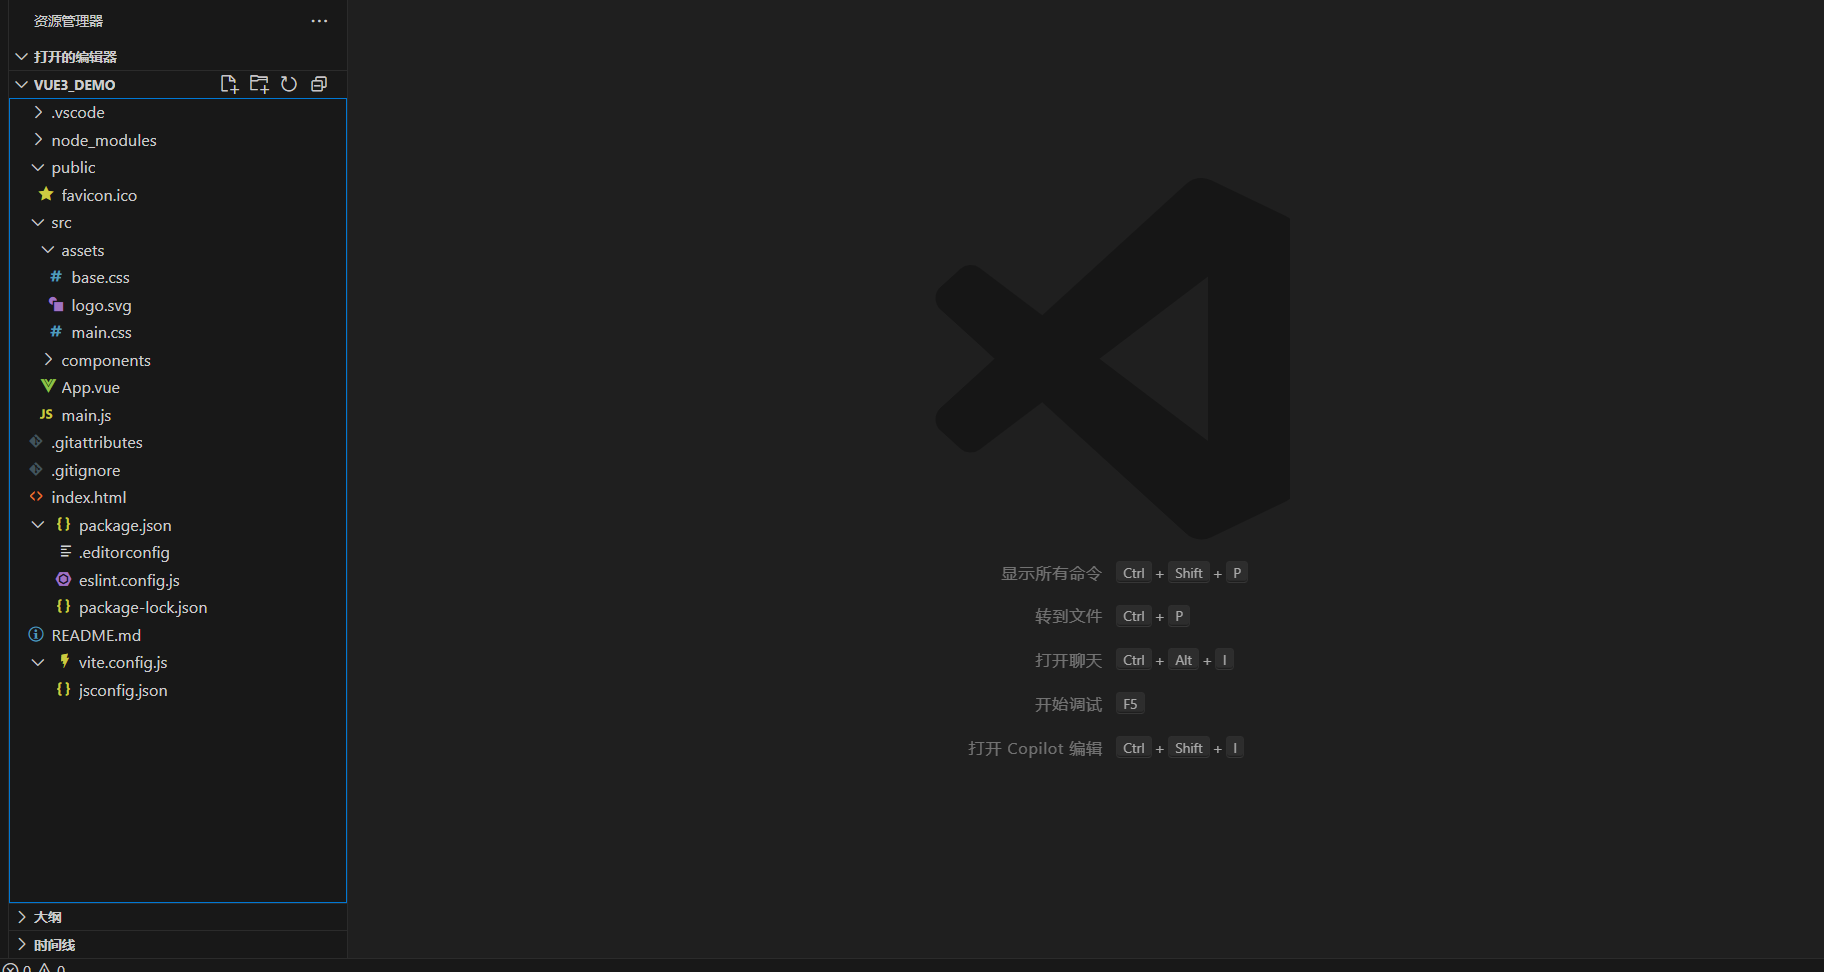
Vue3目录
安装Vue3插件

组合式API
setup选项
setup的特点
setup执行时机早于beforecreate
xxxxxxxxxx<script>export default{setup(){console.log("setup执行了");},beforeCreate(){console.log("beforeCreate执行了");}}</script>
setup中获取不到this
xxxxxxxxxx<script>export default{setup(){// console.log("setup执行了");console.log(this);},beforeCreate(){console.log("beforeCreate执行了");}}</script>
setup中的数据和函数必须return才能使用
xxxxxxxxxx<script>export default{setup(){// console.log("setup执行了");console.log(this);const age = 16const name = 'zs'const getname = ()=>{return name}return{age,getname}}}</script><template><div></div><div></div></template>
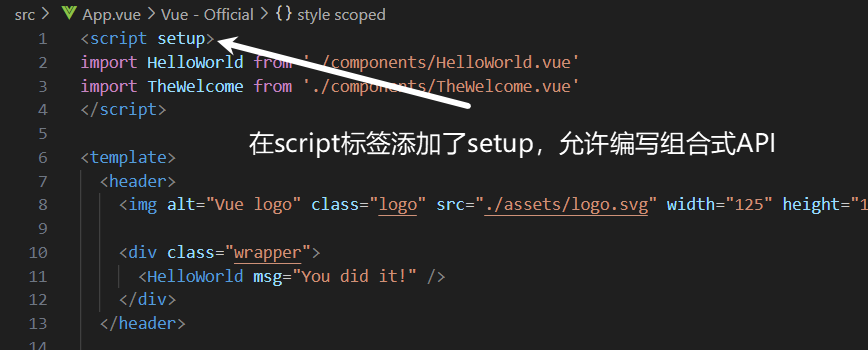
简化setup写法
<script setup>语法糖
简化写法示例:
xxxxxxxxxx<script setup> // console.log("setup执行了"); console.log(this); const age = 16 const name = 'zs' const getname = ()=>{ return name }</script><template> <div></div> <div></div></template>
reactive&ref函数
reactive函数
作用:接受对象类型数据的参数传入并返回一个响应式的对象
语法
从vue包中导入reactive函数
在
<script setup>中执行reactive函数并传入类型为对象的初始值,并使用变量接收返回值
xxxxxxxxxx<script setup> // 导入 import { reactive } from 'vue'; // 执行函数 传入参数变量接收 // const a = reactive('对象类型数据') const a = reactive({ const:30 })
</script><template> <div></div> <button @click="a.const++">+1</button></template>
ref函数
reactive函数需要接受对象类型的数据,而对于简单类型的数据无法进行处理,可以使用ref函数进行处理
作用:接收简单类型或者对象类型的数据传入并返回一个响应式的对象
语法:
xxxxxxxxxx<script setup> // 导入 import { ref } from 'vue'; const b=ref(0) console.log(b.value);
</script><template> <div></div> <button @click="b++">+1</button></template>
注意点:
脚本中访问数据,需要通过.value
在template中,.value不需要加
computed
computed计算属性函数 计算属性基本思想和Vue2的完全一致,组合式API下的计算属性只是修改了写法
语法:
xxxxxxxxxx<script setup> // 导入 import { computed,ref } from 'vue'; let a = ref([1,2,3,4,5,6,7,8,9]) const b=computed(()=>{ // 计算逻辑 return a.value.filter(item => item>2) })
</script><template> <div></div> <button @click="a[0]++">+1</button></template>
最佳实践
计算属性中不应该有“副作用" 比如异步请求/修改dom
避免直接修改计算属性的值 计算属性应该是只读的,特殊情况可以配置get,set
watch
作用:侦听一个或者多个数据的变化,数据变化时执行回调函数
语法:
监听一个值的变化
xxxxxxxxxx<script setup> // 导入 import { watch,ref } from 'vue'; // 监听一个值变化 let a = ref(0) watch(a,(newvalue,oldvalue)=>{ // 计算逻辑 console.log("新值:"+newvalue); console.log("新值:"+oldvalue);
})
</script><template> <div></div> <button @click="a++">+1</button></template>
监听多个值的变化
xxxxxxxxxx<script setup> // 导入 import { watch,ref } from 'vue'; // let a = ref([1,2,3,4,5,6,7,8,9]) // 监听一个值变化 let a = ref(0) let name = ref('张三') watch([a,name],(newvalue,oldvalue)=>{ // 计算逻辑 console.log("新值:"+newvalue); console.log("老值:"+oldvalue);
})
</script><template> <div></div> <button @click="a++">数字+1</button> <div></div> <button @click="name='李四'">该名字</button></template>
两个额外参数:
immediate(立即执行)
deep(深度侦听)
默认watch进行的是浅层监视 constref1=ref(简单类型)可以直接监视 constref2=ref(复杂类型)监视不到复杂类型内部数据的变化
xxxxxxxxxx<script setup> // 导入 import { watch,ref } from 'vue'; let a = ref([1,2,3,4,5,6,7,8,9]) // 监听一个值变化 // let a = ref(0)a let name = ref('张三') watch(a,(newvalue,oldvalue)=>{ // 计算逻辑 console.log("新值:"+newvalue); console.log("老值:"+oldvalue);
},{ // 添加额外参数 immediate:true, deep:true } )
</script><template> <div></div> <button @click="a[0]++">数字+1</button> <div></div> <button @click="name='李四'">该名字</button></template>
精确侦听对象的某个属性
xxxxxxxxxxconst info = ref({name: 'cp',age: 18})watch(()=> info.value.age,//监听的值写成箭头函数的形式()=> console.log(age发生变化了'))
生命周期函数
在VUE3中也支持选项式API,但更推荐使用组合式API
生命周期函数如下:
| 选项式API | 组合式API |
|---|---|
| beforeCreate/created | setup |
| beforeMount | onBeforeMount |
| mounted | onMounted |
| beforeUpdate | onBeforeUpdate |
| updated | onUpdated |
| beforeUnmount | onBeforeUnmount |
| unmounted | onUnmounted |
父子通信
父传子
基本思想 1.父组件中给子组件绑定属性 2.子组件内部通过props选项接收
语法:
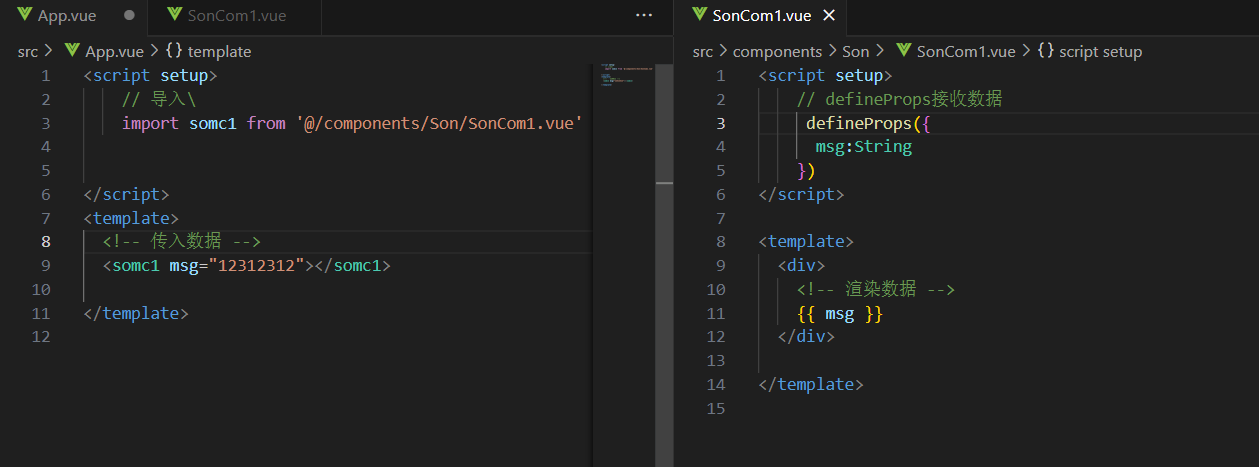
注意:由于写了setup,所以无法直接配置props 选项 所以:此处需要借助于“编译器宏”函数(defineProps)接收子组件传递的数据
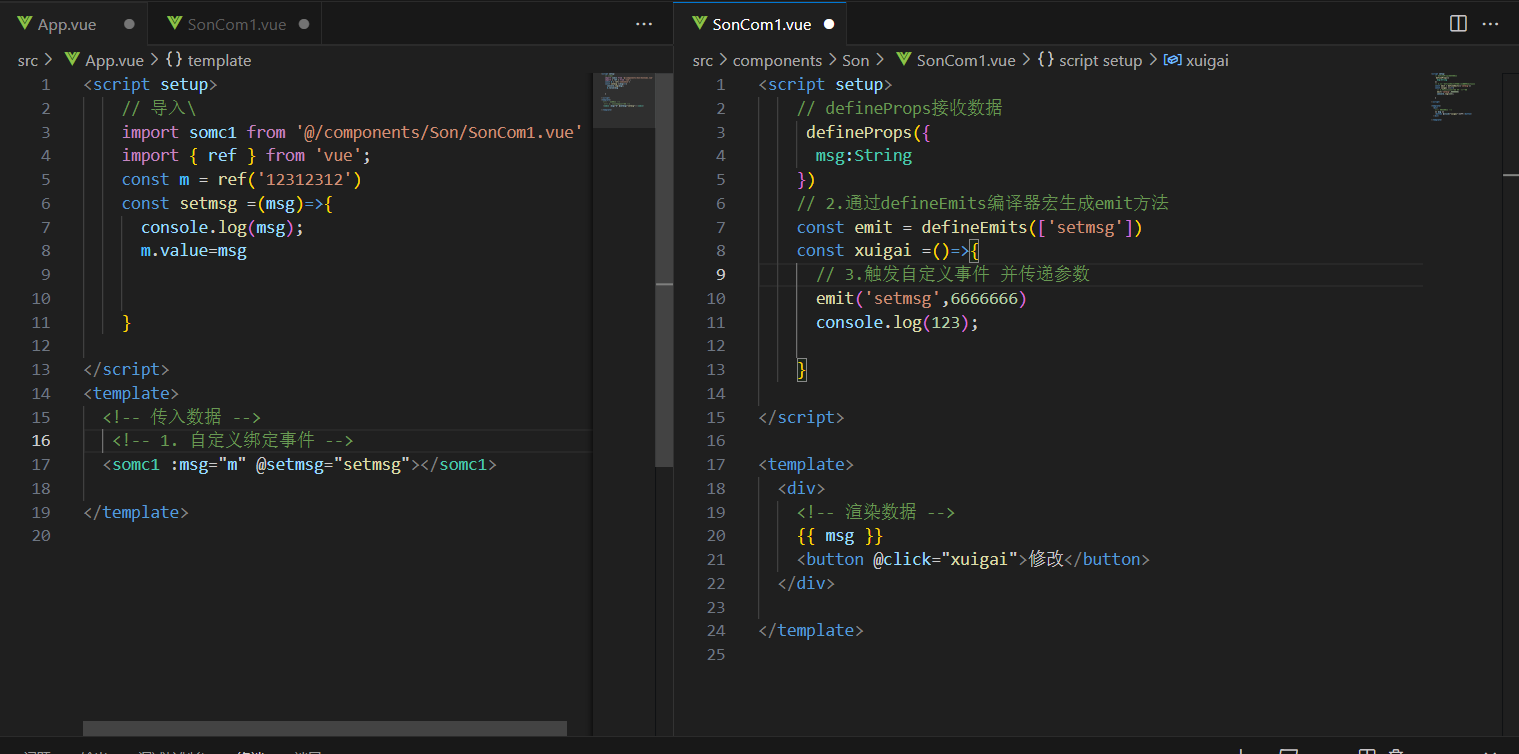
子传父
基本思想
父组件中给子组件标签通过@绑定事件
子组件内部通过emit方法触发事件
语法:
模板引用
通过ref标识获取真实的dom对象或者组件实例对象
步骤:
调用ref函数生成一个ref对象
通过ref标识绑定ref对象到标签
语法:
xxxxxxxxxx<script setup>import { ref } from 'vue'// 1.创建一个空的ref实例  const r = ref(null)  // 3.访问绑定的元素  const getdom = ()=>{    console.log(r.value);
  }</script>
<template>  <!-- 2.组件绑定ref -->  <div ref="r">    12312312  </div>  <button @click="getdom">获取dom</button></template>
defineExpose宏函数
默认情况下在<script setup>语法糖组件内部的属性和方法是不开放双给父组件访问的,
可以通过defineExpose()编译宏指定哪些属性和方法允许访问
语法:
xxxxxxxxxx<script setup>import { ref } from 'vue'// 1.创建一个空的ref实例  const r = ref(null)  // 3.访问绑定的元素  const getdom = ()=>{    console.log(r.value);
  }  defineExpose({    // 将获取的dom暴露,供其他组件使用    r  })</script>
<template>  <!-- 2.组件绑定ref -->  <div ref="r">    12312312  </div>  <button @click="getdom">获取dom</button></template>
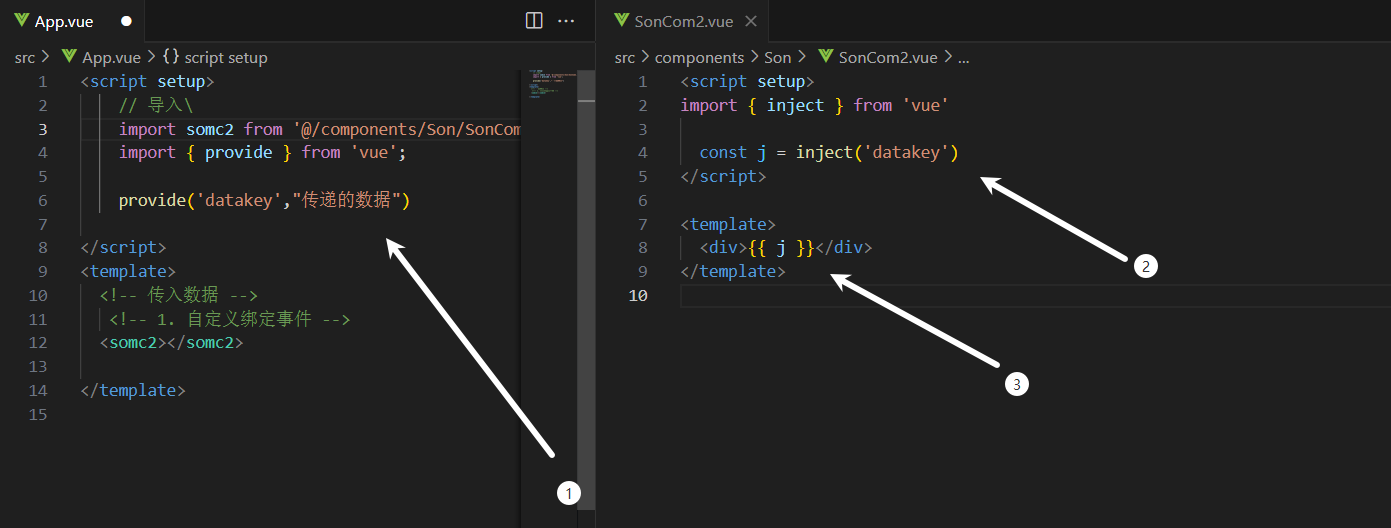
provide和inject跨层级通信
作用和场景 顶层组件向任意的底层组件传递数据和方法,实现跨层组件通信
跨层传递普通数据
顶层组件通过provide函数提供数据
底层组件通过inject函数获取数据
新特性
defineOptions
背景说明:
有<script setup>之前,如果要定义 props,emits 可以轻而易举地添加一个与 setup 平级的属性。
但是用了<script setup>后,就没法这么干了setup属性已经没有了,自然无法添加与其平级的属性。
为了解决这一问题,引入了 defineProps 与defineEmits 这两个宏。但这只解决了props 与 emits 这两个属性。
如果我们要定义组件的name 或其他自定义的属性,还是得回到最原始的用法一再添加一个普通的<script>标签。
这样就会存在两个<script>标签。让人无法接受。
所以在Vue3.3中新引入了defineOptions宏。顾名思义,主要是用来定义OptionsAPI的选项。可以用defineOptions定义任意的选项,props,emits,expose,slots除外(因为这些可以使用definexxx来做到)
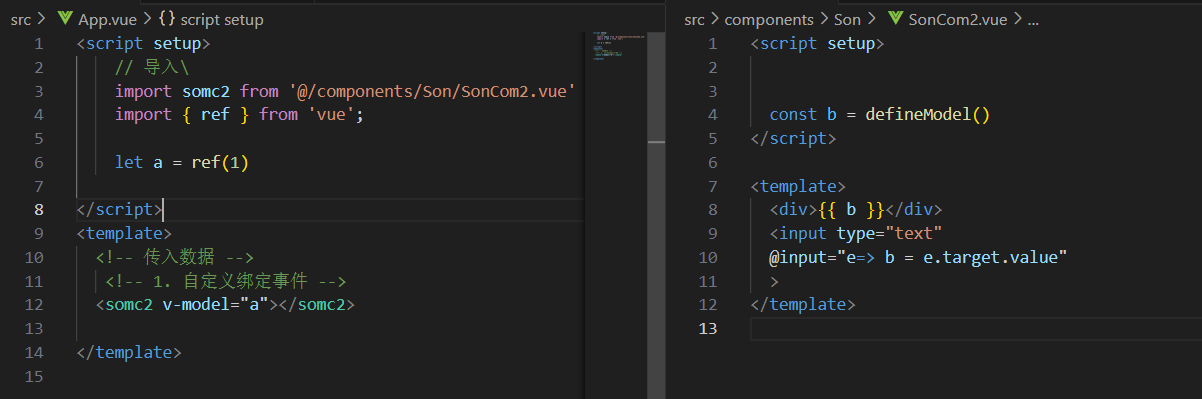
defineModel
在Vue3中,自定义组件上使用v-model,相当于传递一个modelValue属性,同时触发update:modelValue 事件

语法:
Pinia
介绍
什么是Pinia
Pinia 是 Vue 的专属状态管理库,它允许你跨组件或页面共享状态。如果你熟悉组合式 API 的话,你可能会认为可以通过一行简单的 export const state = reactive({}) 来共享一个全局状态。对于单页应用来说确实可以,但如果应用在服务器端渲染,这可能会使你的应用暴露出一些安全漏洞。 而如果使用 Pinia,即使在小型单页应用中,你也可以获得如下功能:
测试工具集
插件:可通过插件扩展 Pinia 功能
为 JS 开发者提供适当的 TypeScript 支持以及自动补全功能。
支持服务端渲染
Devtools 支持
追踪 actions、mutations 的时间线
在组件中展示它们所用到的 Store
让调试更容易的 Time travel
热更新
不必重载页面即可修改 Store
开发时可保持当前的 State
Pinia相对于Vuex的优势
提供更加简单的APl(去掉了mutation)
提供符合,组合式风格的API(和Vue3新语法统一)
去掉了modules的概念,每一个store都是一个独立的模块
配合TypeScript更加友好,提供可靠的类型推断
安装Pinia
在实际开发项目的时候,关于Pinia的配置,可以在项目创建时自动添加
手动配置方法
安装
xxxxxxxxxxyarn add pinia# 或者使用 npmnpm install pinia将pinia导入到项目
xxxxxxxxxximport { createApp } from 'vue'import { createPinia } from 'pinia'import App from './App.vue'const pinia = createPinia()const app = createApp(App)app.use(pinia)app.mount('#app')
使用Pinia
定义store仓库
xxxxxxxxxximport { defineStore } from 'pinia'
// 你可以任意命名 `defineStore()` 的返回值,但最好使用 store 的名字,同时以 `use` 开头且以 `Store` 结尾。// (比如 `useUserStore`,`useCartStore`,`useProductStore`)// 第一个参数是你的应用中 Store 的唯一 ID。export const useAlertsStore = defineStore('alerts', {  // 其他配置...})
Pinia既支持选项式API也支持组合式API,但更推荐使用组合式API编写
语法:
xxxxxxxxxxexport const useCounterStore = defineStore('counter', () => {  const count = ref(0)  const doubleCount = computed(() => count.value * 2)  function increment() {    count.value++  }
  return { count, doubleCount, increment }})
在 Setup Store 中:
ref()就是state属性computed()就是gettersfunction()就是actions
注意,要让 pinia 正确识别 state,你必须在 setup store 中返回 state 的所有属性。这意味着,你不能在 store 中使用私有属性。不完整返回会影响 SSR ,开发工具和其他插件的正常运行。
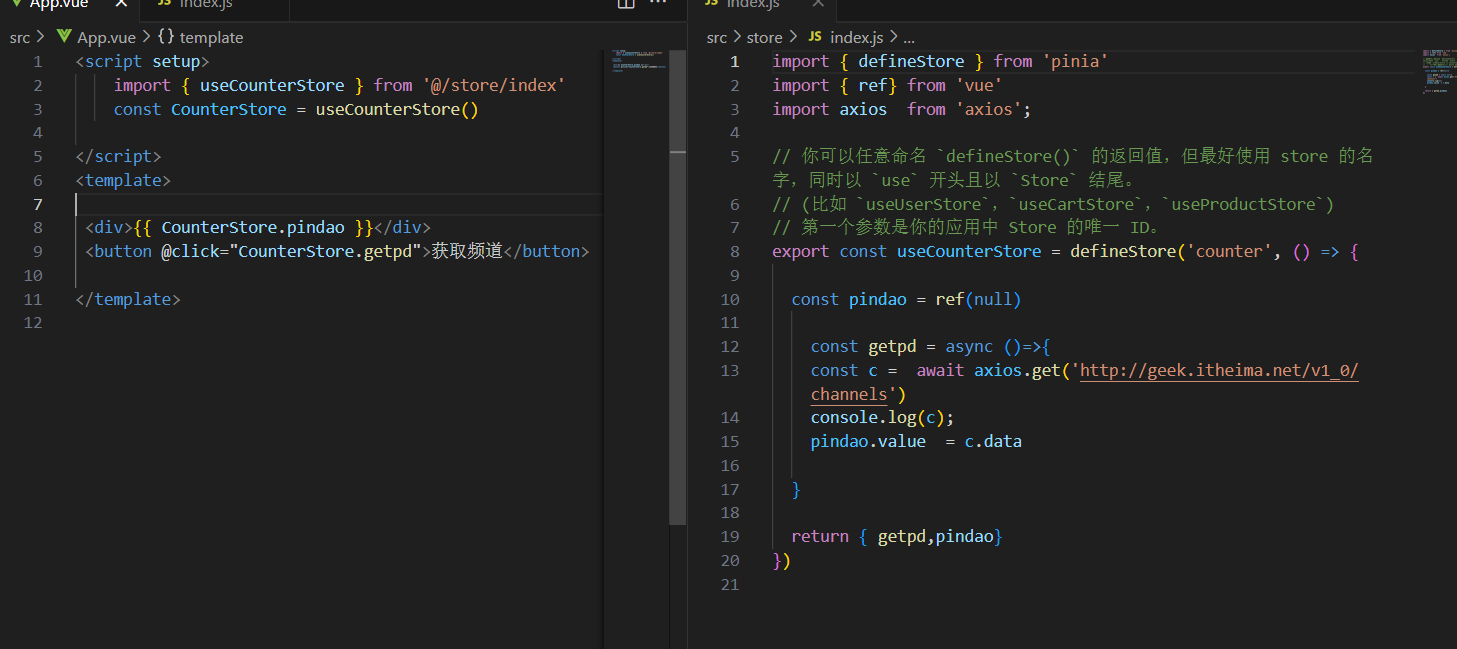
使用仓库
xxxxxxxxxx<script setup>    import { useCounterStore } from '@/store/index'    const CounterStore = useCounterStore()
</script><template> <div>  <div>  {{ CounterStore.count }}
  </div>  <button @click="CounterStore.increment" >changeNum</button> </div>

</template>
action异步写法
storeToRefs方法
导入的store如果不做处理,直接进行解构时,会导致数据丢失响应式,可以使用storeToRefs进行处理
xxxxxxxxxx<script setup>import { useCounterStore } from '@/stores/counter'import { computed } from 'vue'
const store = useCounterStore()// ❌ 这将不起作用,因为它破坏了响应性// 这就和直接解构 `props` 一样const { name, doubleCount } = storename // 将始终是 "Eduardo" //doubleCount // 将始终是 0 //setTimeout(() => { store.increment()}, 1000)// ✅ 这样写是响应式的// 💡 当然你也可以直接使用 `store.doubleCount`const doubleValue = computed(() => store.doubleCount)</script>xxxxxxxxxx<script setup>import { storeToRefs } from 'pinia'const store = useCounterStore()// `name` 和 `doubleCount` 是响应式的 ref// 同时通过插件添加的属性也会被提取为 ref// 并且会跳过所有的 action 或非响应式 (不是 ref 或 reactive) 的属性const { name, doubleCount } = storeToRefs(store)// 作为 action 的 increment 可以直接解构const { increment } = store</script>示例:
xxxxxxxxxx<script setup> import { useCounterStore } from '@/store/index'import { storeToRefs } from 'pinia'; const { getpd,pindao} = storeToRefs(useCounterStore())
</script><template>
<div></div> <button @click="getpd">获取频道</button>
</template>
持久化
Pinia持久化插件
官网:Pinia Plugin Persistedstate
官方文档:开始 | Pinia Plugin Persistedstate
安装
用您喜欢的软件包管理器安装依赖项:
xxxxxxxxxxnpm i pinia-plugin-persistedstate将插件添加到你的 pinia 实例中:
xxxxxxxxxximport { createPinia } from 'pinia'import piniaPluginPersistedstate from 'pinia-plugin-persistedstate'const pinia = createPinia()pinia.use(piniaPluginPersistedstate)
用法
在声明您的store时,请将新persist选项设置为 true。
xxxxxxxxxximport { defineStore } from 'pinia'import { ref } from 'vue'export const useStore = defineStore('main',() => {const someState = ref('hello pinia')return { someState }},{persist: true,},)
相关自定义配置可参考官方文档
end
笔记知识点部分到此结束,下面是项目记录部分
Vue2项目:智慧商城
接口文档:wiki - 智慧商城-实战项目
创建项目
配置步骤
完成
调整项目目录
目标:将目录调整成符合企业规范的目录
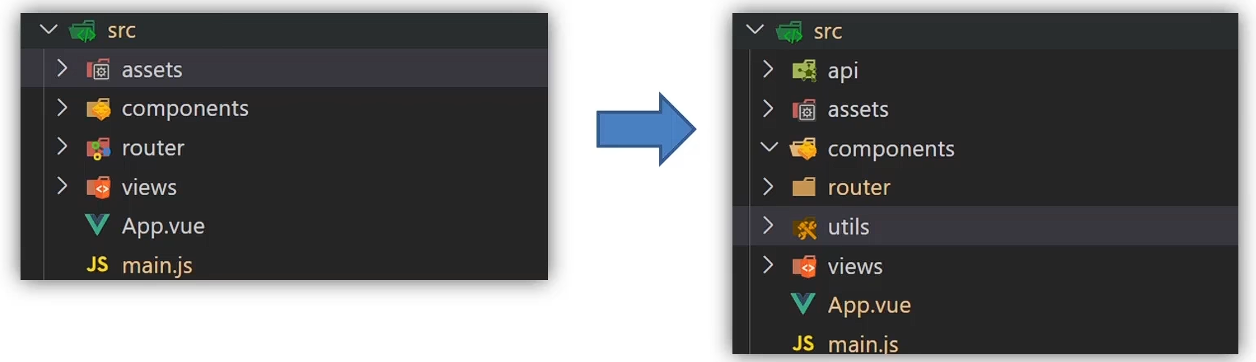
删除多余的文件
修改路由配置和App.vue
新增两个目录api/utils
①api接口模块:发送ajax请求的接口模块 ②utils工具模块:自己封装的一些工具方法模块
vant组件库
认识第三方Vue组件库vant-ui
组件库:第三方封装好了很多很多的组件整合到一起就是一个组件库。
了解其他Vue 组件库 Vue的组件库并不是唯一的,vant-ui也仅仅只是组件库的一种。 一般会按照不同平台进行分类:
PC端:element-ui(element-plus) ant-design-vue
移动端:Vant-ui MintUI(饿了么)CubeUI(滴滴)
安装组件库
通过 npm 安装
xxxxxxxxxx# Vue 3 项目,安装最新版 Vant:npm i vant -S# Vue 2 项目,安装 Vant 2:npm i vant@latest-v2 -S
通过 CDN 安装
xxxxxxxxxx<!-- 引入样式文件 --><link rel="stylesheet" href="https://unpkg.com/vant@2.12/lib/index.css" /><!-- 引入 Vue 和 Vant 的 JS 文件 --><script src="https://unpkg.com/vue@2.6/dist/vue.min.js"></script><script src="https://unpkg.com/vant@2.12/lib/vant.min.js"></script><script>// 在 #app 标签下渲染一个按钮组件new Vue({el: '#app',template: `<van-button>按钮</van-button>`,});// 调用函数组件,弹出一个 Toastvant.Toast('提示');// 通过 CDN 引入时不会自动注册 Lazyload 组件// 可以通过下面的方式手动注册Vue.use(vant.Lazyload);</script>
将组件库引入到项目
全部导入(不推荐)
安装组件库
在main.js中注册
xxxxxxxxxximport Vue from 'vue';import Vant from 'vant';import 'vant/lib/index.css';Vue.use(Vant);测试
自动按需引入组件 (推荐)
babel-plugin-import 是一款 babel 插件,它会在编译过程中将 import 的写法自动转换为按需引入的方式。
安装插件
xxxxxxxxxx# 安装插件npm i babel-plugin-import -Dbable.config.js配置
xxxxxxxxxx// 在.babelrc 中添加配置// 注意:webpack 1 无需设置 libraryDirectory{"plugins": [["import", {"libraryName": "vant","libraryDirectory": "es","style": true}]]}// 对于使用 babel7 的用户,可以在 babel.config.js 中配置module.exports = {plugins: [['import', {libraryName: 'vant',libraryDirectory: 'es',style: true}, 'vant']]};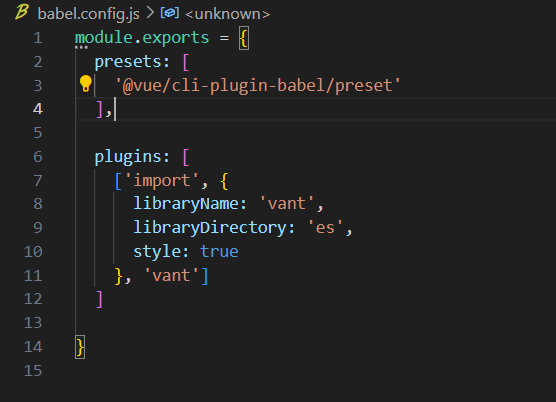
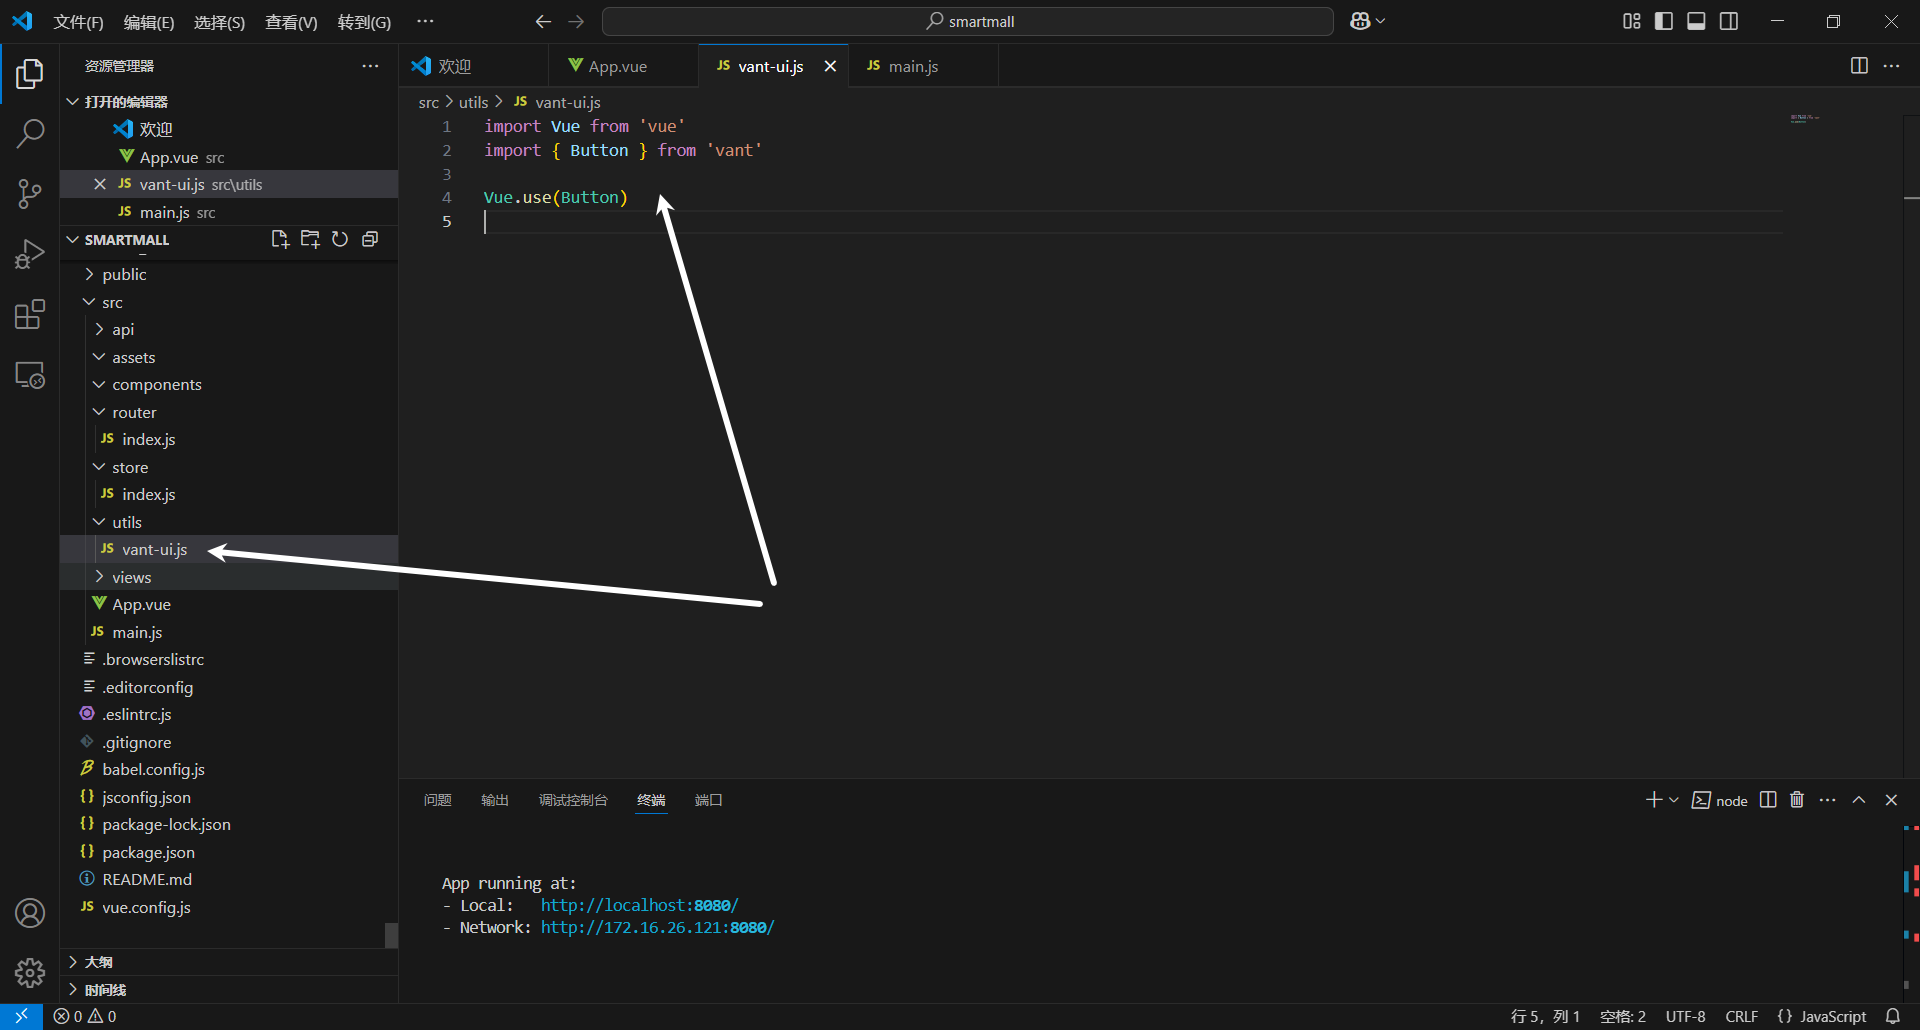
xxxxxxxxxx// 接着你可以在代码中直接引入 Vant 组件// 插件会自动将代码转化为方式二中的按需引入形式import { Button } from 'vant';一般将导入组件的代码进行抽离,封装到一个单独的js文件中,便于维护
VW适配解决
基于postcss插件实现项目vw适配
PostCSS - 是一个用 JavaScript 工具和插件来转换 CSS 代码的工具 | PostCSS中文网
安装插件
xxxxxxxxxxyarn add postcss-px-to-viewport@1.1.1-Dnpm install postcss-px-to-viewport@1.1.1 -D --force
PostCSS 示例配置
下面提供了一份基本的 PostCSS 示例配置,可以在此配置的基础上根据项目需求进行修改。
xxxxxxxxxx// postcss.config.jsmodule.exports = { plugins: { 'postcss-px-to-viewport': { viewportWidth: 375, }, },};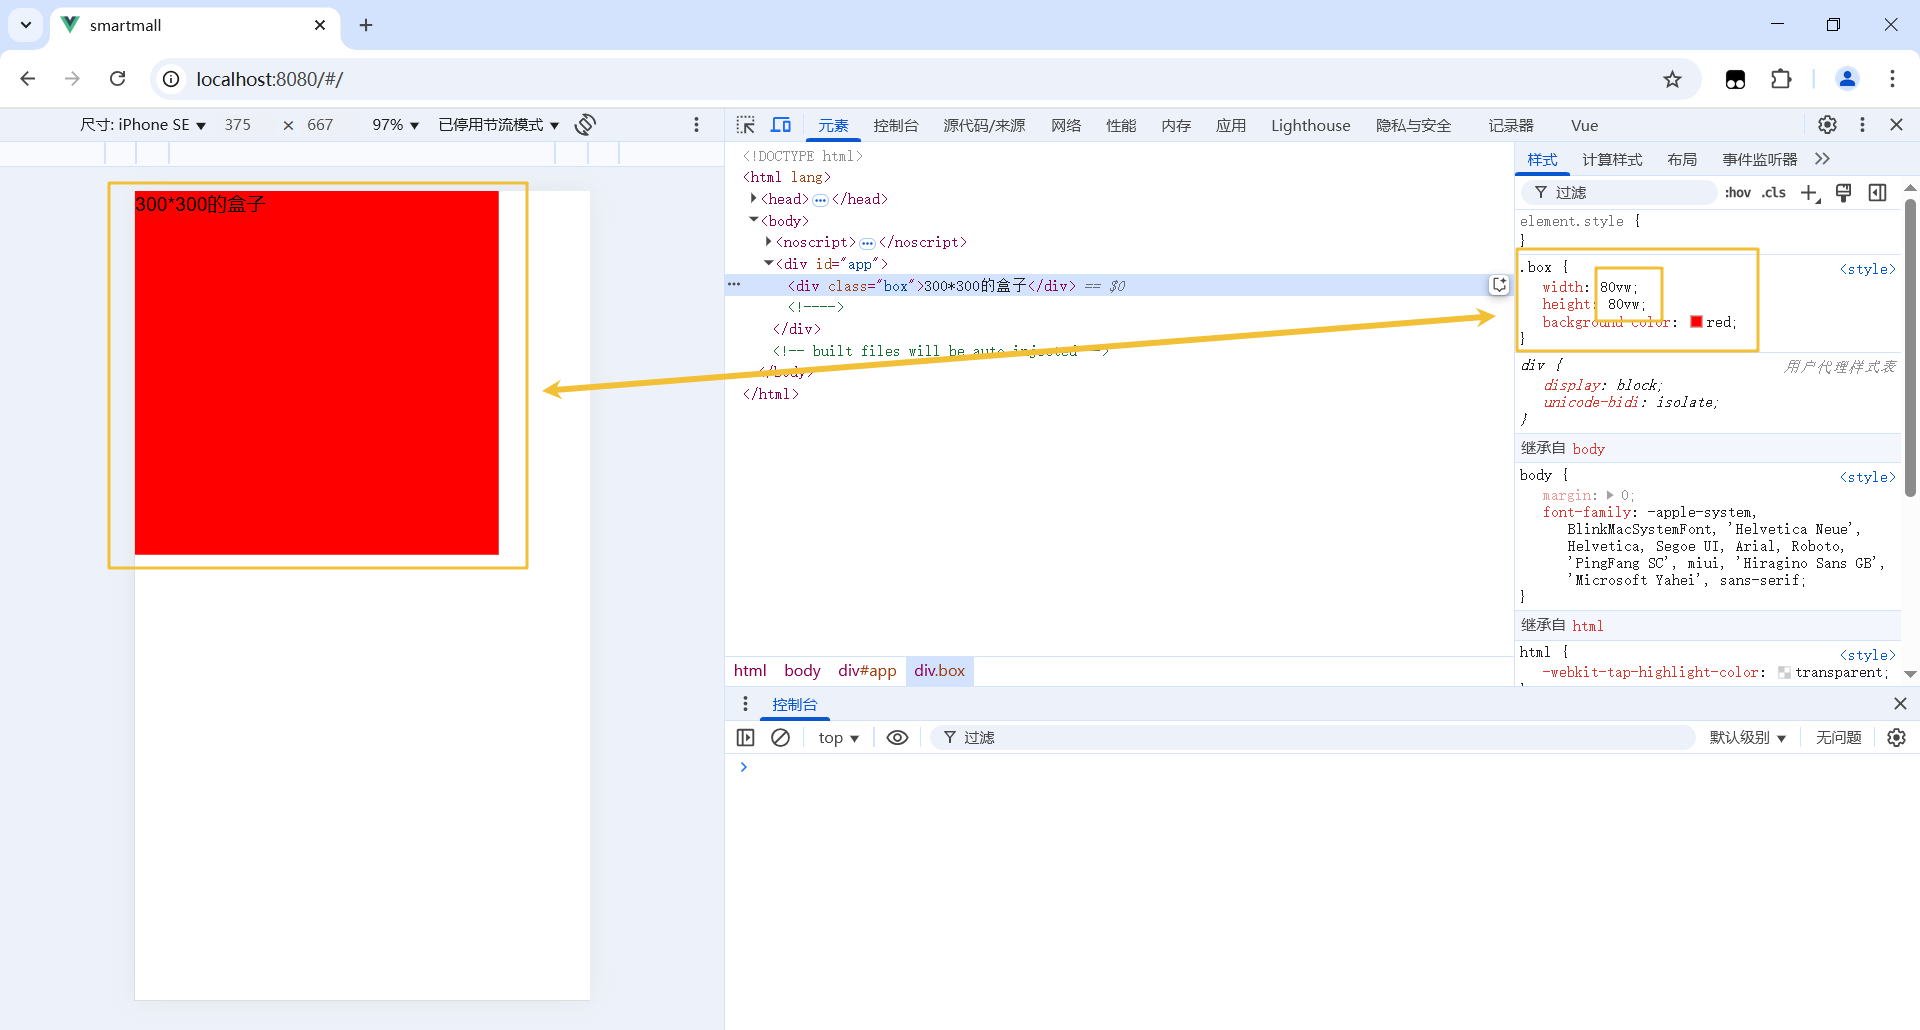
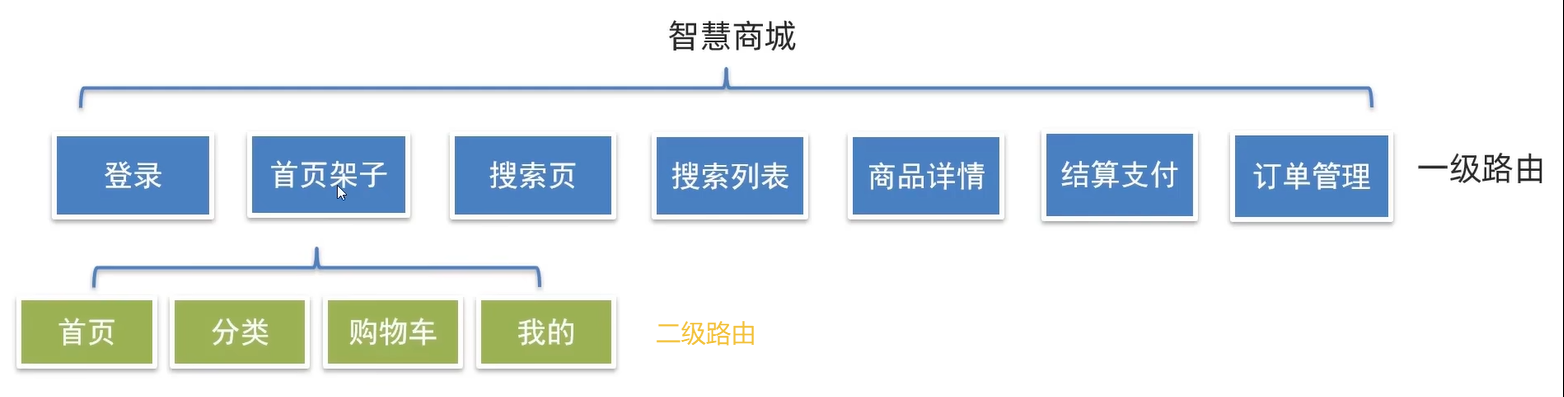
路由设计和配置
分析项目页面,设计路由,配置一级路由 但凡是单个页面,独立展示的,都是一级路由
搭建目录结构
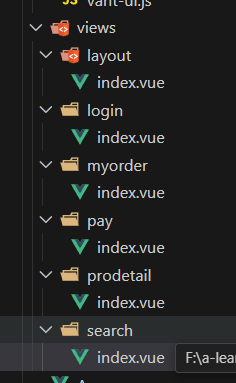
配置路由模块
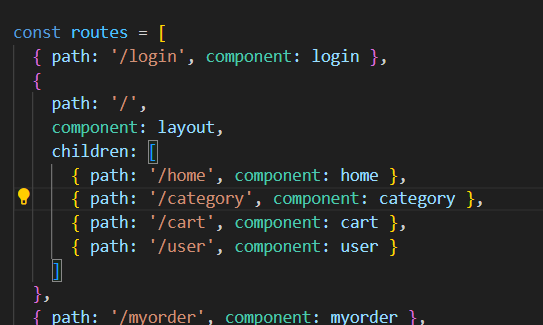
xxxxxxxxxximport Vue from 'vue'import VueRouter from 'vue-router'// 导入模块import login from '@/views/login/index.vue'import layout from '@/views/layout/index.vue'import myorder from '@/views/myorder/index.vue'import pay from '@/views/pay/index.vue'import prodetall from '@/views/prodetail/index.vue'import search from '@/views/search/index.vue'import list from '@/views/search/list.vue'Vue.use(VueRouter)const routes = [{ path: '/login', component: login },{ path: '/layout', component: layout },{ path: '/myorder', component: myorder },{ path: '/pay', component: pay },{ path: '/prodetall', component: prodetall },{ path: '/search', component: search },{ path: '/list', component: list }]const router = new VueRouter({routes})export default router
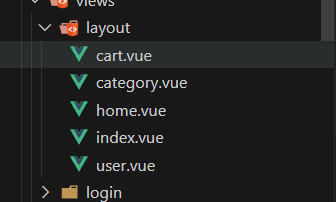
使用vant编写底部标签栏,配置二级路由(layout/index)
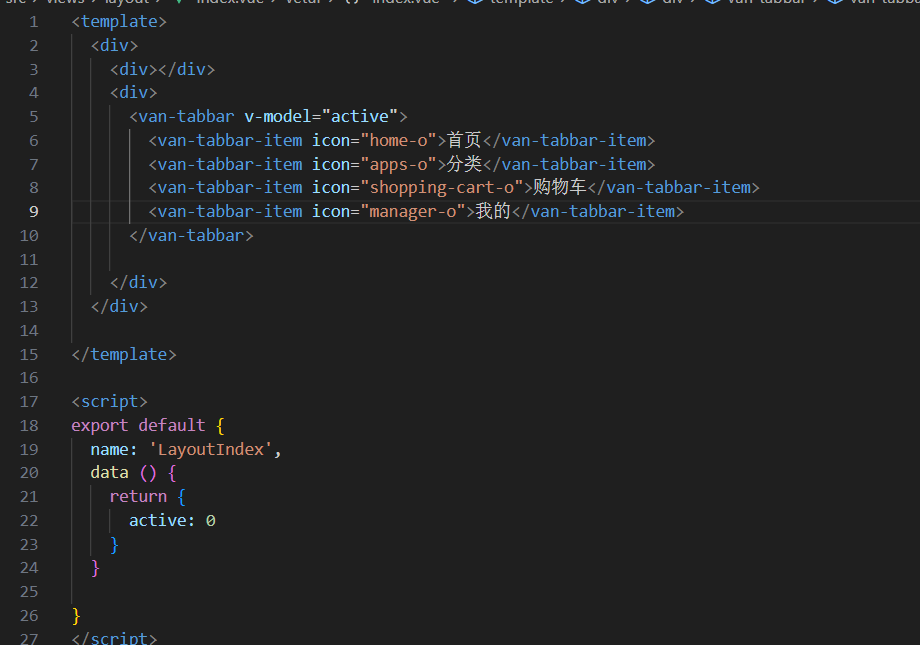
基于底部导航,配置二级路由
路由模式
标签栏支持路由模式,用于搭配 vue-router 使用。路由模式下会匹配页面路径和标签的 to 属性,并自动选中对应的标签。
xxxxxxxxxx<router-view />
<van-tabbar route>  <van-tabbar-item replace to="/home" icon="home-o">标签</van-tabbar-item>  <van-tabbar-item replace to="/search" icon="search">标签</van-tabbar-item></van-tabbar>
登陆页及图形验证码
编写静态页面
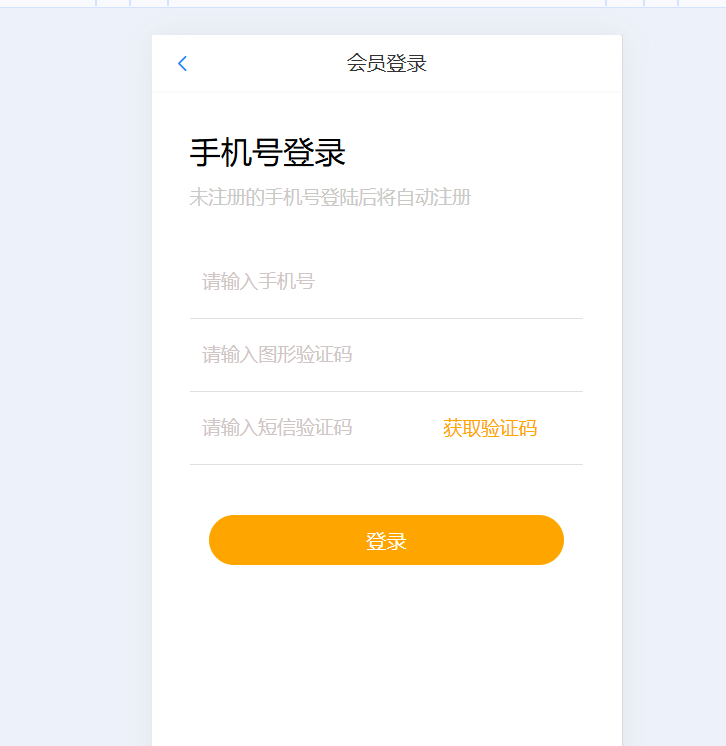
xxxxxxxxxx<template>  <div>    <van-nav-bar title="会员登录" left-arrow @click-left="$router.go(-1)" />    <div id="bigbox">
      <h3 id="tip1">手机号登录</h3>      <p id="tip2">未注册的手机号登陆后将自动注册</p>
      <div id="from_box">        <div id="inpcommon"><input type="text" placeholder="请输入手机号"></div>        <div id="inpcommon"><input type="text" placeholder="请输入图形验证码"><img src="" alt=""></div>        <div id="inpcommon"><input type="text" placeholder="请输入短信验证码"><span id="tip3">获取验证码</span></div>        <button id="loginButn">登录</button>
      </div>    </div>  </div></template>
<script>export default {  name: 'LoginIndex'
}</script>
<style scoped lang="less">#bigbox {  padding: 30px;
  #tip1 {    font-size: 25px;    font-weight: normal;  }
  #tip2 {    margin-top: 10px;    font-size: 15px;    color: rgb(203, 201, 198);  }
  #tip3{    font-size: 15px;    color: orange;  }
  #from_box {    margin: 30px 0;  }
  #inpcommon {    border-bottom: 0.5px solid rgb(228, 223, 223);    padding: 10px 0;    width: 100%;
  }
  input {    border: 0;    padding: 10px;    font-size: 15px;    color: rgb(95, 95, 95);  }
  input::placeholder {    color: #d0c6c6;  }
  input:focus {    outline: none;    /* 移除默认的轮廓 */    border: 0;    color: rgb(147, 145, 145);
  }
  #loginButn {    height: 40px;    border-radius: 20px;    border: 0;    background-color: orange;    color: white;    padding: 5px;
    display: block;    width: 90%;    margin: 40px auto 0;
  }
}</style>
封装请求
目标:将axios请求方法,封装到request模块 使用axios来请求后端接口,一般都会对axios进行一些配置(比如:配置基础地址,请求响应拦截器等) 所以项目开发中,都会对axios进行基本的二次封装,单独封装到一个request模块中,便于维护使用
https://www.axios-http.cn/docs/
在utils中新建一个request.js,添加以下配置
xxxxxxxxxximport axios from 'axios'
// 创建axios实例const instance = axios.create({ baseURL: 'https://smart-shop.itheima.net/index.php?s=/api', timeout: 5000
})
// 配置拦截器// 添加请求拦截器instance.interceptors.request.use(function (config) { // 在发送请求之前做些什么 return config}, function (error) { // 对请求错误做些什么 return Promise.reject(error)})
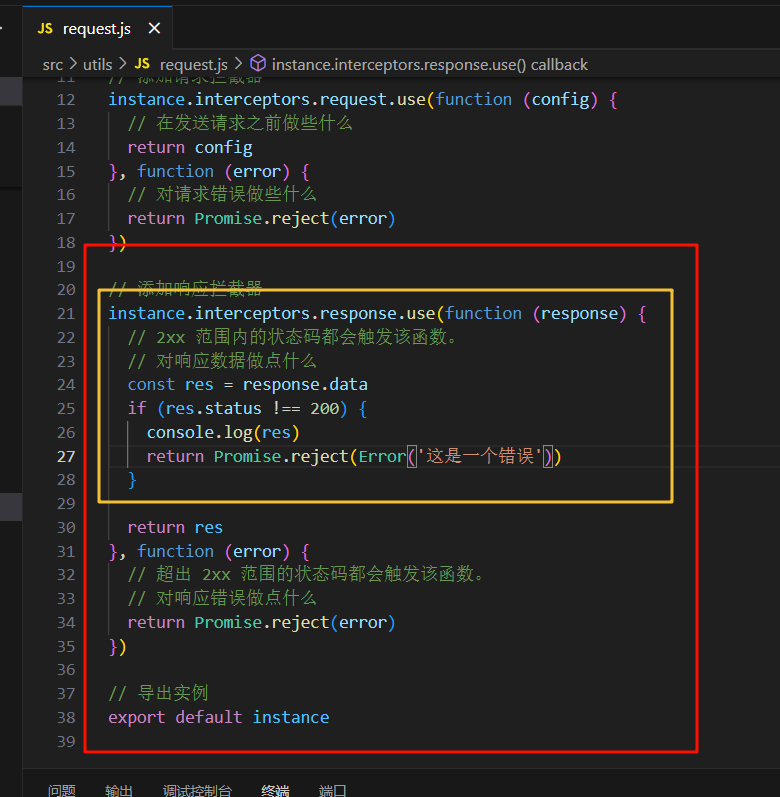
// 添加响应拦截器instance.interceptors.response.use(function (response) { // 2xx 范围内的状态码都会触发该函数。 // 对响应数据做点什么 return response.data}, function (error) { // 超出 2xx 范围的状态码都会触发该函数。 // 对响应错误做点什么 return Promise.reject(error)})
// 导出实例export default instance
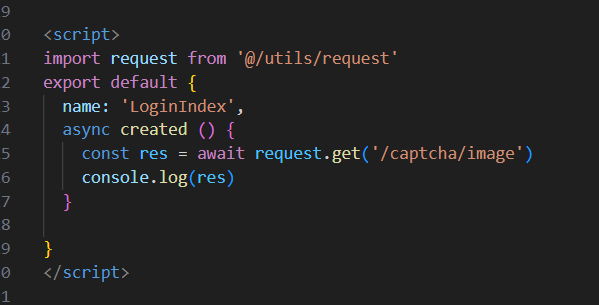
请求验证码
需求: 1.动态将请求回来的base64图片,解析渲染出来 2.点击验证码图片盒子,要要刷新验证码
xxxxxxxxxx<template>  <div>    <van-nav-bar title="会员登录" left-arrow @click-left="$router.go(-1)" />    <div id="bigbox">
      <h3 id="tip1">手机号登录</h3>      <p id="tip2">未注册的手机号登陆后将自动注册</p>
      <div id="from_box">        <div id="inpcommon"><input type="text" placeholder="请输入手机号"></div>        <div id="inpcommon"><input id="codeInp" type="text" placeholder="请输入图形验证码"><img :src="codeUrl" alt="" id="codeImg" @click="getNew"></div>        <div id="inpcommon"><input type="text" placeholder="请输入短信验证码"><span id="tip3">获取验证码</span></div>        <button id="loginButn">登录</button>
      </div>    </div>  </div></template>
<script>import request from '@/utils/request'export default {  name: 'LoginIndex',  data () {    return {      codeKey: '', // 验证码Key      codeUrl: '', // 验证码地址      codeInput: ''// 输入的图形验证码    }  },  created () {    this.getPicCode()  },  methods: {    async getPicCode () {      const res = await request.get('/captcha/image')      this.codeUrl = res.data.base64      this.codeKey = res.data.key    },    getNew () {      this.getPicCode()    }  }
}</script>
将请求封装成API接口
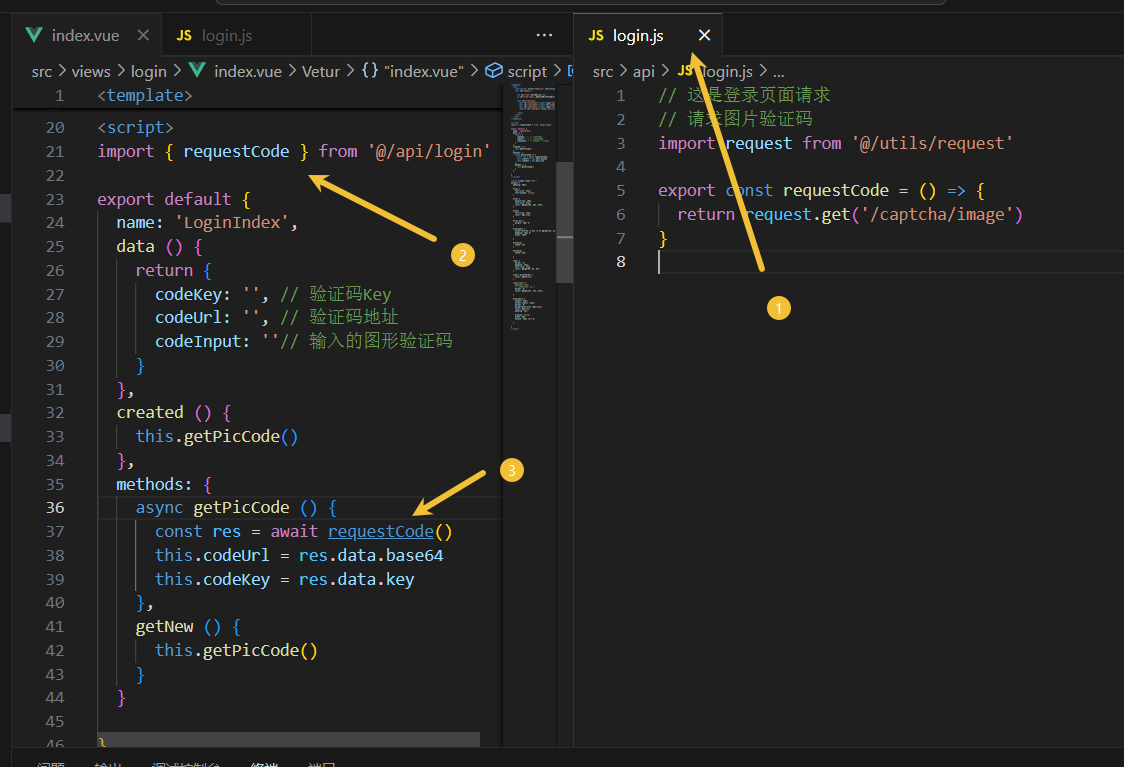
封装api模块的好处:
请求与页面逻辑分离
相同的请求可以直接复用
请求进行了统一管理
Toast轻提示
阅读vant组件库文档,掌握toast轻提示
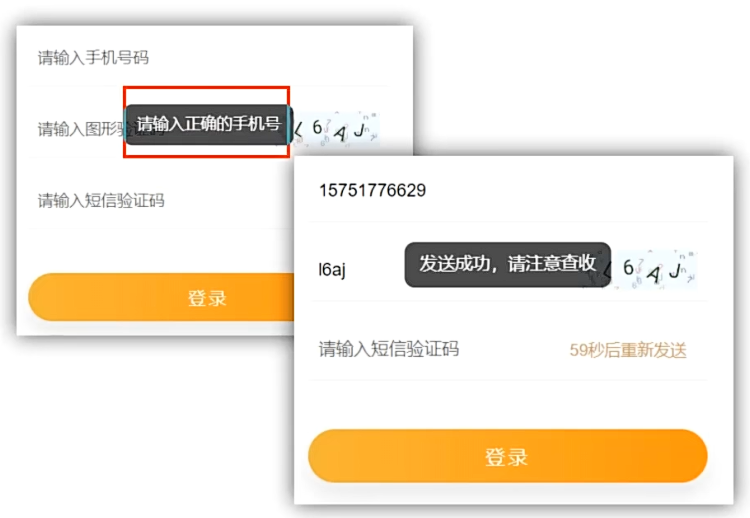
xxxxxxxxxxGetSmsCode () {if (this.phone === '') {Toast('手机号不能为空')return}if (this.codeInput === '') {Toast('图形验证码不能为空')return}console.log('验证通过')}
短信验证请求和登录
步骤分析: 1.点击按钮,实现倒计时效果 2.倒计时之前的校验处理(手机号、验证码) 3.封装短信验证请求接口,发送请求添加提示
验证方法
x
async GetSmsCode () { const phonereg = /^(13[0-9]|14[01456879]|15[0-35-9]|16[2567]|17[0-8]|18[0-9]|19[0-35-9])\d{8}$/ const codereg = /^\w{4}$/ if (this.phone === '') { Toast('手机号不能为空') return } if (!phonereg.test(this.phone)) { Toast('手机号不合法') return } if (this.codeInput === '') { Toast('图形验证码不能为空') return } if (!codereg.test(this.codeInput)) { Toast('图形验证码不合法') return } // console.log() let i = 3
this.$refs.codeBtn.style.pointerEvents = 'none' // 禁止点击 // 操作逻辑 const time1 = setInterval(() => { if (i <= 0) { clearInterval(time1) this.$refs.codeBtn.innerHTML = '获取验证码' this.$refs.codeBtn.style.pointerEvents = 'auto' return }
this.$refs.codeBtn.innerHTML = '重新发送(' + i + ')秒' i-- }, 1000)
const a = await requestlogin(this.codeInput, this.codeKey, this.phone) // console.log(a) Toast(a.message)}登录逻辑与上方类似
响应拦截器统一处理错误
问题:每次请求,都会有可能会错误,就都需要错误提示 说明:响应拦截器是拿到数据的第一个数据流转站,可以在里面统一处理错误。
登录权证信息存储
目标:vuex构建user模块存储登录权证(token&userld)
说明:
token存入vuex的好处,易获取,响应式
vuex需要分模块=>user模块status

vuex user模块配置示例
export default { namespaced: true, state () { return { usertoken: '', userId: '' } }, getters: { }, mutations: { settokenANDid (state, data) { state.usertoken = data[0] state.userId = data[1] } }, actions: { }, modules: { }}
vuex持久化
封装storage存储模块,利用本地存储,进行vuex持久化处理
xxxxxxxxxx
endend2